A Beginner's Guide to Integrating MongoDB With TensorFlow Using JavaScript

Folasayo Samuel Olayemi15 min read • Published Sep 04, 2024 • Updated Sep 04, 2024


Rate this tutorial


Are you a JavaScript newbie or guru and curious to know how Tensorflow.js works with MongoDB as the database? This tutorial is for you.
In this tutorial, we explain how you can use MongoDB with Tensorflow.js, a library that allows developers to run machine learning models directly in the browser or on Node.js. This implementation is advantageous to developers looking to create web applications that are scalable and efficient and support intricate datasets for machine learning.
MongoDB is an open-source NoSQL database. NoSQL databases are effective for working with large sets of distributed data. MongoDB is a document database that allows unparalleled scalability and flexibility, plus all the querying and indexing that you need.
TensorFlow is an end-to-end, open-source platform for machine learning. It’s a rich system for managing all aspects of a machine learning system. However, this tutorial focuses on using a specific TensorFlow API to develop and train machine learning models. TensorFlow is developed by the Google Brain team. It operates by building computational graphs, which are networks of nodes where each node represents a mathematical operation. The edges between nodes represent multidimensional data arrays (tensors) that flow between operations.
Here are a few useful applications of TensorFlow.
- Image recognition: TensorFlow is used in image recognition applications, where it can detect objects, faces, and scenes in images and videos. This capability is needed for applications ranging from security systems, where it helps in surveillance by recognizing human activities and faces, to healthcare, where it aids in diagnosing diseases by analyzing medical imagery. Read more about TensorFlow for image recognition
- Natural language processing (NLP): TensorFlow's ability to handle large datasets and complex algorithms makes it an excellent choice for NLP tasks. It powers applications such as language translation, sentiment analysis, and chatbots, helping machines understand, interpret, and generate human language in a contextually relevant way. Explore TensorFlow applications in NLP.
- Recommendation systems: Many e-commerce and streaming companies use TensorFlow to develop their recommendation systems, which analyze users' past behavior to suggest products or media likely to be of interest. This personalization enhances user experience and can significantly increase the conversion rates for businesses. Learn about building recommendation systems with TensorFlow
- Autonomous vehicles: TensorFlow is used in the automotive industry to develop and improve systems for autonomous vehicles. By processing data from various sensors and cameras, TensorFlow-based models help in making decisions about vehicle steering and collision avoidance. See how TensorFlow is applied in autonomous driving
- Healthcare: TensorFlow is used for various tasks like disease detection and drug discovery. It analyzes patterns from large datasets of medical records to predict disease progression and outcomes, facilitating early diagnosis and personalized treatment plans. Discover TensorFlow applications in healthcare
These examples illustrate the versatility of TensorFlow across different domains, showcasing its role in driving innovation by transforming how data is interpreted and utilized in creating intelligent applications. Each use case link provided offers a deeper dive into how TensorFlow is employed in real-world applications, providing evidence of its broad utility and impact.
Before we dive into the details, make sure you have the following installed:
- MongoDB: Ensure MongoDB is installed and running on your macOS machine. For detailed instructions, refer to the official MongoDB documentation to download, install, and start the MongoDB server appropriate for macOS.
- dotenv installation: Before accessing the MongoDB URI stored in environment variables, make sure that you have the
dotenvpackage installed in your Node.js project. This package loads environment variables from a.envfile into process.env, making it easy to manage sensitive configurations securely. Installdotenvusingnpmby running the following command in your project directory:

Once installed, you can use
dotenv at the beginning of your application to load the environment variables:- Knowledge base: A basic understanding of JavaScript, Node.js, MongoDB operations, and fundamental machine learning concepts is important.
First, let’s properly set up our development environment to ensure smooth operation and efficient data handling:
MongoDB Configuration: Make sure MongoDB is correctly installed and configured to store and retrieve your data efficiently. After installation, verify that MongoDB is running by using the
mongod command, which starts the MongoDB server. Check the MongoDB service status to confirm it’s active, indicating that your database is ready to accept connections.Start by creating a new Node.js project:
- Initialize a new project: Open your terminal, navigate to your project directory, and run
npm init -yto create a newpackage.jsonfile which will manage all your project dependencies. - Install Node.js packages: Install the necessary Node.js packages by running
npm install mongoose @tensorflow/tfjs-node. Here’s what each package does:mongoose: This is an ODM (object data modeling) library for MongoDB and Node.js. This tool handles how data is interconnected, ensures the data fits a predefined structure, and translates between the objects in your code and their representation in MongoDB.@tensorflow/tfjs-node: This package allows you to run TensorFlow models with Node.js. It provides the back end for TensorFlow.js, which lets you execute models and process data at high speed, directly within a Node.js environment.
By following these steps, you will have a well-configured environment ready for developing applications using MongoDB and TensorFlow.js. This setup makes it so that all components are correctly installed and integrated, allowing you to focus on building your application without worrying about environmental issues.
Effective data management in MongoDB is crucial for machine learning:
- Schema design: Design a schema that reflects the structure of your data model, optimizing for the operations you'll perform most frequently. MongoDB's flexible schema allows you to tailor your data structure to your specific requirements, which can significantly improve both performance and scalability. For a deeper understanding of how to effectively leverage MongoDB's schema flexibility in your projects, explore the comprehensive guide: MongoDB Schema Design Best Practices. This resource provides valuable insights into creating efficient and scalable database schemas, ensuring you make the most out of MongoDB's capabilities.
- Data import: Use the MongoDB Node.js driver alongside TensorFlow.js to facilitate the data import process that feeds machine learning models. Here’s a step-by-step breakdown of how to write scripts that import your data into TensorFlow.js using an example:
Here, we guide you through connecting to MongoDB, defining your data schema, and retrieving the data to be processed with TensorFlow.js. Here's a step-by-step breakdown to clarify this process further:
- Connect to MongoDB: First, establish a connection to your MongoDB instance using the Mongoose library. This involves setting up the database URI in your environment variables for secure access.
2. Define a schema and model: Define a Mongoose schema that corresponds to the structure of your data. This schema helps MongoDB understand the data it will store and retrieve.
javascript
    const DataSchema = new mongoose.Schema({
      features: Array, // Array of features for machine learning
      labels: Array    // Array of labels for each feature set
    });
    const Dataset = mongoose.model('Dataset', DataSchema);
- Fetch data: Use the model to fetch data from your database. This data will be used as the dataset for training your TensorFlow.js model. Dataset.find().then(data => { const tensors = data.map(d => tf.tensor(d.features)); console.log('Data ready for TensorFlow.js processing:', tensors); });
These steps ensure that you're not just fetching any data, but specifically, the data structured and stored in your MongoDB setup, making it ready for integration with TensorFlow.js for machine learning purposes. This detailed setup helps beginners and experienced developers understand the flow from data retrieval to machine learning model training in JavaScript.
Step 1: Connect to MongoDB
Establish a connection to your MongoDB database using Mongoose. Use the mongoose.connect function with the MongoDB URI stored in your environment variables. This approach keeps your database credentials secure. Typically, the MongoDB URI is stored in an environment variable to prevent hard-coding sensitive information in your source code. To access and use the MongoDB URI, you should first set it in your environment file (.env) as follows:
After setting up your environment variable, you can access it in your Node.js application using process.env.MONGODB_URI. Ensure your environment variables are loaded by requiring the dotenv package at the beginning of your script:
This setup confirms that your database connection string is loaded from your environment, maintaining security and flexibility in different deployment environments.
Step 2: Define a schema and model
Define the structure of your data using Mongoose schemas to model your application's data. This schema will dictate the form of the documents you can store in a particular collection.
Step 4: Convert data to tensors
Transform the data fetched from MongoDB into tensors, which are multi-dimensional arrays suitable for input into TensorFlow models. This conversion is crucial for performing any kind of machine-learning computation.
By following these steps, you can successfully import your data from MongoDB into TensorFlow.js, preparing it for machine learning tasks like training and prediction. This process bridges the gap between your database management system and machine learning applications, enabling seamless data flow and integration.
Let’s construct a simple predictive model suitable for basic machine learning tasks. This model is designed to demonstrate the straightforward nature of defining and training a neural network using TensorFlow.js.
Here is a code example with comments.
Expected output:
After running this block of code, there's no immediate output as it's setting up the model. The model is now ready for training with specified configurations.
Data should be preprocessed and normalized before it is fed into the model. This step ensures the model trains on data that is scaled uniformly. We will train the model using the tensors prepared from MongoDB data. Here is a code example with comments and the expected output.
When you run this script, you should see output in the console similar to:
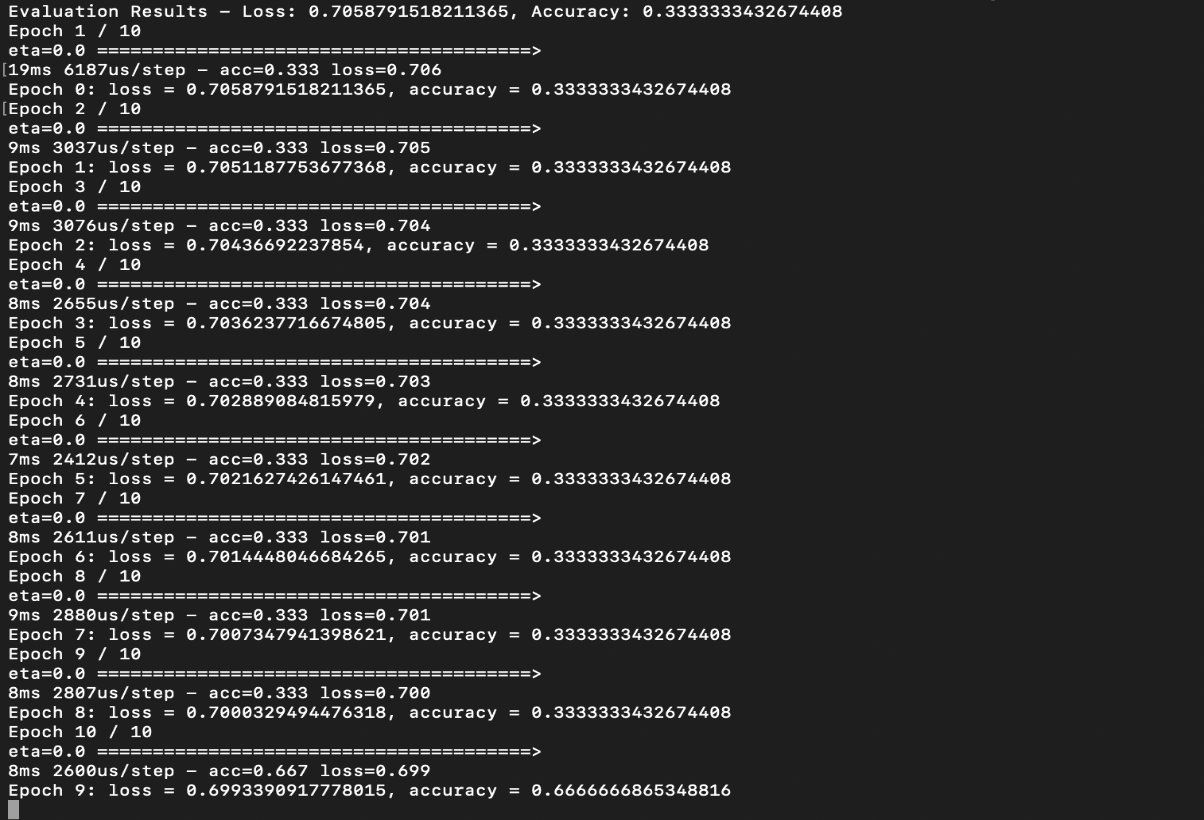
This output displays the training results, showing the accuracy and loss after the training process is completed, indicating how well the model performed. The exact values will vary depending on your specific data and training conditions.
What is seeding?
Seeding data involves populating a database with an initial set of data. This is particularly useful during the development of an application, where having a non-empty database is crucial for testing and developing features that interact with the database. Seeding helps simulate a more realistic environment by providing data that the application can retrieve, update, or delete without the need to manually add test data.
Seeding is important because it determines if your application can handle predefined data correctly. It allows developers and testers to foresee how the application behaves with various data sets, identify bugs, and improve the efficiency of the data handling logic. It's also critical for automated testing environments, where consistent data states are required to ensure test accuracy.
The provided script demonstrates how to seed data into a MongoDB database using Mongoose, which is a Node.js library that provides MongoDB object modeling.
Key steps explained:
- Connecting to MongoDB: Establishes a connection to your MongoDB using the URI stored in your environment variables, which ensures that sensitive data like your database credentials are not hard-coded in your application
- Schema definition: Defines how data is organized in the database, which is critical for ensuring the integrity of your data and how it's accessed and manipulated
- Model creation: Compiles the schema into a model, which you can use to create, read, update, and delete documents in your database
- Data insertion: Uses the model to insert an array of predefined data into the database, which is crucial for populating the database with initial data for development and testing purposes
This script is typically executed at the development stage or when setting up the production environment initially. It's designed to make the application development lifecycle smoother and error-free by providing a reliable and consistent dataset to work with.
First, save the seeding script in a file — for example,
seed.js. Then, run the script using Node.js by executing node seed.js in your command line.This script connects to your MongoDB database, defines the same schema as your application, and inserts a set of example data. Once the data is seeded, you can run your original TensorFlow.js integration script to train and evaluate the model using this data.
Get the full source and discover detailed information.
Step 1: Fetch data and convert to tensors
First, let's retrieve the data from MongoDB and convert it into tensors, which are the core components used in TensorFlow.js for handling data:
Using Mongoose, we query all documents in the dataset. If no data is found, the process is halted. Each element's features and labels are converted into tensors for machine learning processing.
Step 2: Build and compile the model
Next, define the architecture of your TensorFlow.js model and set up the parameters for learning:
A sequential model is suitable for a stack of layers where each layer has exactly one input tensor and one output tensor. These layers are fully connected and are used to predict output from the input features. The model is prepared for training by setting an optimizer, loss function, and metrics for performance evaluation.
Step 3: Prepare data and train the model
Now, prepare your data for training and begin the training process:
Features and labels are stacked into tensors to match the input requirements of the TensorFlow model. The model learns from the data over a specified number of epochs, adjusting its weights to minimize loss and improve accuracy.
Step 4: Evaluate the model
Finally, evaluate the model to understand its effectiveness:
This step assesses the model's performance on the same data, providing metrics such as loss and accuracy to gauge its prediction capabilities.
This approach allows you to utilize JavaScript throughout the stack for both data handling with MongoDB and machine learning with TensorFlow.js, streamlining development for web-based applications.
Evaluating your model is crucial to understanding how well it predicts or classifies new, unseen data. This step involves using a test dataset not used during the training phase.
To facilitate this, you can choose from various test datasets available online. Here are a few sources where you can find datasets that fit the characteristics of your data:
- UCI Machine Learning Repository — a collection of databases, domain theories, and data generators widely used by the machine learning community
- Kaggle Datasets — offers a diverse range of datasets provided by the Kaggle community, which can be useful for practicing and applying machine learning techniques
- Google Dataset Search — a tool that enables the discovery of datasets stored across the web, curated, and indexed for public use
Here's how to proceed with your evaluation.
Step 1: Prepare a test dataset
Make sure you have a separate dataset reserved for testing. This dataset should mirror the structure of your training data but include different instances to evaluate the model's generalization capability effectively.
Step 2: Evaluate the model
Use the
evaluate method of your TensorFlow.js model to assess its performance on the test dataset. This function returns the loss value and the metrics that were defined during the model compilation.The loss value is a numerical representation of how well the model's predictions match the actual target values. The lower the loss, the better a model's predictions are. It serves as a primary measure to optimize during the training process through backpropagation. The loss function you choose depends on the nature of your problem (e.g., binary cross-entropy for binary classification, mean squared error for regression).
During model compilation with TensorFlow.js, you specify the loss function that will be used to calculate this value, along with any additional metrics (like accuracy) that help evaluate the model’s performance further.
Here's how you can execute this evaluation:
In this code snippet:
model.evaluate(testFeatures, testLabels)invokes the evaluation process wheretestFeaturesare the input data andtestLabelsare the true values for those inputs.- The
evaluationResultsarray contains the loss first, followed by any other metrics you specified during the compilation. For each metric, including the loss, the result can be accessed and displayed. result.dataSync()is used to retrieve the output from TensorFlow’s tensor format to JavaScript-readable numbers.
This evaluation method helps verify how effectively the model generalizes to new data, based on the predefined loss function and metrics.
Select a test dataset from the links provided that best matches your model's needs and proceed with the evaluation to gauge the performance of your TensorFlow.js model effectively.
Improving your model involves tweaking various aspects of its architecture and training configuration to achieve better accuracy and efficiency. Here’s how you can experiment:
Step 1: Adjust model architecture
Modifying the model's architecture can lead to significant improvements. You might add more layers, increase the number of units in existing layers, or change activation functions to enhance learning dynamics.
Step 2: Experiment with different optimizers and learning rates
Different optimizers and learning rates can affect the speed and quality of the learning process. Trying different combinations can help you find the optimal setup for your specific problem.
Step 3: Training with modifications
After making adjustments, retrain your model to see the effects of the changes. It’s important to monitor both the training process and the validation results to avoid overfitting.
To clearly understand the impact of your modifications, compare the performance metrics before and after the improvements. This comparison can be logged or visualized to show progress and confirm the benefits of the changes.
By structuring the testing and improvement process in this manner, you not only ensure that your model is robust and generalizes well, but you also optimize its performance to meet the specific needs of your application. This iterative approach to development and evaluation enables more efficient model tuning and, ultimately, more accurate predictive performance.
Integrating MongoDB with TensorFlow.js opens up a myriad of possibilities for building and deploying machine-learning-powered applications in JavaScript. This guide serves as a starting point to inspire you to further explore this exciting intersection of web development and machine learning.
For further learning, check out the TensorFlow.js and MongoDB documentation, and explore more complex machine learning models and database operations. If you have questions or want to share your work, join us in the MongoDB Developer Community.
Thanks for reading...
Happy Coding!
Top Comments in Forums
There are no comments on this article yet.
Rate this tutorial