How to Migrate PostgreSQL to MongoDB With Confluent Kafka
Rate this tutorial
In today's data-driven world, businesses are continuously seeking innovative ways to harness the full potential of their data. One critical aspect of this journey involves data migration – the process of transferring data from one database system to another, often driven by evolving business needs, scalability requirements, or the desire to tap into new technologies.
In this era of digital transformation, where agility and scalability are paramount, organizations are increasingly turning to NoSQL databases like MongoDB for their ability to handle unstructured or semi-structured data at scale. On the other hand, relational databases like PostgreSQL have long been trusted for their robustness and support for structured data.
As businesses strive to strike the right balance between the structured and unstructured worlds of data, the question arises: How can you seamlessly migrate from a relational database like PostgreSQL to the flexible documented-oriented model of MongoDB while ensuring data integrity, minimal downtime, and efficient synchronization?
The answer lies in an approach that combines the power of Confluent Kafka, a distributed streaming platform, with the agility of MongoDB. In this article, we'll explore the art and science of migrating from PostgreSQL to MongoDB Atlas, leveraging Confluent Kafka as our data streaming bridge. We'll delve into the step-by-step tutorial that can make this transformation journey a success, unlocking new possibilities for your data-driven initiatives.
Apache Kafka is an open-source distributed streaming platform developed by the Apache Software Foundation that is designed to handle real-time data streams.
To understand Kafka, imagine a busy postal system in a bustling city. In this city, there are countless businesses and individuals sending packages and letters to one another, and it's essential that these messages are delivered promptly and reliably.
Apache Kafka is like the central hub of this postal system, but it's not an ordinary hub; it's a super-efficient, high-speed hub with a memory that never forgets. When someone sends a message (data) to Kafka, it doesn't get delivered immediately. Instead, it's temporarily stored within Kafka's memory. Messages within Kafka are not just one-time deliveries. They can be read and processed by multiple parties. Imagine if every package or letter sent through the postal system had a copy available for anyone who wanted it. This is the core concept of Kafka: It's a distributed, highly scalable, and fault-tolerant message streaming platform.
From maintaining real-time inventory information for e-commerce to supporting real-time patient monitoring, Kafka has varied business use cases in different industries and can be used for log aggregation and analysis, event sourcing, real-time analytics, data integration, etc.
In the same analogy of the postal system, the system collects and arranges its letters and packages into different sections and organizes them into compartments for each type of item. Kafka does the same. The messages it receives from the producer of data are arranged and organized into Kafka topics. Kafka topics are like different mailboxes where messages with a similar theme are placed, and various programs can send and receive these messages to exchange information. This helps keep data well-organized and ensures that the right people or systems can access the information they need from the relevant topic.
Kafka connectors are like special mailboxes that format and prepare letters (data) in a way that Kafka can understand, making it easier for data to flow between different systems. Say the sender (system) wants to send a letter (data) to the receiver (another system) using our postal system (Kafka). Instead of just dropping the letter in the regular mailbox, the sender places it in a special connector mailbox outside their house. This connector mailbox knows how to format the letter properly. So connectors basically act as a bridge that allows data to flow between Kafka and various other data systems.
Confluent is a company that builds tools and services. It has built tools and services for Apache Kafka to make it more robust and feature-rich. It is like working with a more advanced post office that not only receives and delivers letters but also offers additional services like certified mail, tracking, and package handling. The migration in this article is done using Confluent Kafka through its browser user interface.
To begin with, you can set up an account on Confluent Kafka by registering on the Confluent Cloud website. You can sign up with your email account or using GitHub.
Once you log in, this is how the home page looks:
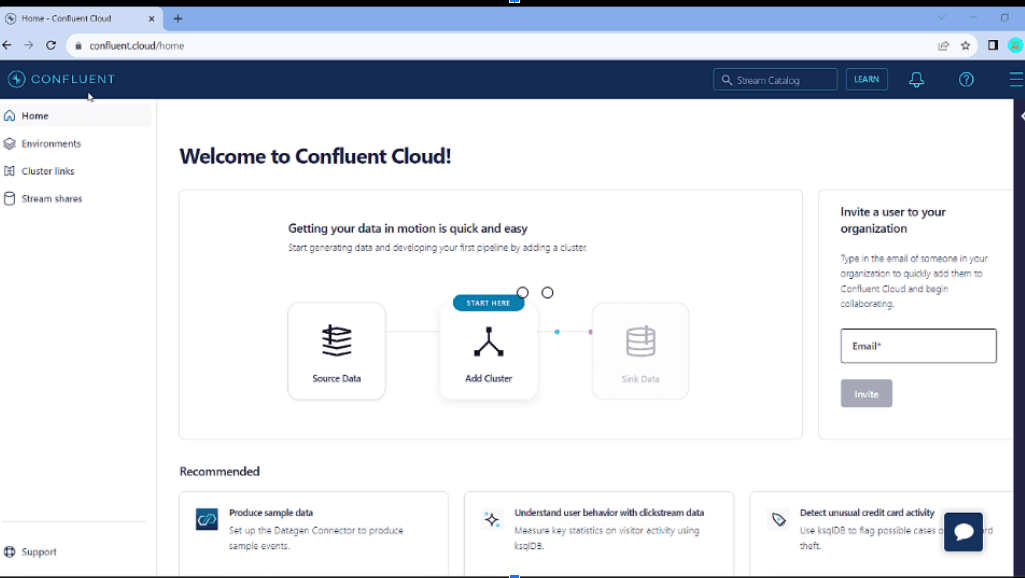
This free account comes with free credits worth $400 which you can use to utilize the resources in the Confluent Cloud. If your database size is small, your migration could also be completed within this free credit limit. If you go to the billing section, you can see the details regarding the credits.
To create a new cluster, topics, and connectors for your migration, click on the Environments tab from the side menu and create a new environment and cluster.
You can select the type of cluster. Select the type “basic” which is the free tier with basic configuration. If you want to have a higher configuration for the cluster, you can select the “standard”, “enterprise,” or “dedicated” cluster types which have higher storage, partition, and uptime SLA respectively with hourly rates.
Next, you can select the region/zone where your cluster has to be deployed along with the cloud provider you want for your cluster (AWS, GCP, or Azure ). The prerequisite for your data migration to work through Kafka connectors is that the Kafka cluster where you create your connectors should be in the same region as your MongoDB Atlas cluster to where you will migrate your PostgreSQL data.
Then, you can provide your payment information and launch your cluster.
Once your cluster is launched, this is how the cluster menu looks with options to have a cluster overview and create topics and connectors, among other features.
With this, we are ready with the basic Kafka setup to migrate your data from PostgreSQL to MongoDB Atlas.
For this example walkthrough, if you do not have an existing PostgreSQL database that you would like to migrate to a MongoDB Atlas instance using Confluent Kafka, you can create a sample database in PostgreSQL by following the below steps and then continue with this tutorial.
- Download PostgreSQL Database Server from the official website and start your instance locally.
- Create a database
mytestdband tableusersand put some sample data into the employee table.
1 -- Create the database mytestdb 2 CREATE DATABASE mytestdb; 3 4 -- Connect to the mytestdb database 5 \c org; 6 7 -- Create the users table 8 CREATE TABLE users ( 9 id SERIAL PRIMARY KEY, 10 firstname VARCHAR(50), 11 lastname VARCHAR(50), 12 age INT 13 ); 14 15 -- Insert sample data into the 'users' table 16 INSERT INTO users (firstname, lastname, age) 17 VALUES 18 ('John', 'Doe', 25), 19 ('Jane', 'Smith', 30), 20 ('Bob', 'Johnson', 22);
Keep in mind that the host where your PostgreSQL is running — in this case, your local machine — should have Confluent Kafka whitelisted in a firewall. Otherwise, the source connector will not be able to reach the PostgreSQL instance.
To migrate the data from PostgreSQL to MongoDB Atlas, we have to configure a source connector to connect to PostgreSQL that will stream the data into the Confluent Cloud topic. Then, we will configure a sink connector for MongoDB Atlas to read the data from the created topic and write to the respective database in the MongoDB Atlas cluster.
To configure the PostgreSQL source connector, follow the below steps:
- Click on the Connectors tab in your newly created cluster in Confluent. It will list popular plugins available in the Confluent Cloud. You can search for the “postgres source” connector plugin and use that to create your custom connector to connect to your PostgreSQL database.
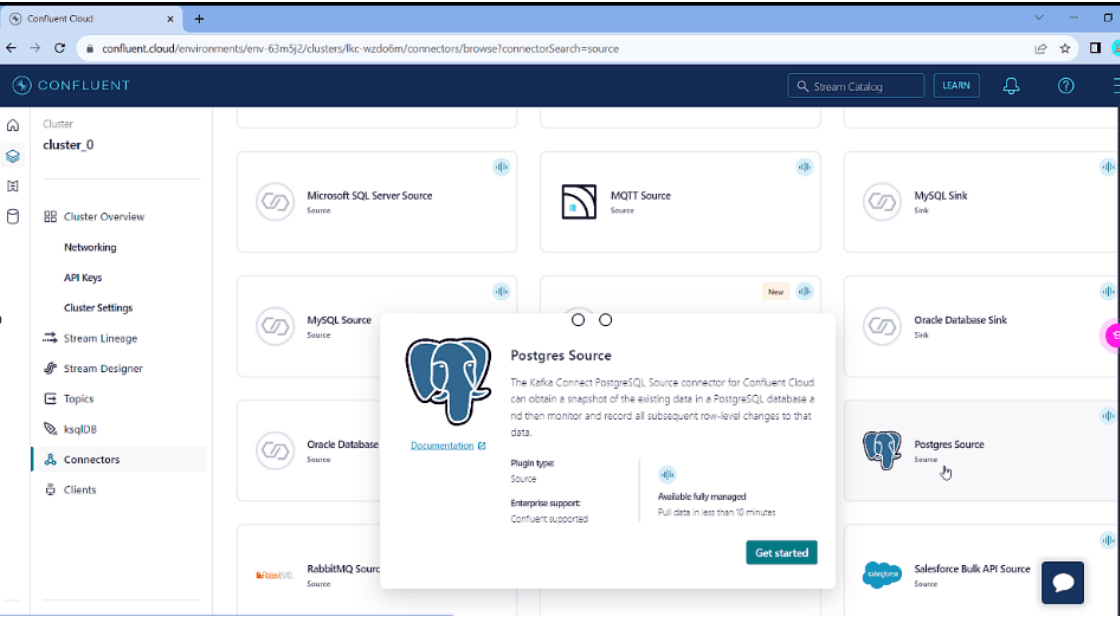
- Next, you will be prompted for the topic prefix. Provide the name of the topic into which you want to stream your PostgreSQL data. If you leave it empty, the topic will be created with the table name for you.
- You can then specify the access levels for the new connector you are creating. You can keep it global and also download the API credentials that you can use in your applications, if needed to connect to your cluster. For this migration activity, you will not need it — but you will need to create it to move to the next step.
- Next, you will be prompted for connection details of PostgreSQL.You can provide the connection params, schema context, transaction isolation levels, poll intervals, etc. for the connection.
- Select the output record type as JSON. MongoDB natively uses the JSON format. You will also have to provide the name of the table that you are trying to migrate.
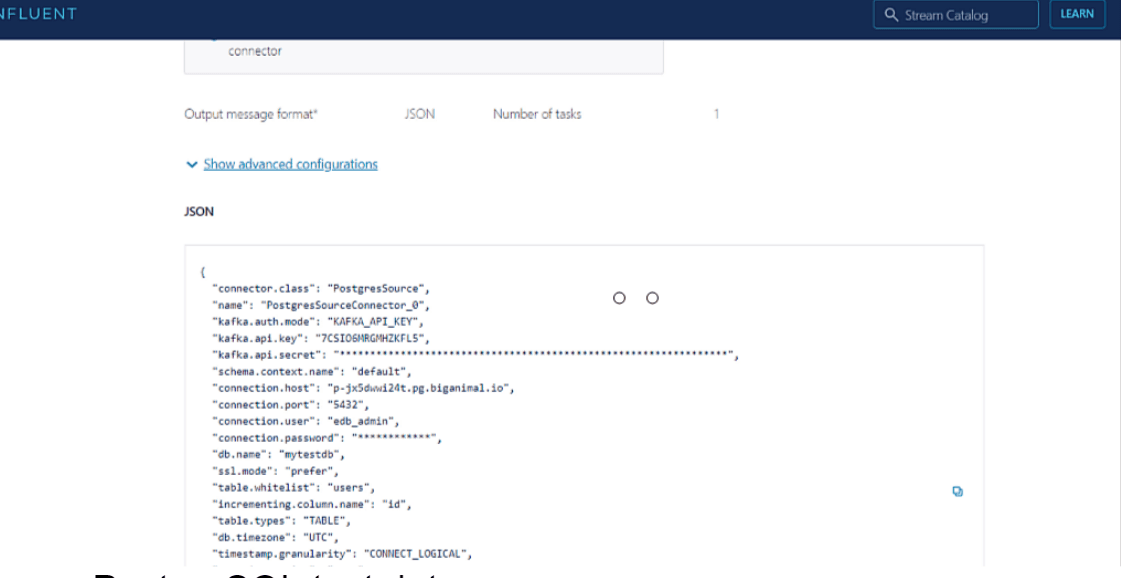
- In the next screen, you will be redirected to an overview page with all the configurations you provided in JSON format along with the cost for running this source connector per hour.
- Once you create your source connector, you can see its status in the Connectors tab and if it is running or has failed. The source connector will start syncing the data to the Confluent Cloud topic immediately after starting up. You can check the number of messages processed by the connector by clicking on the new connector. If the connector has failed to start, you can check connector logs and rectify any issues by reconfiguring the connector settings.
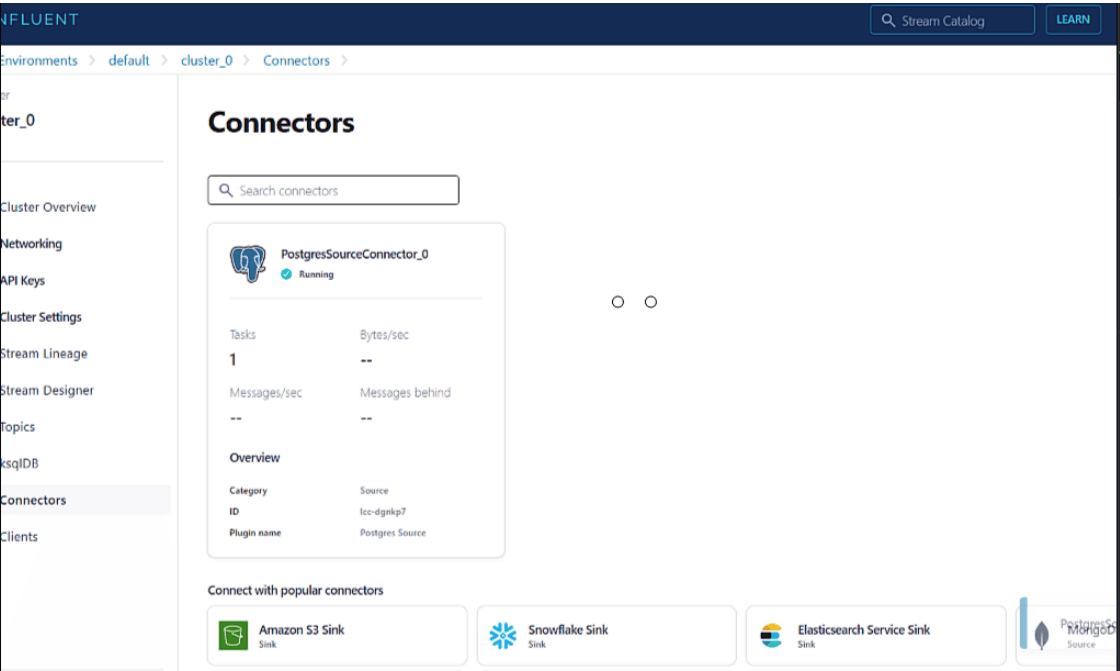
Once your Postgres source connector is running, you can switch to the Topics tab to list all the topics in your cluster, and you will be able to view the new topic created by the source connector.
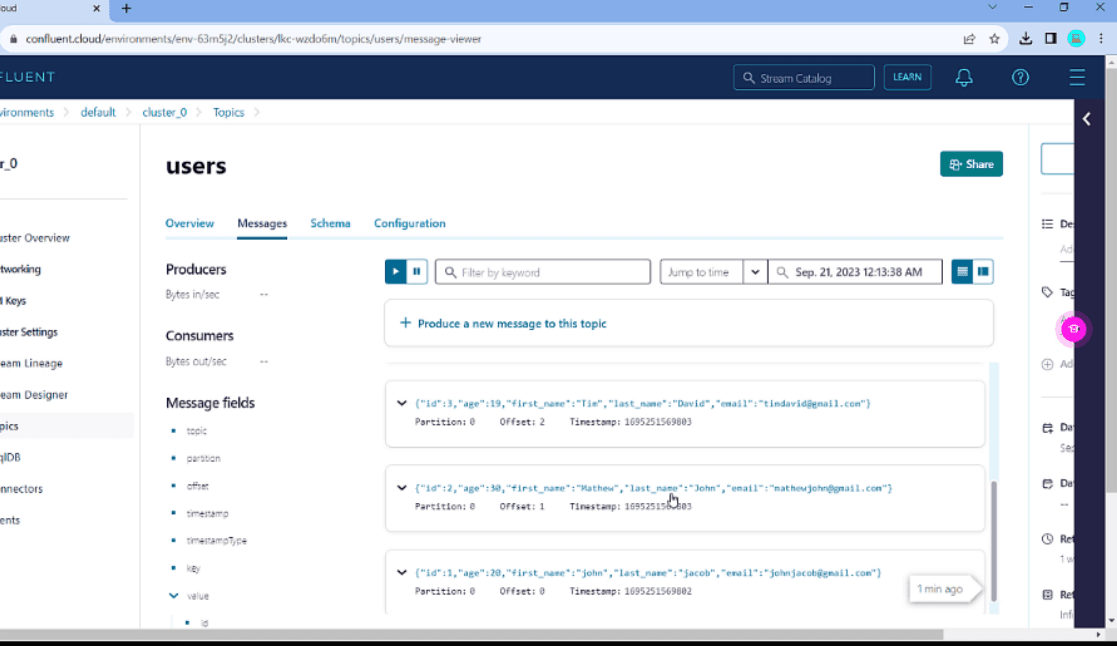
If you click on the newly created topic and navigate to the “Messages” tab, you will be able to view the processed messages. If you are not able to see any recent messages, you can check them by selecting the “Jump to time” option, selecting the default partition 0, and providing a recent past time from the date picker. Here, my topic name is “users.”
Below, you can see the messages processed into my “users” topic from the users table in PostgreSQL.
Now that we have the data that you wanted to migrate (one table, in our example) in our Confluent Cloud topic, we can create a sink connector to stream that data into your MongoDB Atlas cluster. Follow the below steps to configure the data inflow:
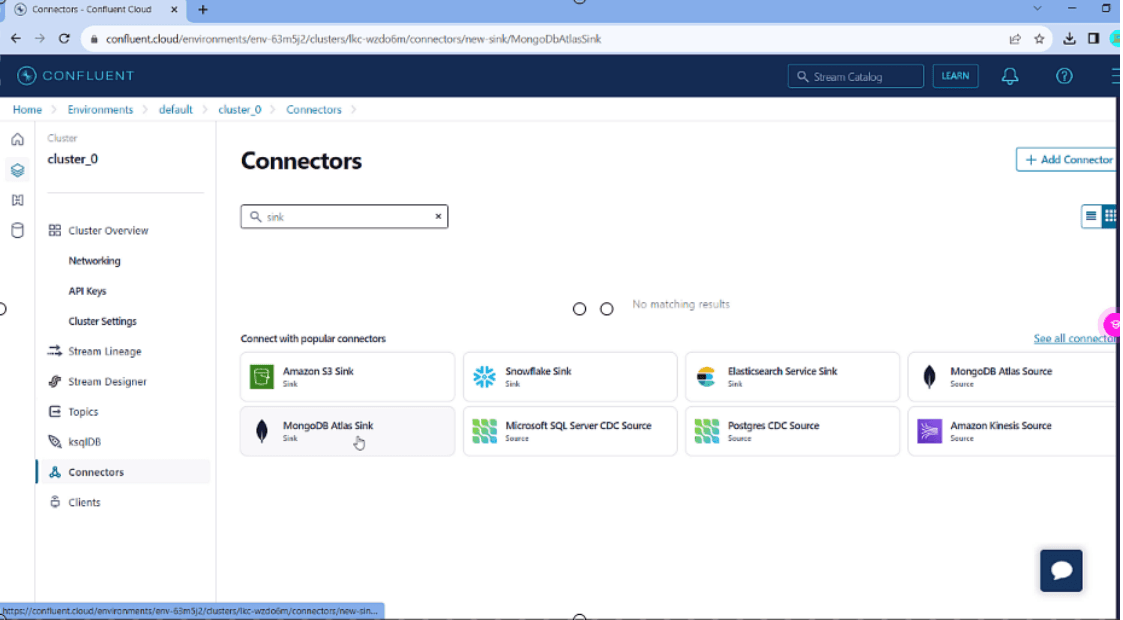
- Go to the Connectors tab and search for “MongoDB Atlas Sink” to find the MongoDB Atlas connector plugin that you will use to create your custom sink connector.
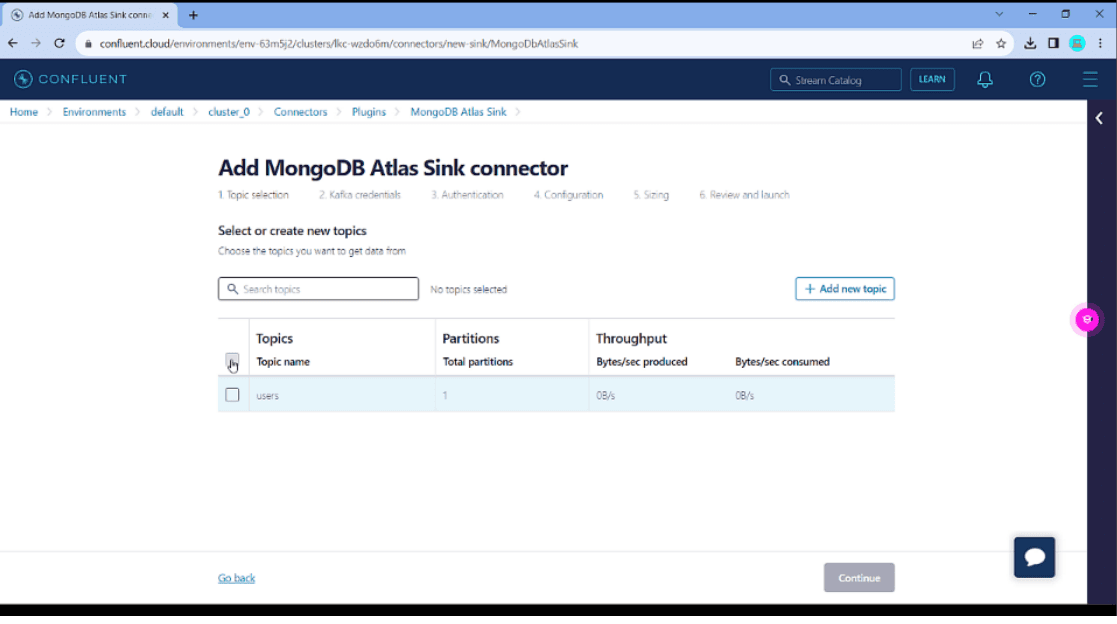
- You will then be asked to select the topic for which you are creating this sink connector. Select the respective topic and click on “Continue.”
- You can provide the access levels for the sink connector and also download the API credentials if needed, as in the case of the source connector.
- In the next section, you will have to provide the connection details for your MongoDB Atlas cluster — including the hostname, username/password, database name, and collection name — into which you want to push the data. The connection string for Atlas will be in the format
mongodb+srv://<username>:<password>@<hostname>, so you can get the details from this format. Remember that the Atlas cluster should be in the same region and hosted on the same cloud provider for the Kafka connector to be able to communicate with it. You have to add your Confluent cluster static IP address into the firewall’s allowlist of MongoDB Atlas to allow the connections to your Altas cluster from Confluent Cloud. For non-prod environments, you can also add 0.0.0.0/0 to allow access from anywhere, but it is not recommended for a production environment as it is a security concern allowing any IP access.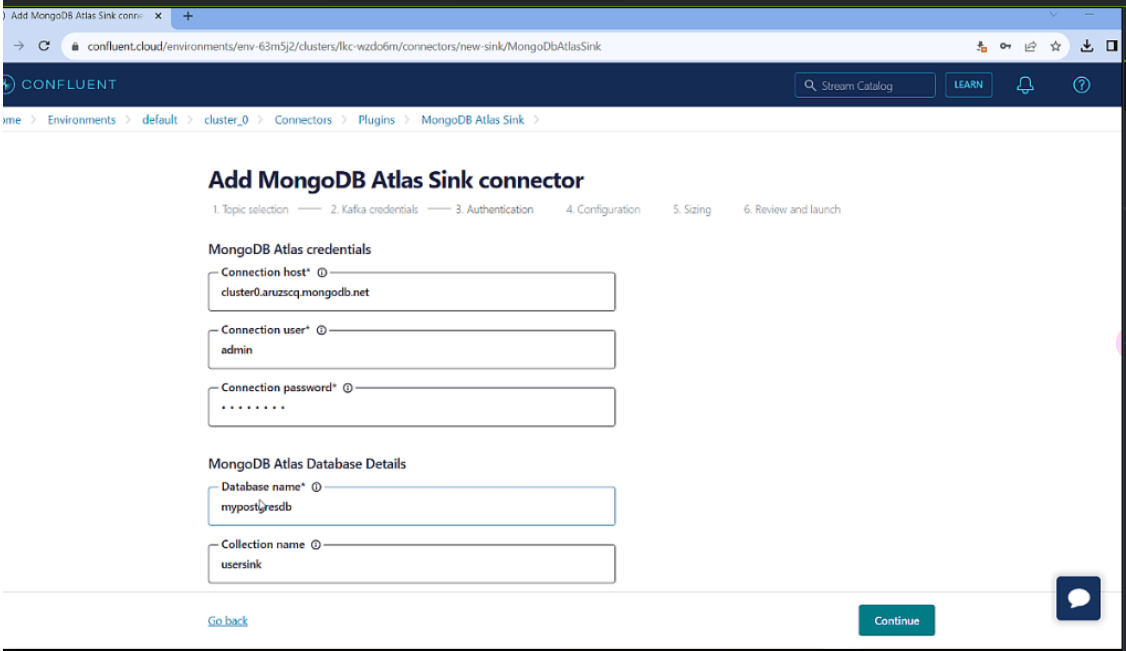
- You can select the Kafka input message type as JSON as in the case of the source connector and move to the final review page to view the configuration and cost for your new sink connector.
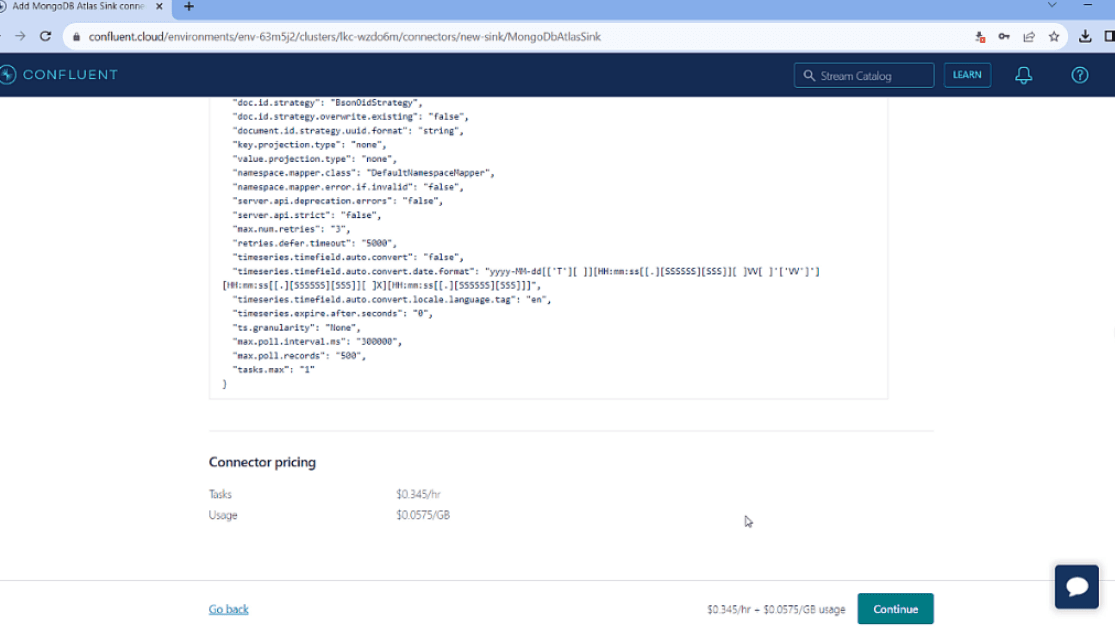
- Once the connector has started, you can query the collection mentioned in your sink connector configuration and you would be able to see the data from your PostgreSQL table in the new collection of your MongoDB Atlas cluster.
This data is synced in real-time from PostgreSQL to MongoDB Atlas using the source and sink connectors, so if you try adding a new record or updating/deleting existing records in PostgreSQL, you can see it reflect real-time in your MongoDB Atlas cluster collection, as well.
If your data set is huge, the connectors will catch up and process all the data in due time according to the data size. After completion of the data transfer, you can validate your MongoDB Atlas DB and stop the data flow by stopping the source and sink connectors directly from the Confluent Cloud Interface.
Using Kafka, not only can you sync the data using its event-driven architecture, but you can also transform the data in transfer in real-time while migrating it from PostgreSQL to MongoDB. For example, if you would like to rename a field or concat two fields into one for the new collection in Atlas, you can do that while configuring your MongoDB Atlas sink connector.
Let’s say PostgreSQL had the fields “firstname” and “lastname” for your “users” table, and in MongoDB Atlas post-migration, you only want the “name” field which would be a concatenation of the two fields. This can be done using the “transform” attribute in the sink connector configuration. This provides a list of transformations to apply to your data before writing it to the database. Below is an example configuration.
1 { 2 "name": "mongodb-atlas-sink", 3 "config": { 4 "connector.class": "com.mongodb.kafka.connect.MongoSinkConnector", 5 "tasks.max": "1", 6 "topics": "your-topic-name", 7 "connection.uri": "mongodb+srv://<username>:<password>@cluster.mongodb.net/test", 8 "database": "your-database", 9 "collection": "your-collection", 10 "key.converter": "org.apache.kafka.connect.storage.StringConverter", 11 "value.converter": "org.apache.kafka.connect.json.JsonConverter", 12 "value.converter.schemas.enable": "false", 13 "transforms": "addFields,unwrap", 14 "transforms.addFields.type": "org.apache.kafka.connect.transforms.InsertField$Value", 15 "transforms.addFields.static.field": "name", 16 "transforms.addFields.static.value": "${r:firstname}-${r:lastname}", 17 "transforms.unwrap.type": "io.debezium.transforms.UnwrapFromEnvelope", 18 "transforms.unwrap.drop.tombstones": "false", 19 "transforms.unwrap.delete.handling.mode": "none" 20 } 21 }
As we are discussing data migration from relational to MongoDB, it’s worth mentioning the MongoDB Relational Migrator. This is a tool designed natively by MongoDB to simplify the process of moving data from relational databases into MongoDB. Relational Migrator analyzes your relational schema and gives recommendations for mapping to a new MongoDB schema.
Its features — including schema analysis, data extraction, indexing, and validation — make it a valuable asset for organizations seeking to harness the benefits of MongoDB's NoSQL platform while preserving their existing relational data assets. Whether for application modernization, data warehousing, microservices, or big data analytics, this tool is a valuable asset for those looking to make the shift from relational to NoSQL databases. It helps to migrate from major relational database technologies including Oracle, SQL Server, MySQL, and PostgreSQL.
In the ever-evolving landscape of data management, MongoDB has emerged as a leading NoSQL database, known for its flexibility, scalability, and document-oriented structure. However, many organizations still rely on traditional relational databases to store their critical data. The challenge often lies in migrating data between these disparate systems efficiently and accurately.
Confluent Kafka acts as a great leverage in this context with its event driven architecture and native support for major database engines including MongoDB Atlas.The source and sink connectors would have inbound and outbound data through Topics and acts as a platform for a transparent and hassle free data migration from relational to MongoDB Atlas cluster.
Top Comments in Forums
There are no comments on this article yet.
Related
Tutorial
Java Meets Queryable Encryption: Developing a Secure Bank Account Application
Oct 08, 2024 | 14 min read
Tutorial
Creating a Memory-enhanced AI Agent With Anthropic's Claude in Amazon Bedrock With MongoDB Atlas
Oct 29, 2024 | 8 min read