As of September 30, 2025, Atlas App Services has reached its end-of-life status and is no longer actively supported by MongoDB.
PowerSync is a top alternative to Atlas Device Sync. It is an SQLite-based solution and could be the right solution to migrate to if you have a mobile application using Device Sync.
This tutorial will guide you through the steps needed to migrate a Device Sync mobile application, written in React Native, to PowerSync. Your backend data will stay in Atlas, so you will need to configure the PowerSync service, update the local database schemas and bindings, and set up a backend service for writing to Atlas.
This tutorial uses a Realm todo list application for React Native available in the realm2powersync example repository.
Phase 1: Preparation and Setup
Deploy an Atlas Cluster
First, you need to deploy an Atlas Cluster and put in some test data. This will guide you as if you are setting up Atlas for the first time. If you already have a cluster deployed, feel free to skip ahead.
Navigate to MongoDB Atlas and register for an Atlas account, or sign in if you already have an account.
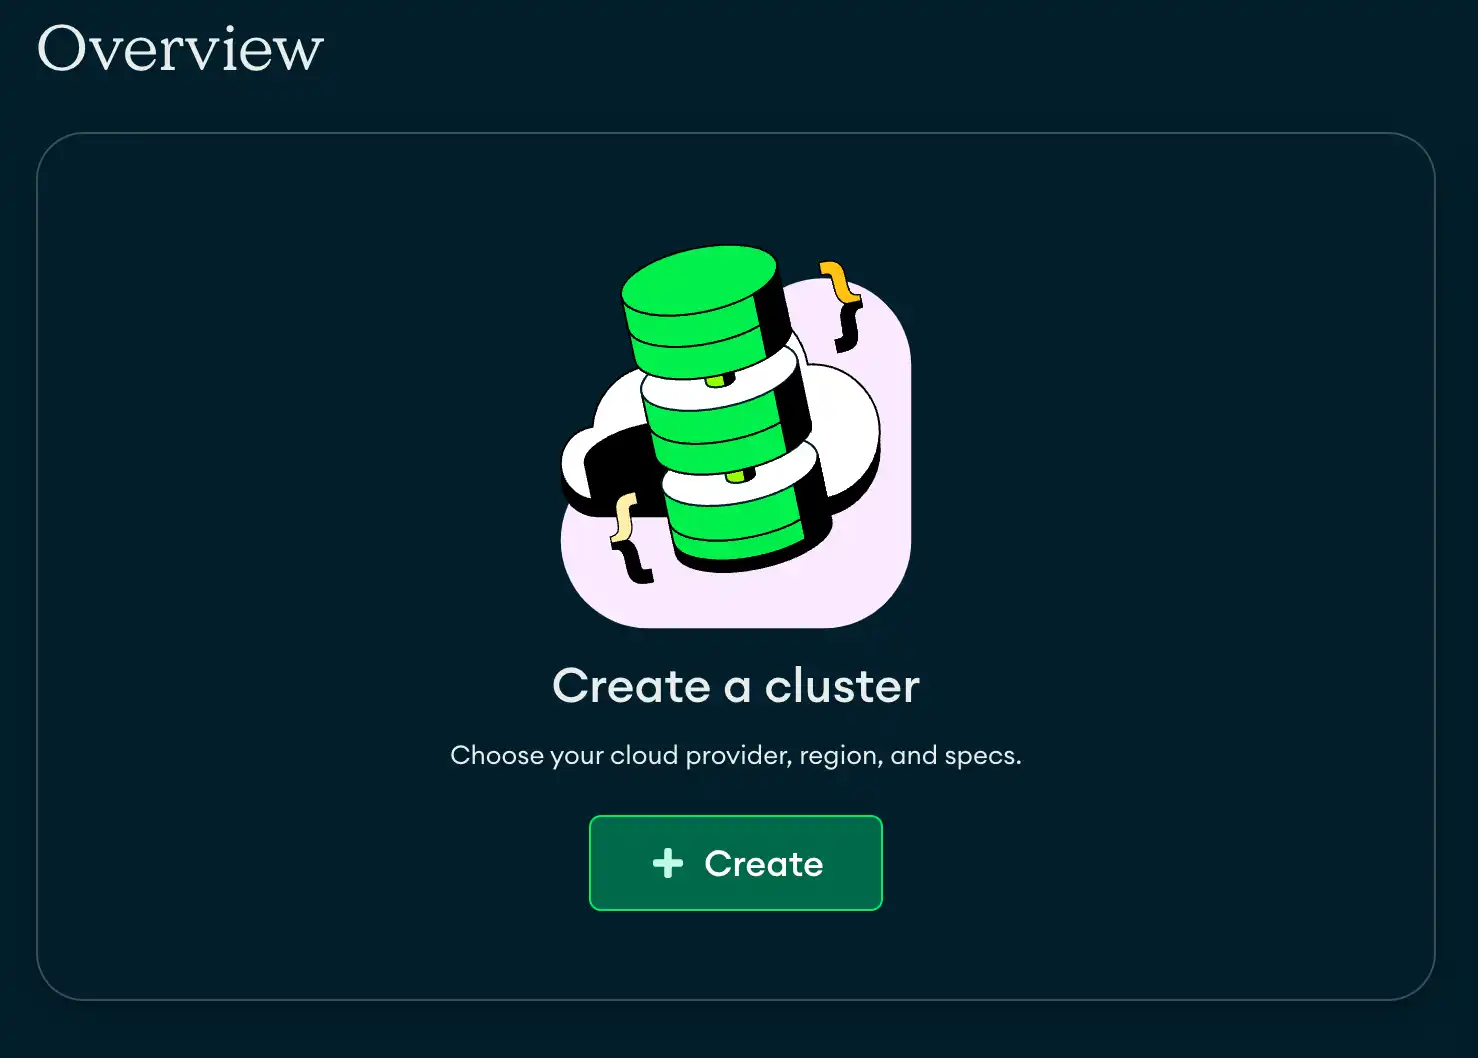
Next, create a cluster.
![Screenshot of the UI]()
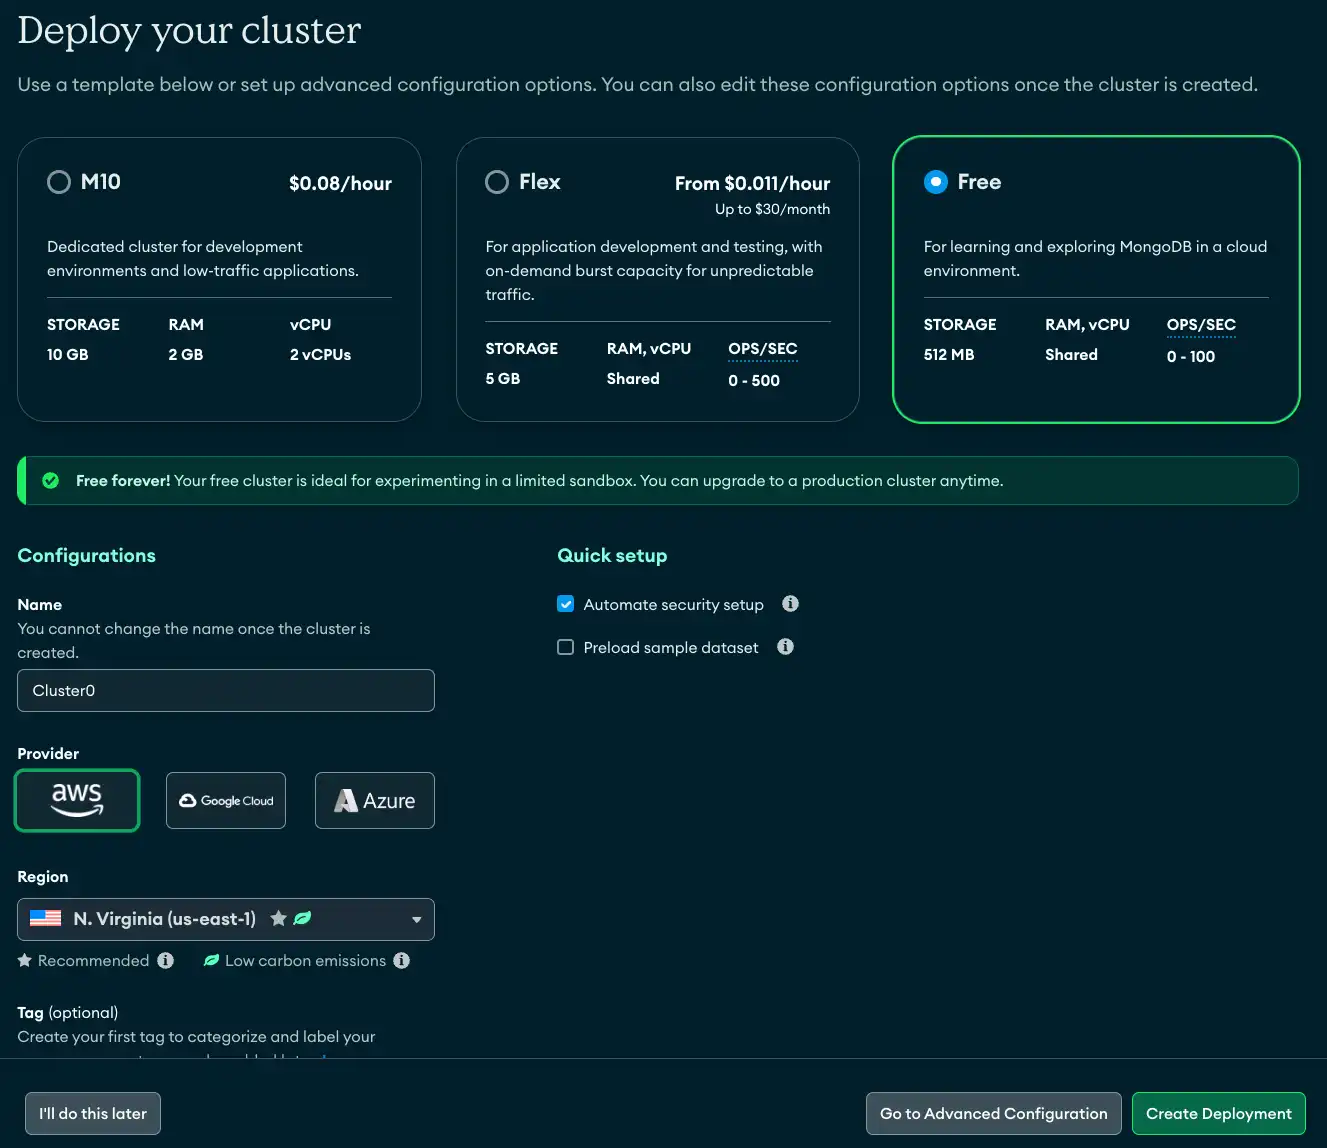
For test purposes, select the M0 (free) cluster with the default settings. Feel free to make any additional changes to suit your needs.
Click Create Deployment.
![Screenshot of the UI]()
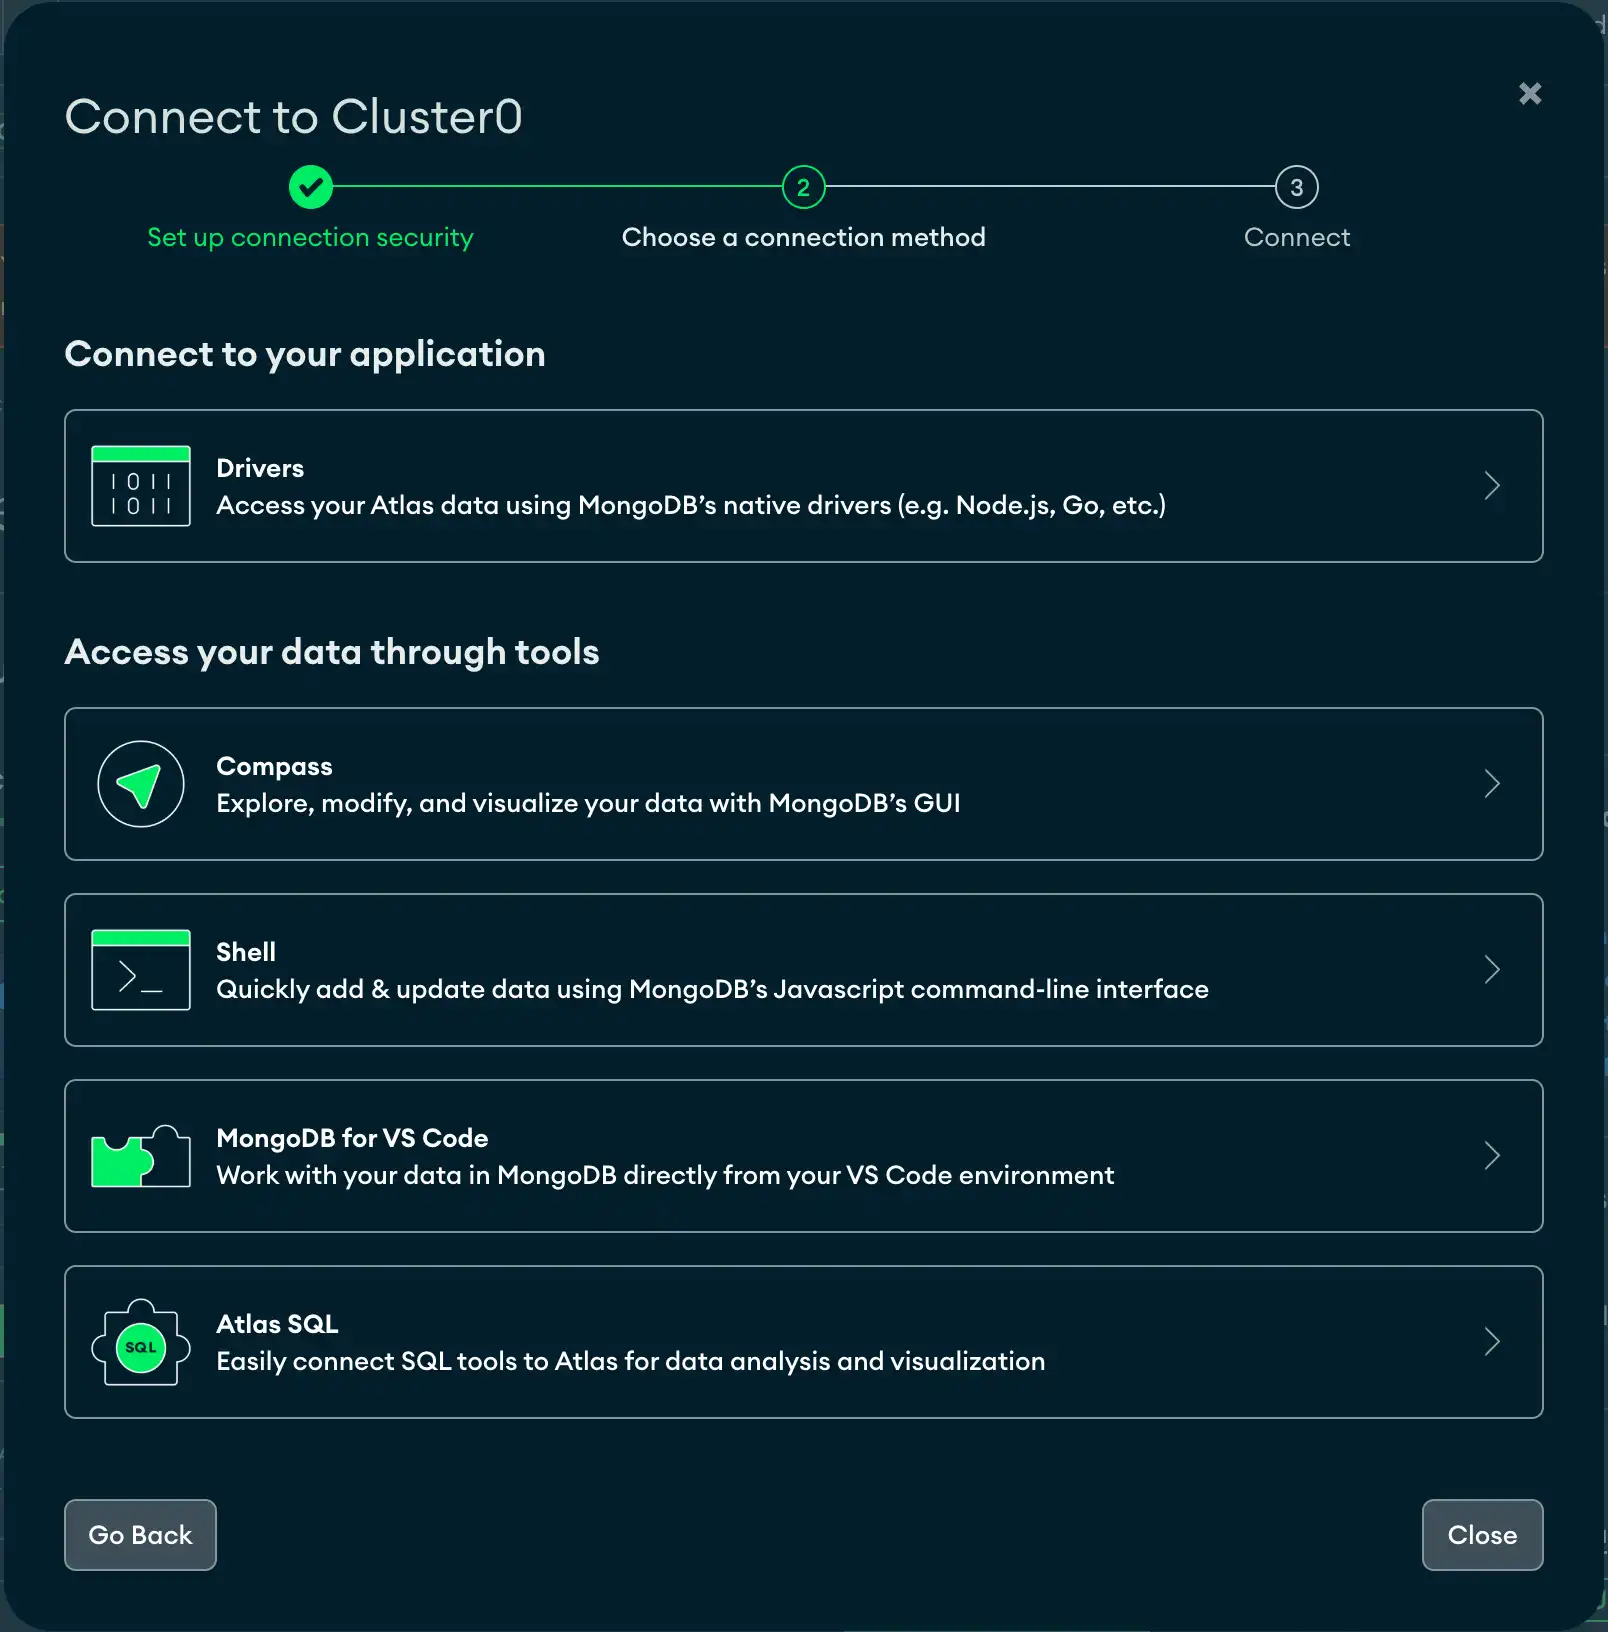
You are returned to your dashboard. The Connect to Cluster modal displays automatically.
Click Choose a connection method, then select Drivers.
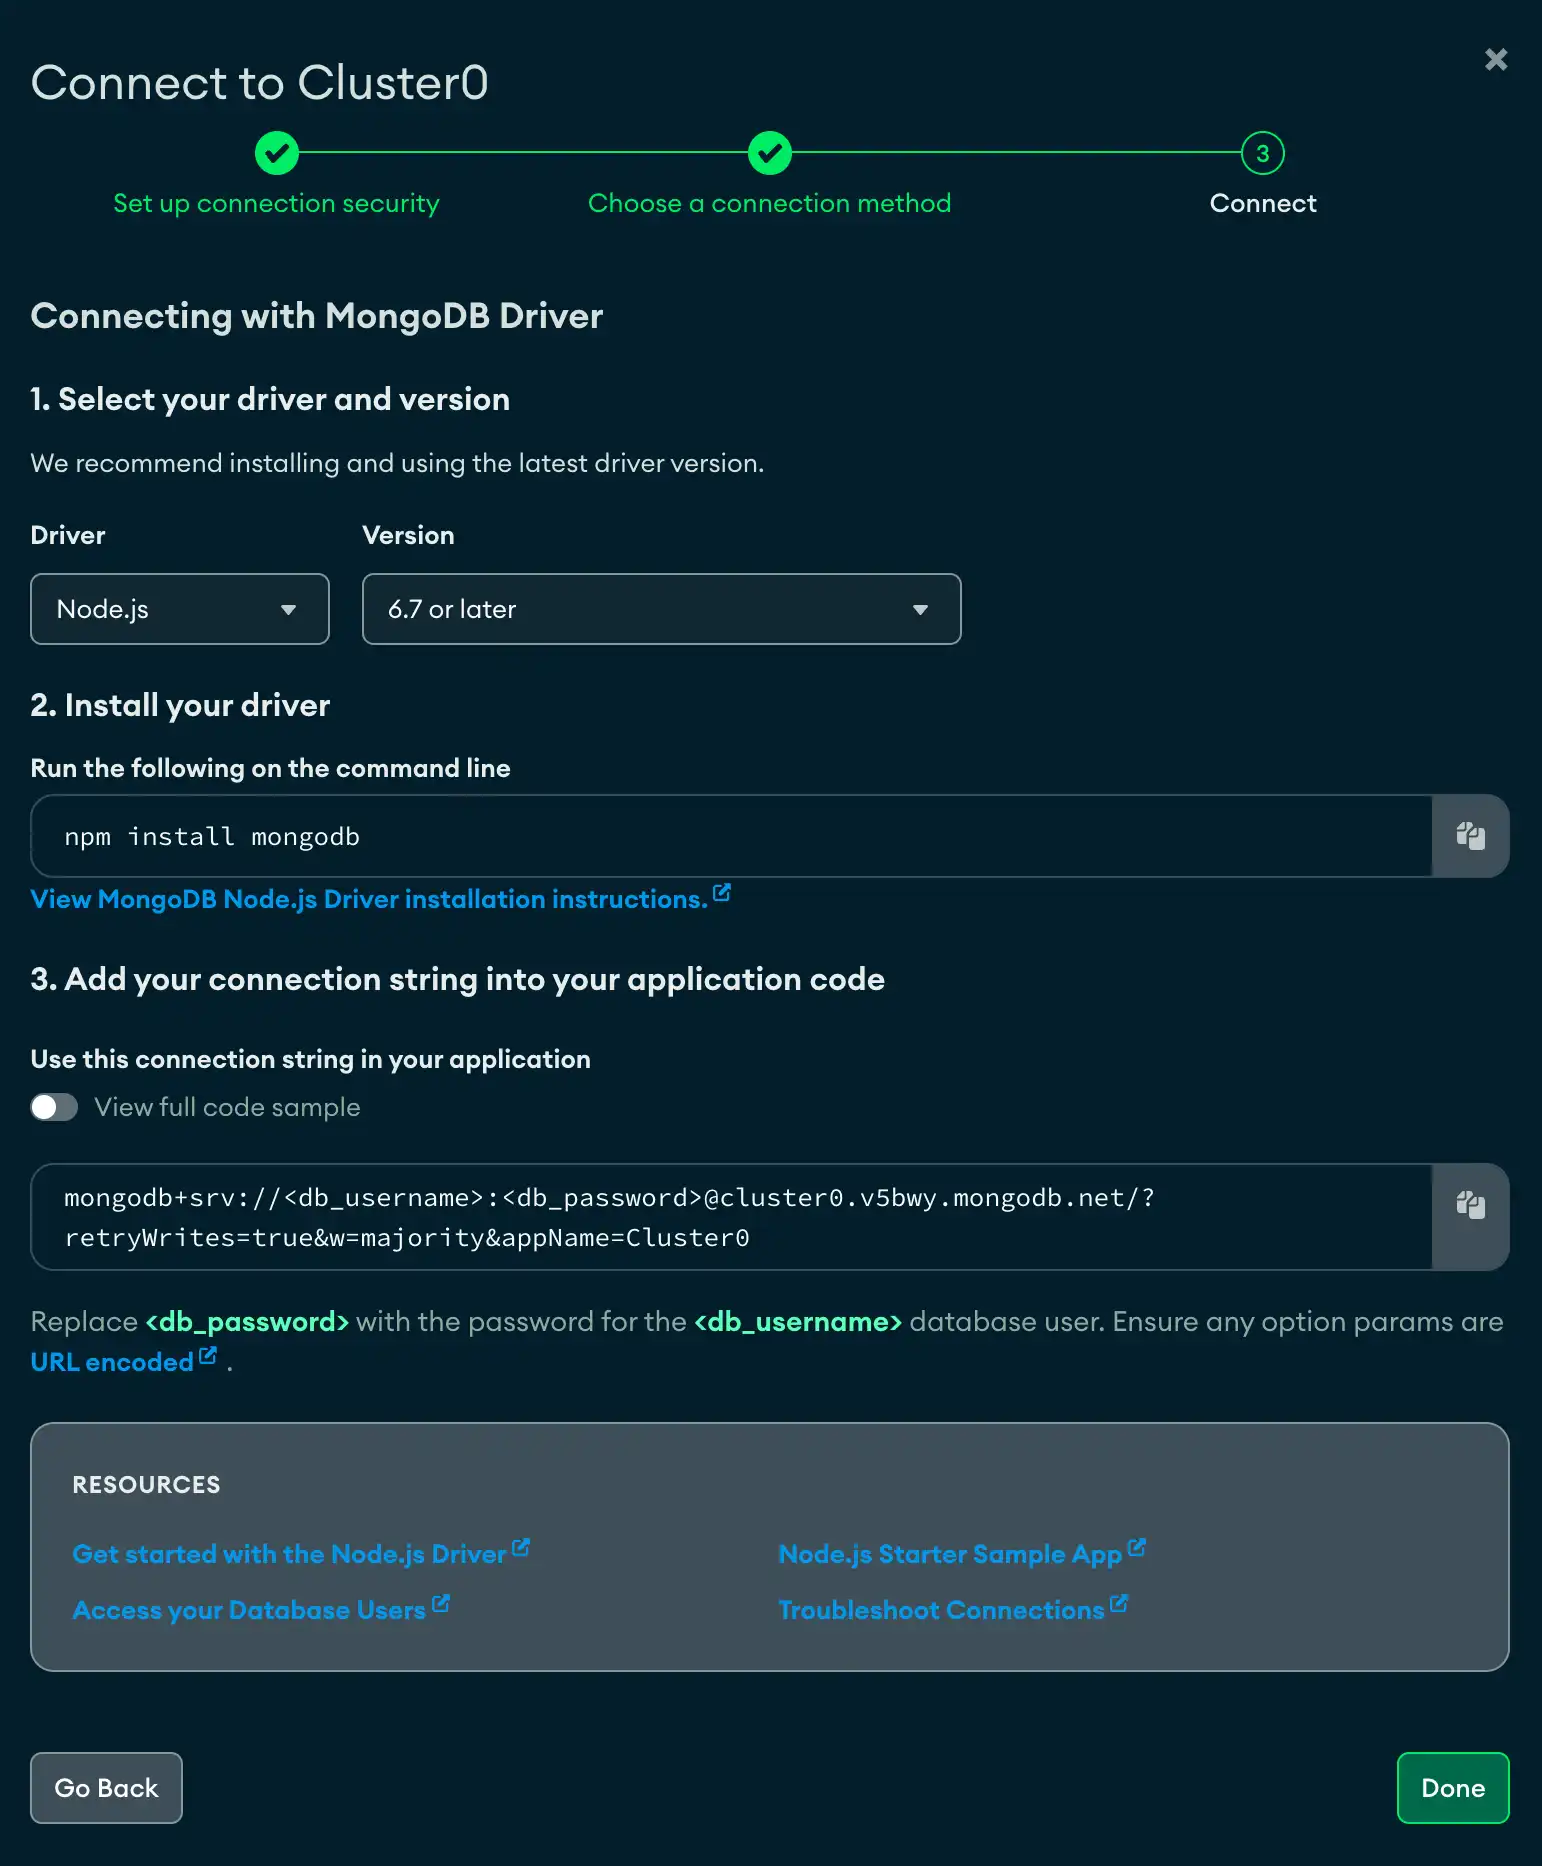
![Screenshot of the UI]()
From this screen, copy the URL that displays in step 3.
![Screenshot of the UI]()
Add your connection string into your application code. This is your connection string; it is required to access your MongoDB instance. Save the connection string for future reference.
You will create a username and password in the next steps that the PowerSync instance will use to connect to the database.
Click Done to close the modal.
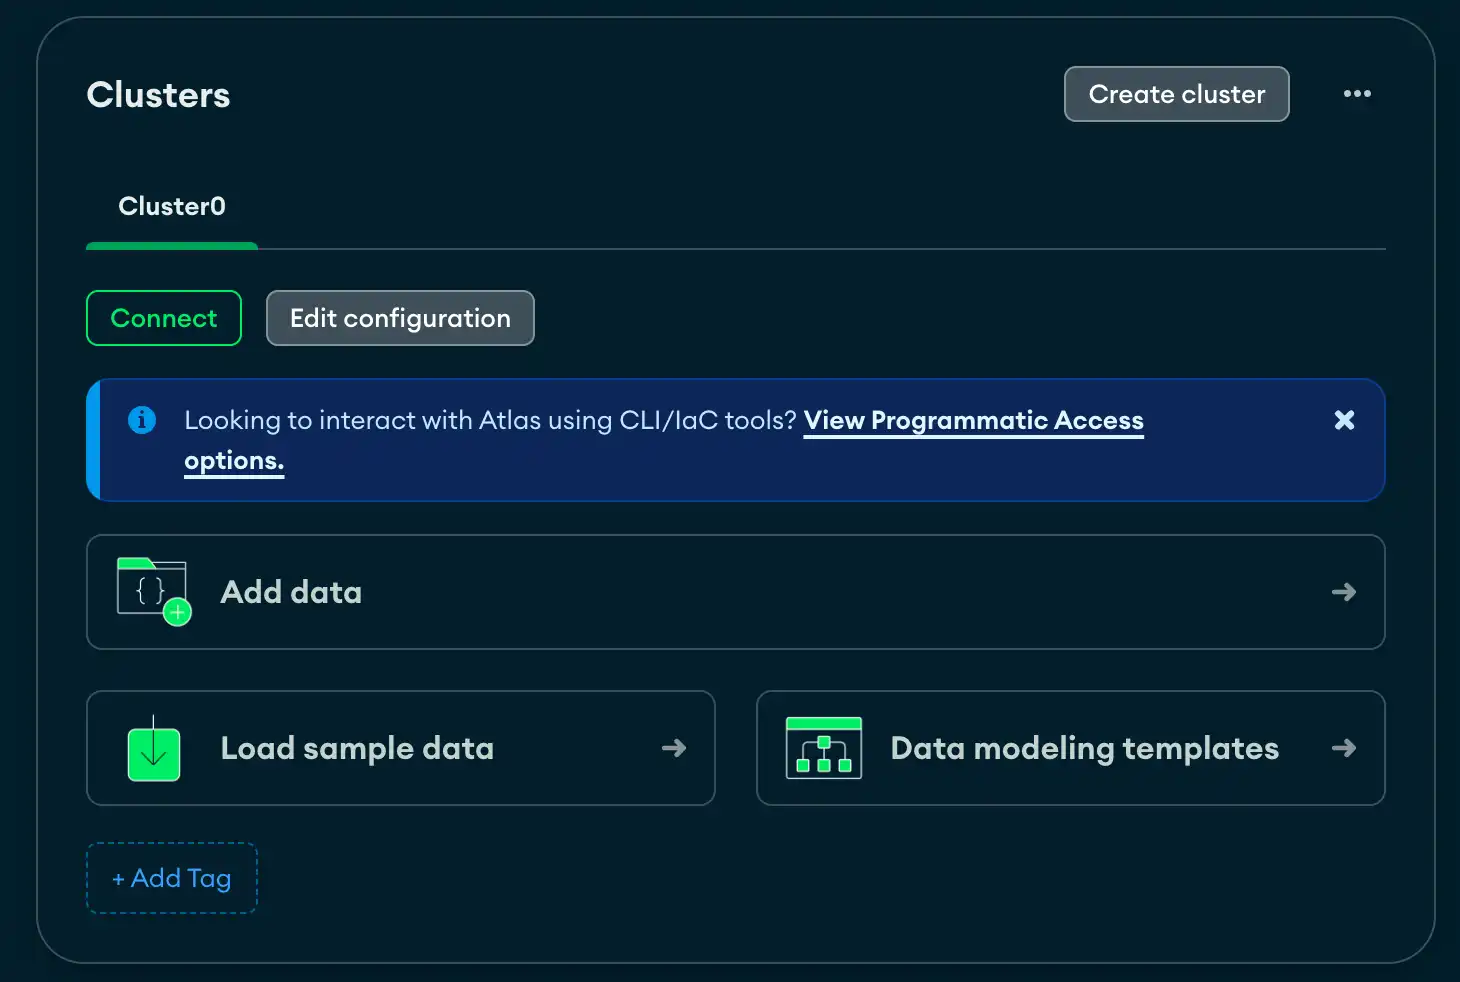
After your cluster finishes deploying, your dashboard should look similar to the following.
Click Add data to create a new database.
![Screenshot of the UI]()
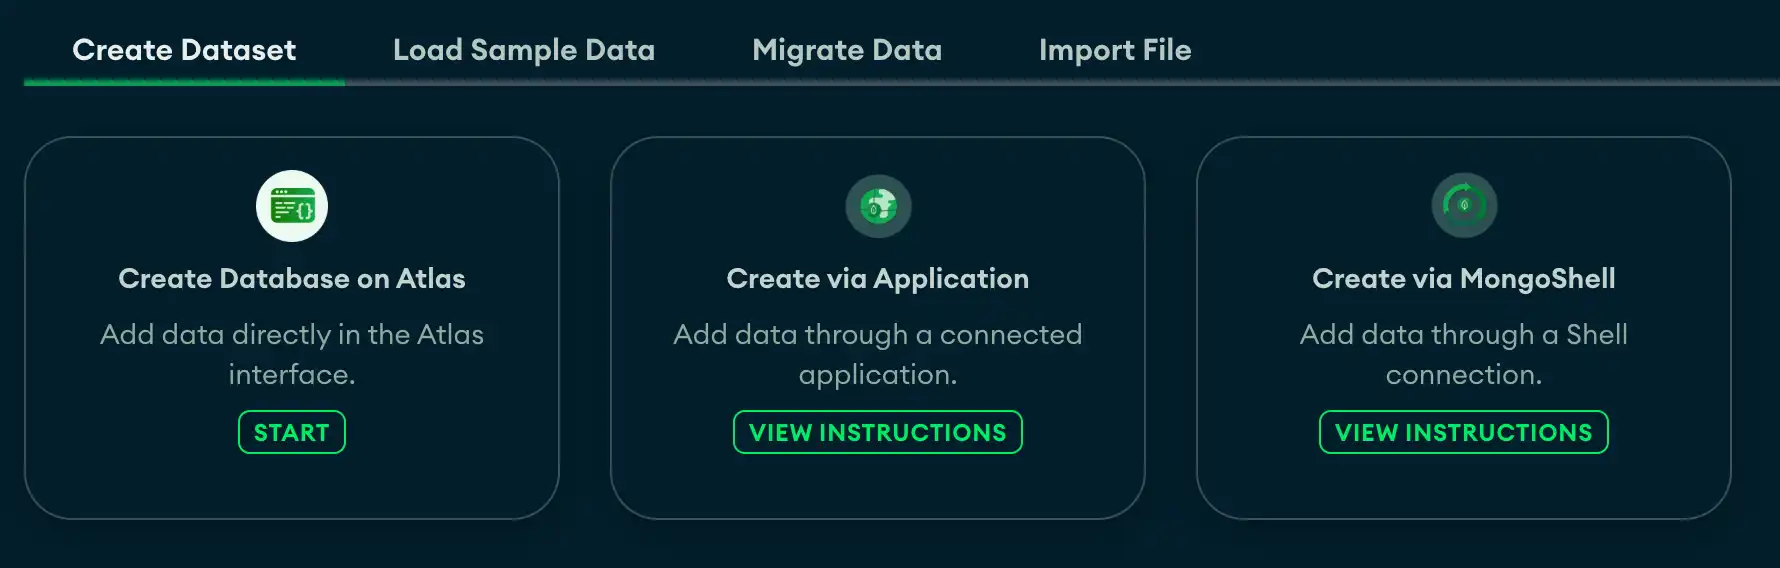
From the Create a Database on Atlas card, click START.
![Screenshot of the UI]()
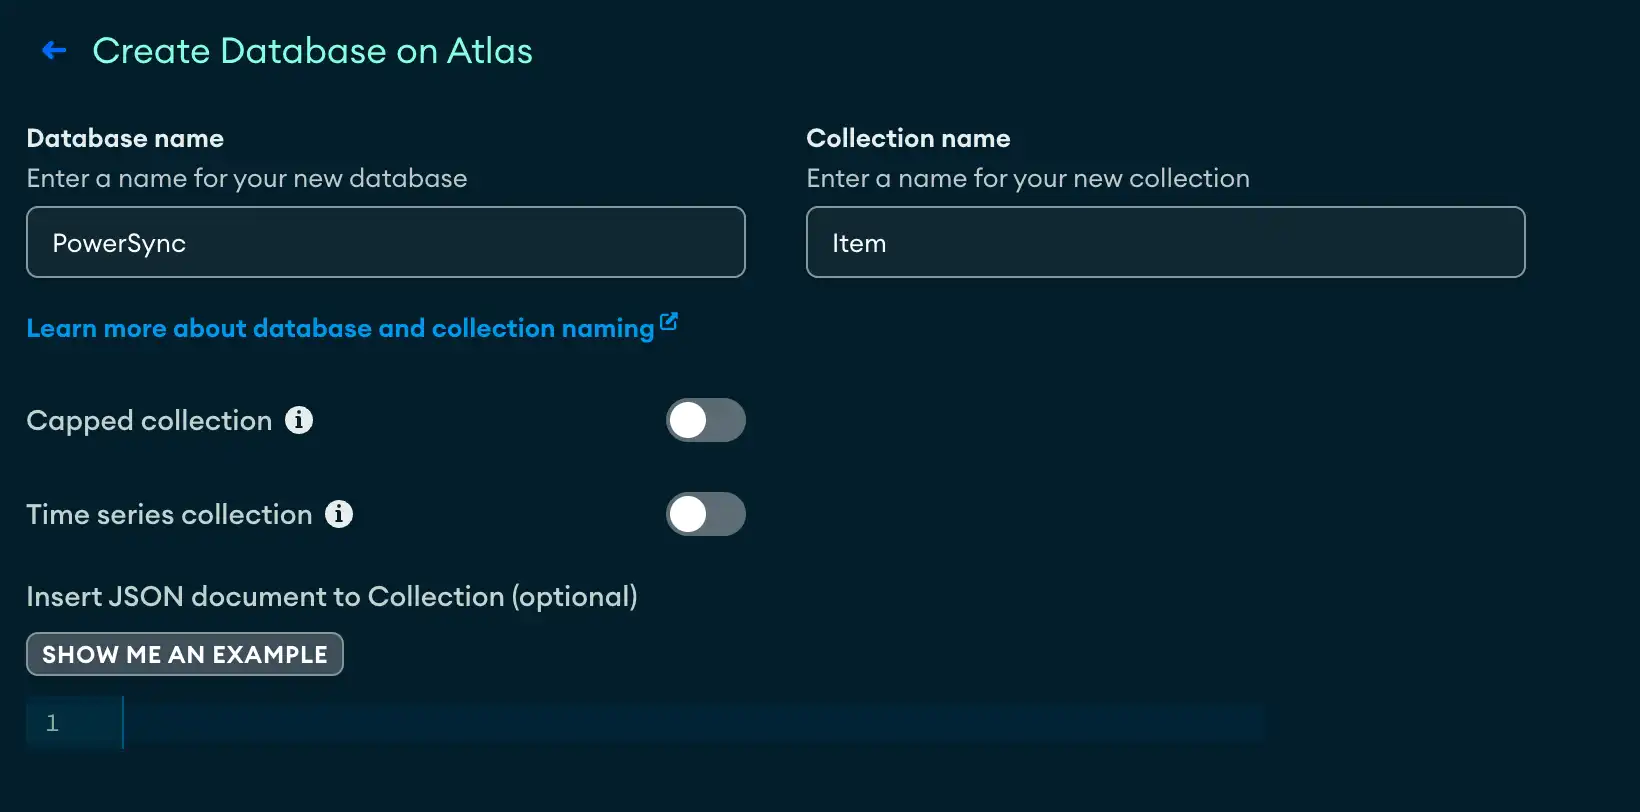
Create a database called PowerSync and a collection called Item, then click Create Database.
![Screenshot of the UI]()
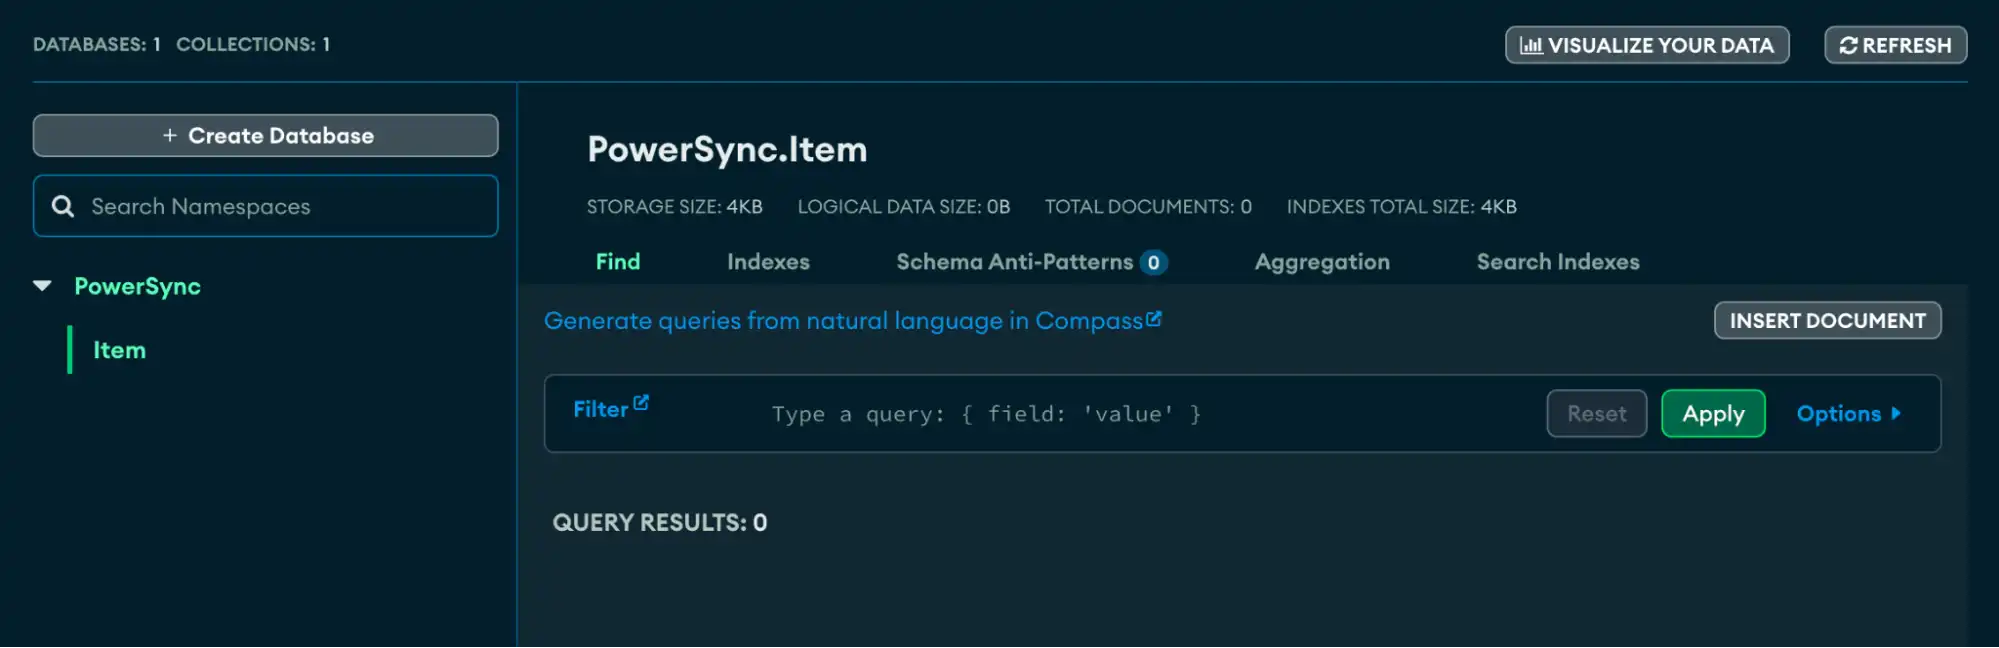
You are returned to the dashboard and should see the newly created database and collection:
![Screenshot of the UI]()
Finally, you need to create a new user that PowerSync will use to connect to this database.
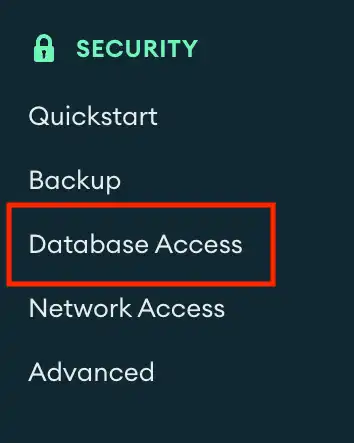
In the left sidebar, click Database Access under the Security heading.
![Screenshot of the UI]()
Click Add New Database User, and create a new user called
powersyncand provide a password. Note the username and password to use in the connection string you copied earlier.Note
If your username or password contains any of the following special characters, you must convert them to a URL-safe format for your connection string:
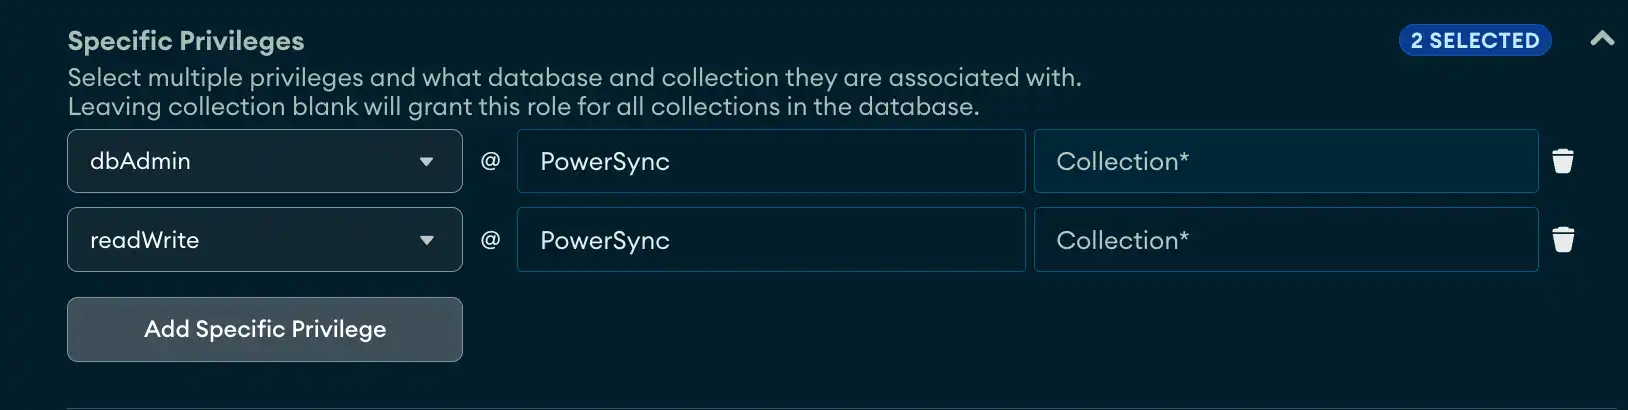
$,:,/,?,!,#,[,],@. You can do this manually or use a URL-encoding application, such as urlencoder.org.In the Database User Privileges section, click Add Specific Privilege and add a privilege for a
readWriteand adbAdminrole for the PowerSync database.![Screenshot of the UI]()
Click Add User.
You should see the newly created user with the required database permissions.
![Screenshot of the UI]()


For more details on user permissions, refer to the MongoDB section of the PowerSync Source Database Setup guide.
Add PowerSync IPs to IP Access List
In order for PowerSync to access the database running in Atlas, you must add the service IP addresses to the IP access list. These IP addresses are listed in the PowerSync Security & IP Filtering documentation.
In the left sidebar, click Network Access under the Security heading.
Click + Add IP Address and enter the IP address. To better assist anyone administering this list in the future, we also recommend entering PowerSync as the optional comment.
Click Confirm, and repeat for each IP.
Import Sample Data
If you haven't already, update the placeholders in the connection string that you copied earlier with the username and password for your database user.
In this step, you will import some sample data that will be used to sync data in future steps.
First, install MongoDB Database Tools to gain access to mongoimport.
Refer to the Installation guide
instructions for your operating system.
After you have installed database-tools, enter the following in the terminal
to confirm that you can access mongoimport:
mongoimport --version
This should return the version of the tool. Consult the above Installation guide if you are having problems.
Next, create a JSON file called sample.json with the following contents:
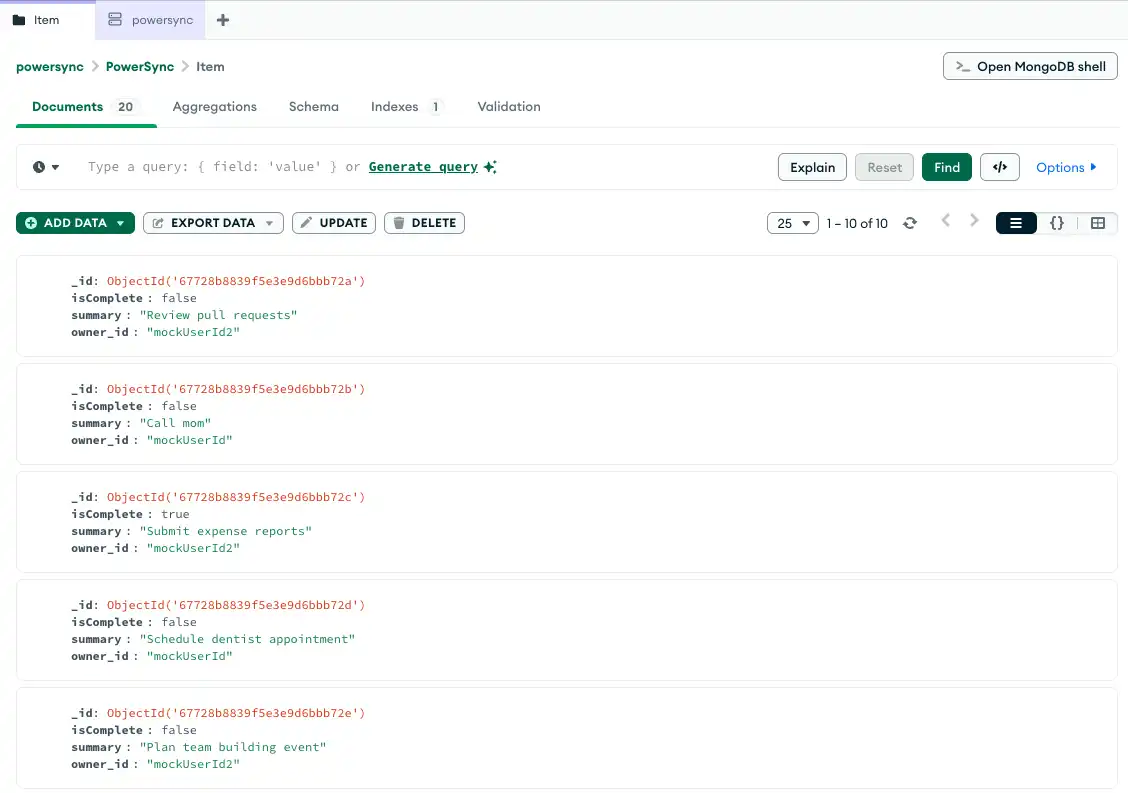
[ { "isComplete": false, "summary": "Complete project documentation", "owner_id": "mockUserId" }, { "isComplete": true, "summary": "Buy groceries", "owner_id": "mockUserId" }, { "isComplete": false, "summary": "Schedule dentist appointment", "owner_id": "mockUserId" }, { "isComplete": false, "summary": "Prepare presentation for next week", "owner_id": "mockUserId" }, { "isComplete": true, "summary": "Pay utility bills", "owner_id": "mockUserId" }, { "isComplete": false, "summary": "Fix bug in login system", "owner_id": "mockUserId2" }, { "isComplete": false, "summary": "Call mom", "owner_id": "mockUserId" }, { "isComplete": true, "summary": "Submit expense reports", "owner_id": "mockUserId2" }, { "isComplete": false, "summary": "Plan team building event", "owner_id": "mockUserId2" }, { "isComplete": false, "summary": "Review pull requests", "owner_id": "mockUserId2" } ]
This sample data contains some to-do list items. The owner_id will be used
for filtering examples later in this tutorial.
To import this JSON, enter the following command, replacing the
<connection-string> placeholder with your connection string:
mongoimport --uri="<connection-string>" --db=PowerSync --collection=Item --file=sample.json --jsonArray
You should see the following message:
10 document(s) imported successfully. 0 document(s) failed to import.
If not, confirm that your command parameters (including connection string) are correct and that your Atlas user has the correct database access.
You can view and manage the inserted documents by either navigating to your collection in the Atlas UI or using the MongoDB Compass visual desktop application. To view and manage your database and collections through MongoDB Compass, you must connect using the same connection string.

Setup PowerSync
Now navigate to PowerSync and register or sign in.
If you are signing in for the first time, you will need to create a new instance to get started.
Create a new instance called TodoList.

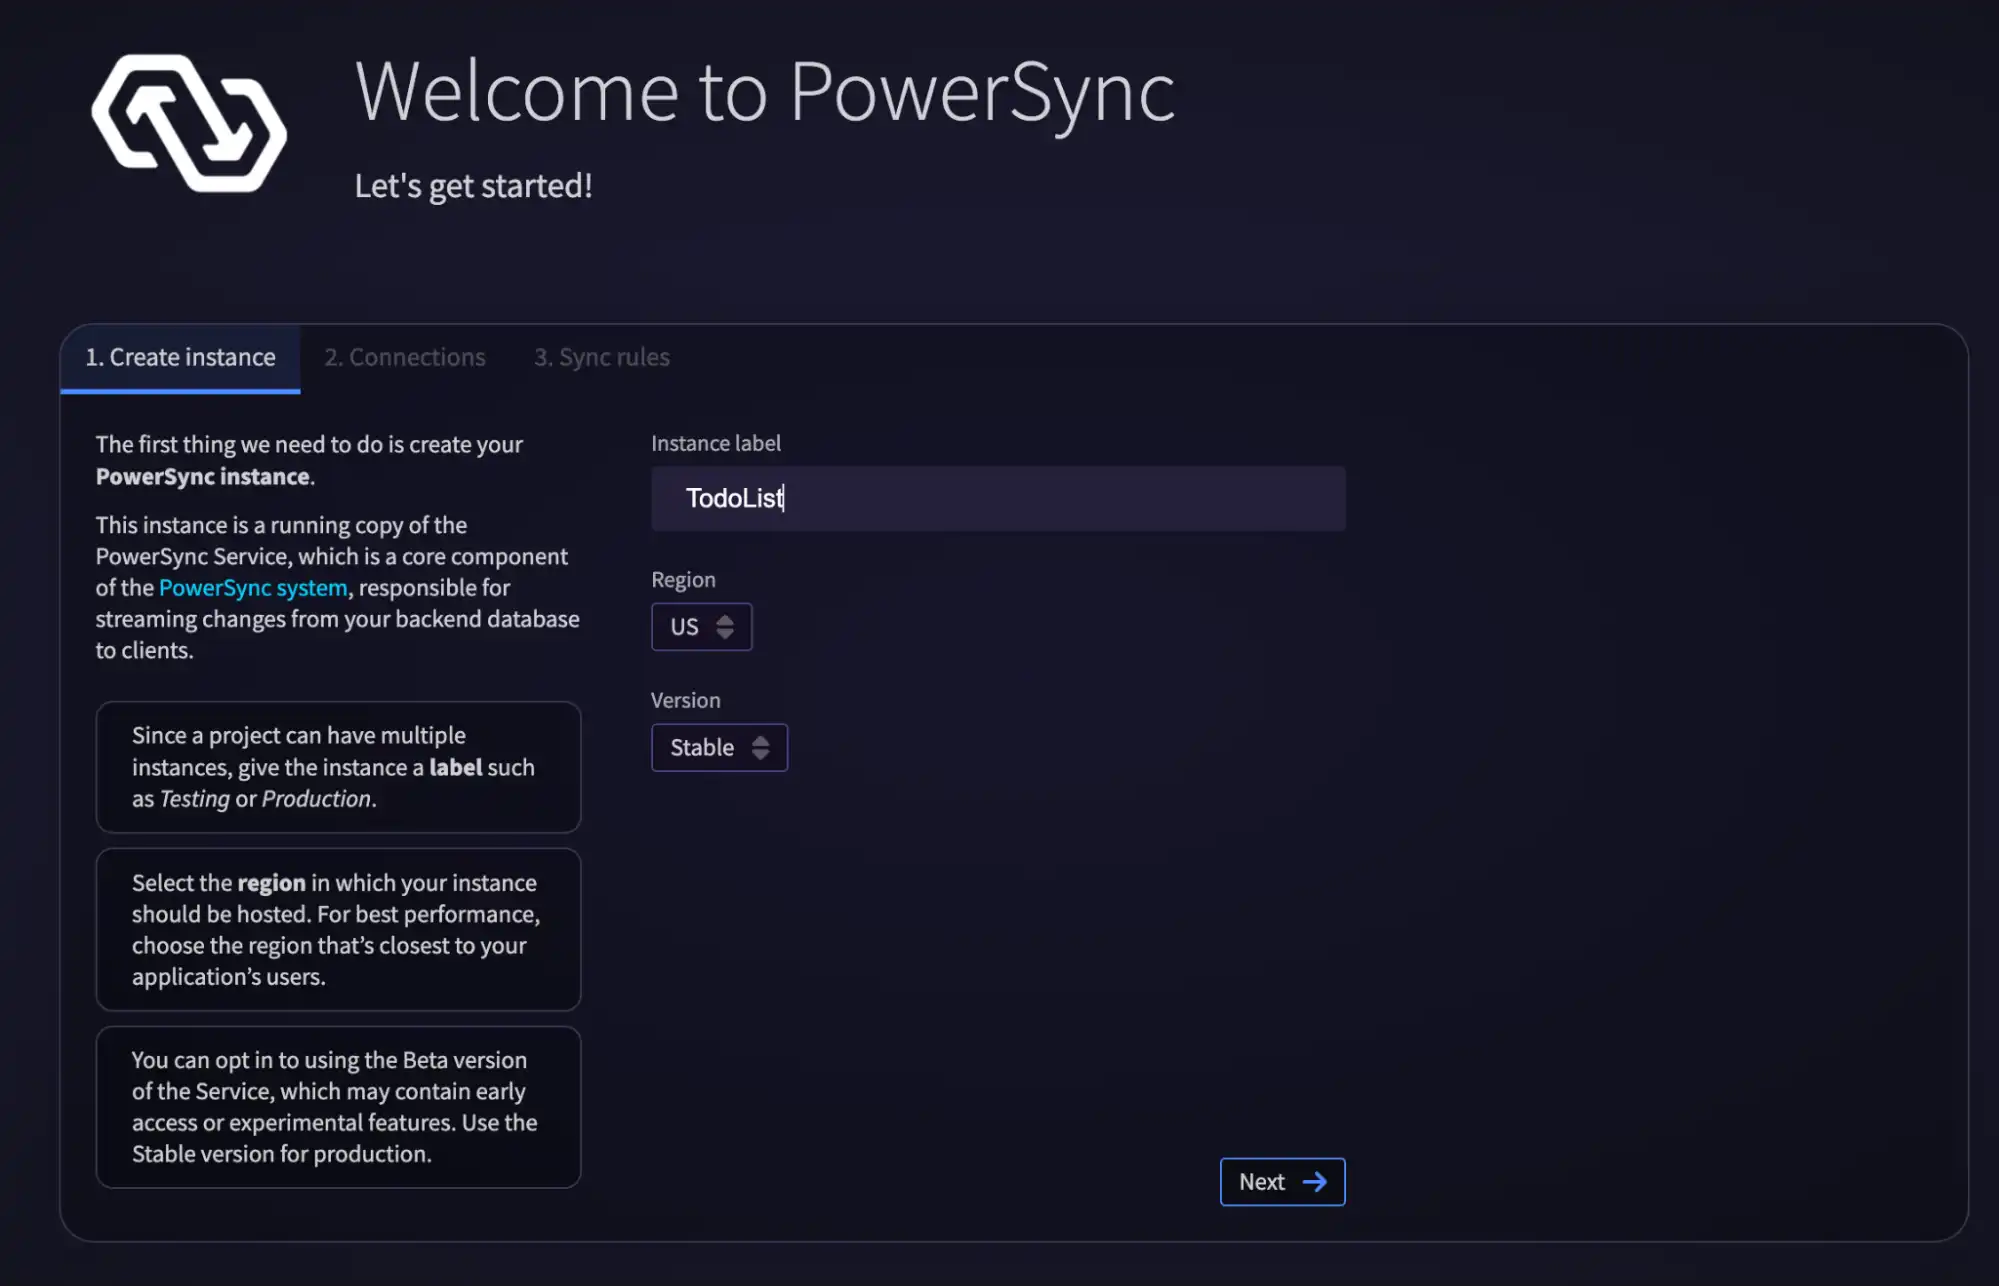
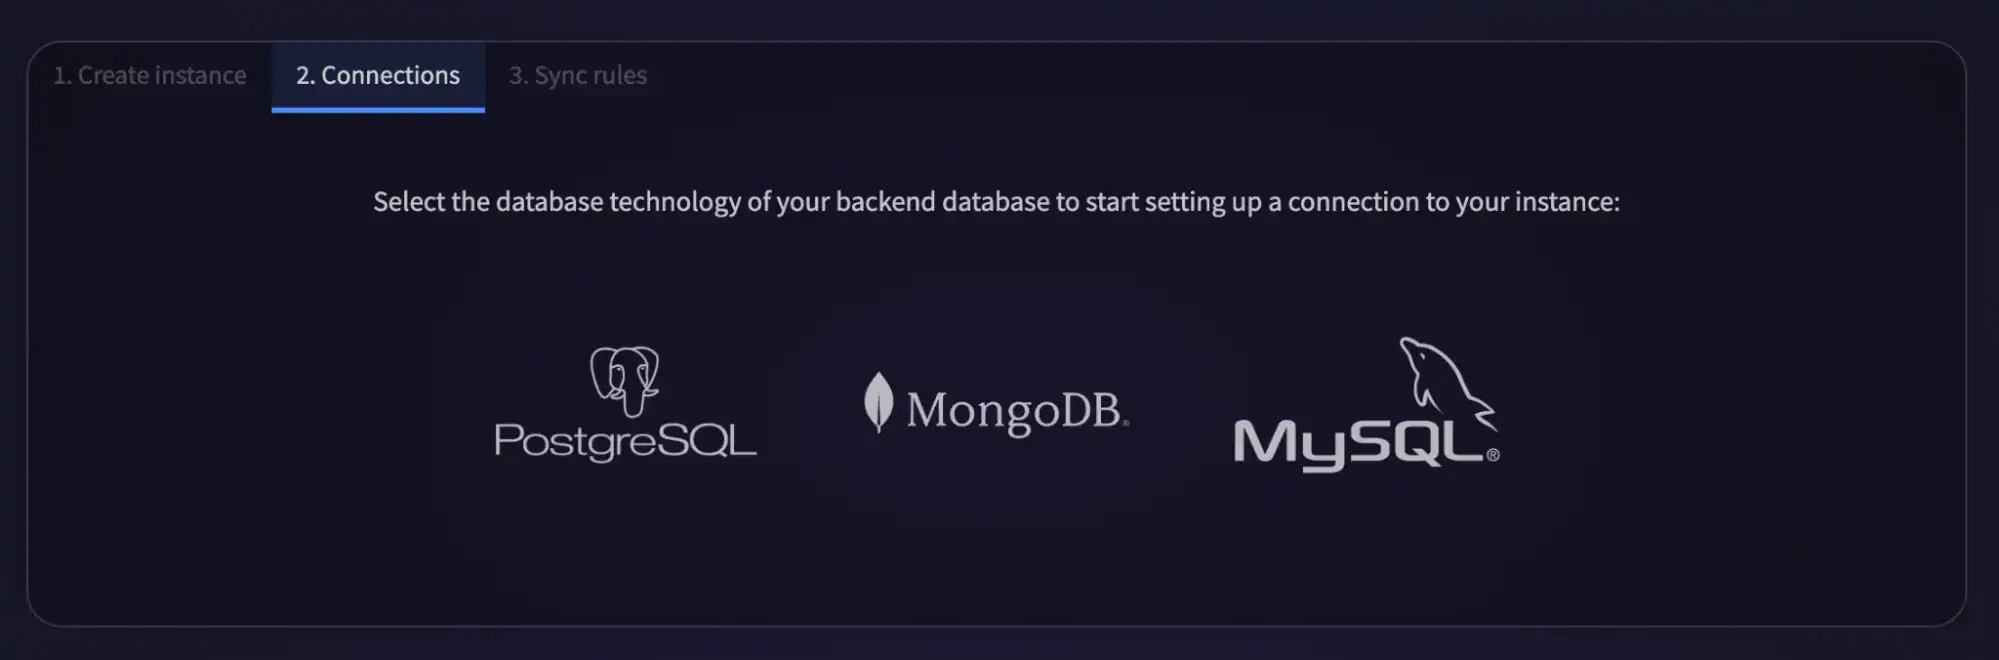
Select MongoDB as the connecting database.

Use your Atlas connection string to populate the connection settings.
Important
Use a shortened version of your connection string that does not contain
your username, password, or other URL parameters. For example, your
connection will look like mongodb+srv://m0cluster.h6folge.mongodb.net/.
Enter the Database name ("PowerSync"), username ("powersync"), and the password you assigned to this account in a previous step.

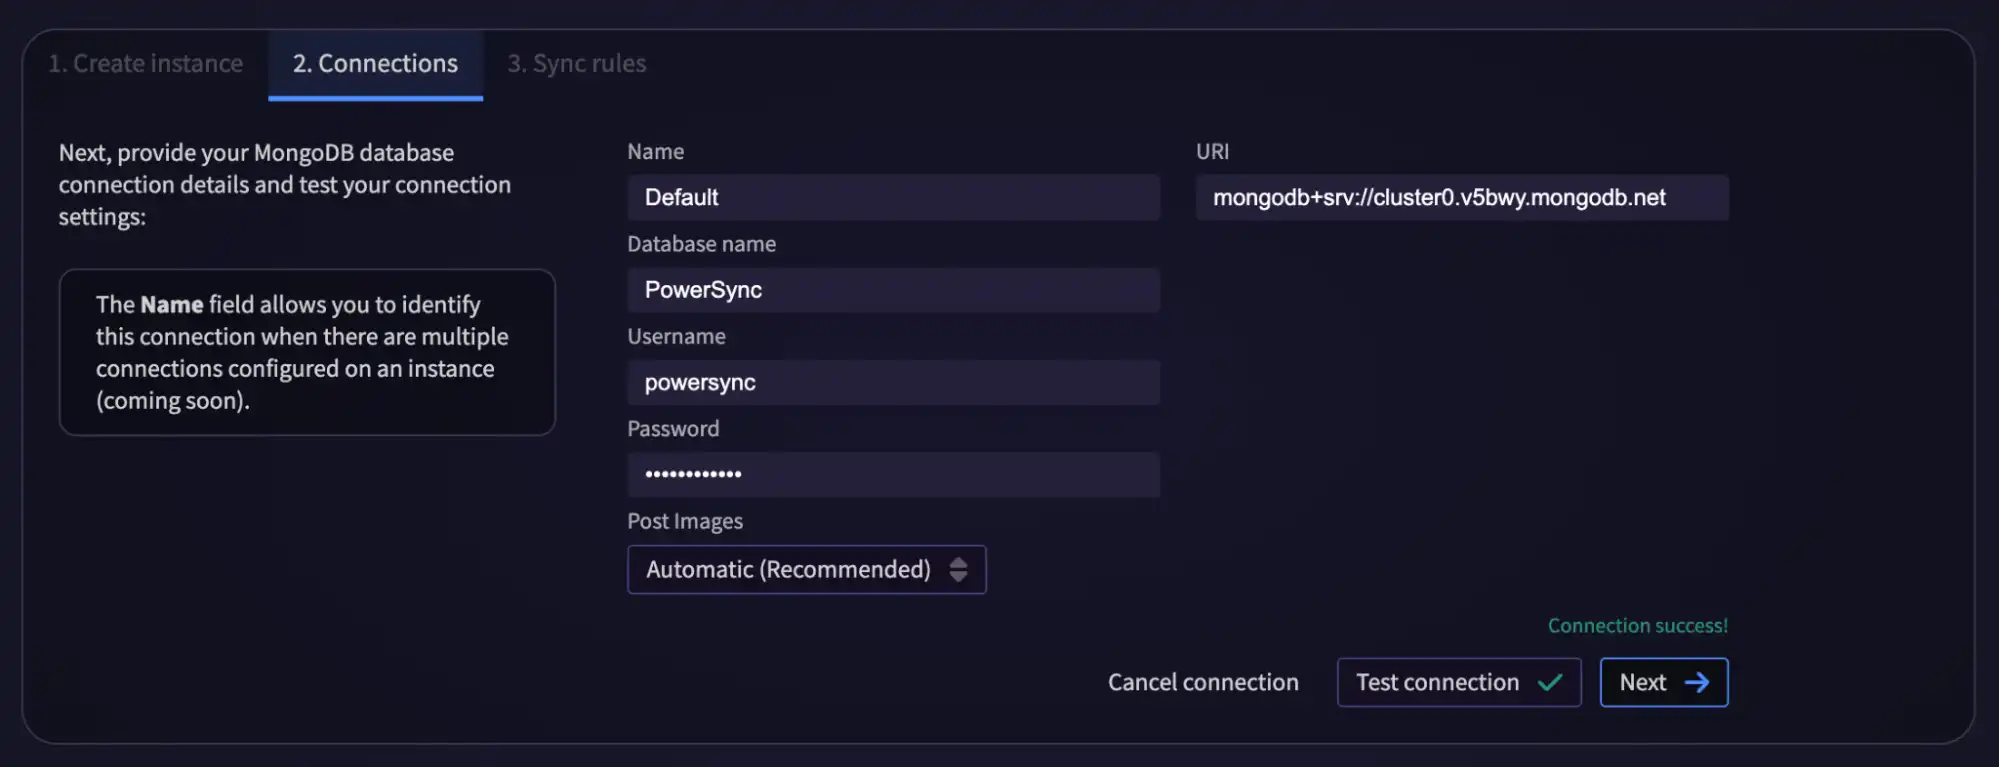
Click Test connection to ensure you can connect successfully.
If you see the following error, confirm that all of the required PowerSync service IPs are in your Atlas IP access list.


If you are still having issues, refer to the PowerSync Database Connection Guide for MongoDB connections.
Click Next to deploy your new PowerSync instance. This can take a few minutes to complete.
After your instance is deployed, you can ensure that you can view the migrated data by creating some basic sync rules.
First, remove the default sync rules and replace them with the following:
bucket_definitions: user_buckets: parameters: SELECT request.user_id() as user_id data: - SELECT _id as id, * FROM "Item" WHERE bucket.user_id = 'global' OR owner_id = bucket.user_id
For items to sync correctly to the PowerSync service, note the following:
The
_idmust be mapped toid.The collection name "Item" must be enclosed in quotation marks. This is because our collection name starts with a capital letter.
The user-specific buckets must match to a
user_idofglobal, which provides access to the entire database. Otherwise, you will match on the provideduser_id, which will be retrieved from the auth token.
Note that PowerSync Sync Rules are a pretty deep topic. To learn more, you can check out this Sync Rules blog post or the PowerSync Sync Rules documentation.
Click Save and Deploy. Once again, it may take quite a few minutes for the deployment to finish.
After the deployment completes, you should see the following:

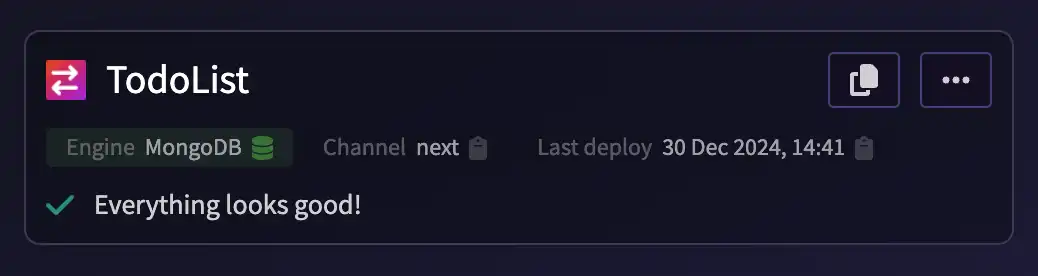
After the deployment completes, you should see the appropriate status.
If you get any errors, ensure that the PowerSync user is set up with the
permissions listed in the
PowerSync Source Database Setup
documentation.
Click Manage instances to review the sync rules and deployment status.
View Synced Data
To finalize this setup, you will use the PowerSync Diagnostics App to view the to-do list items you have just created and added to your sync rules. To use this tool, you first need to create a development token.
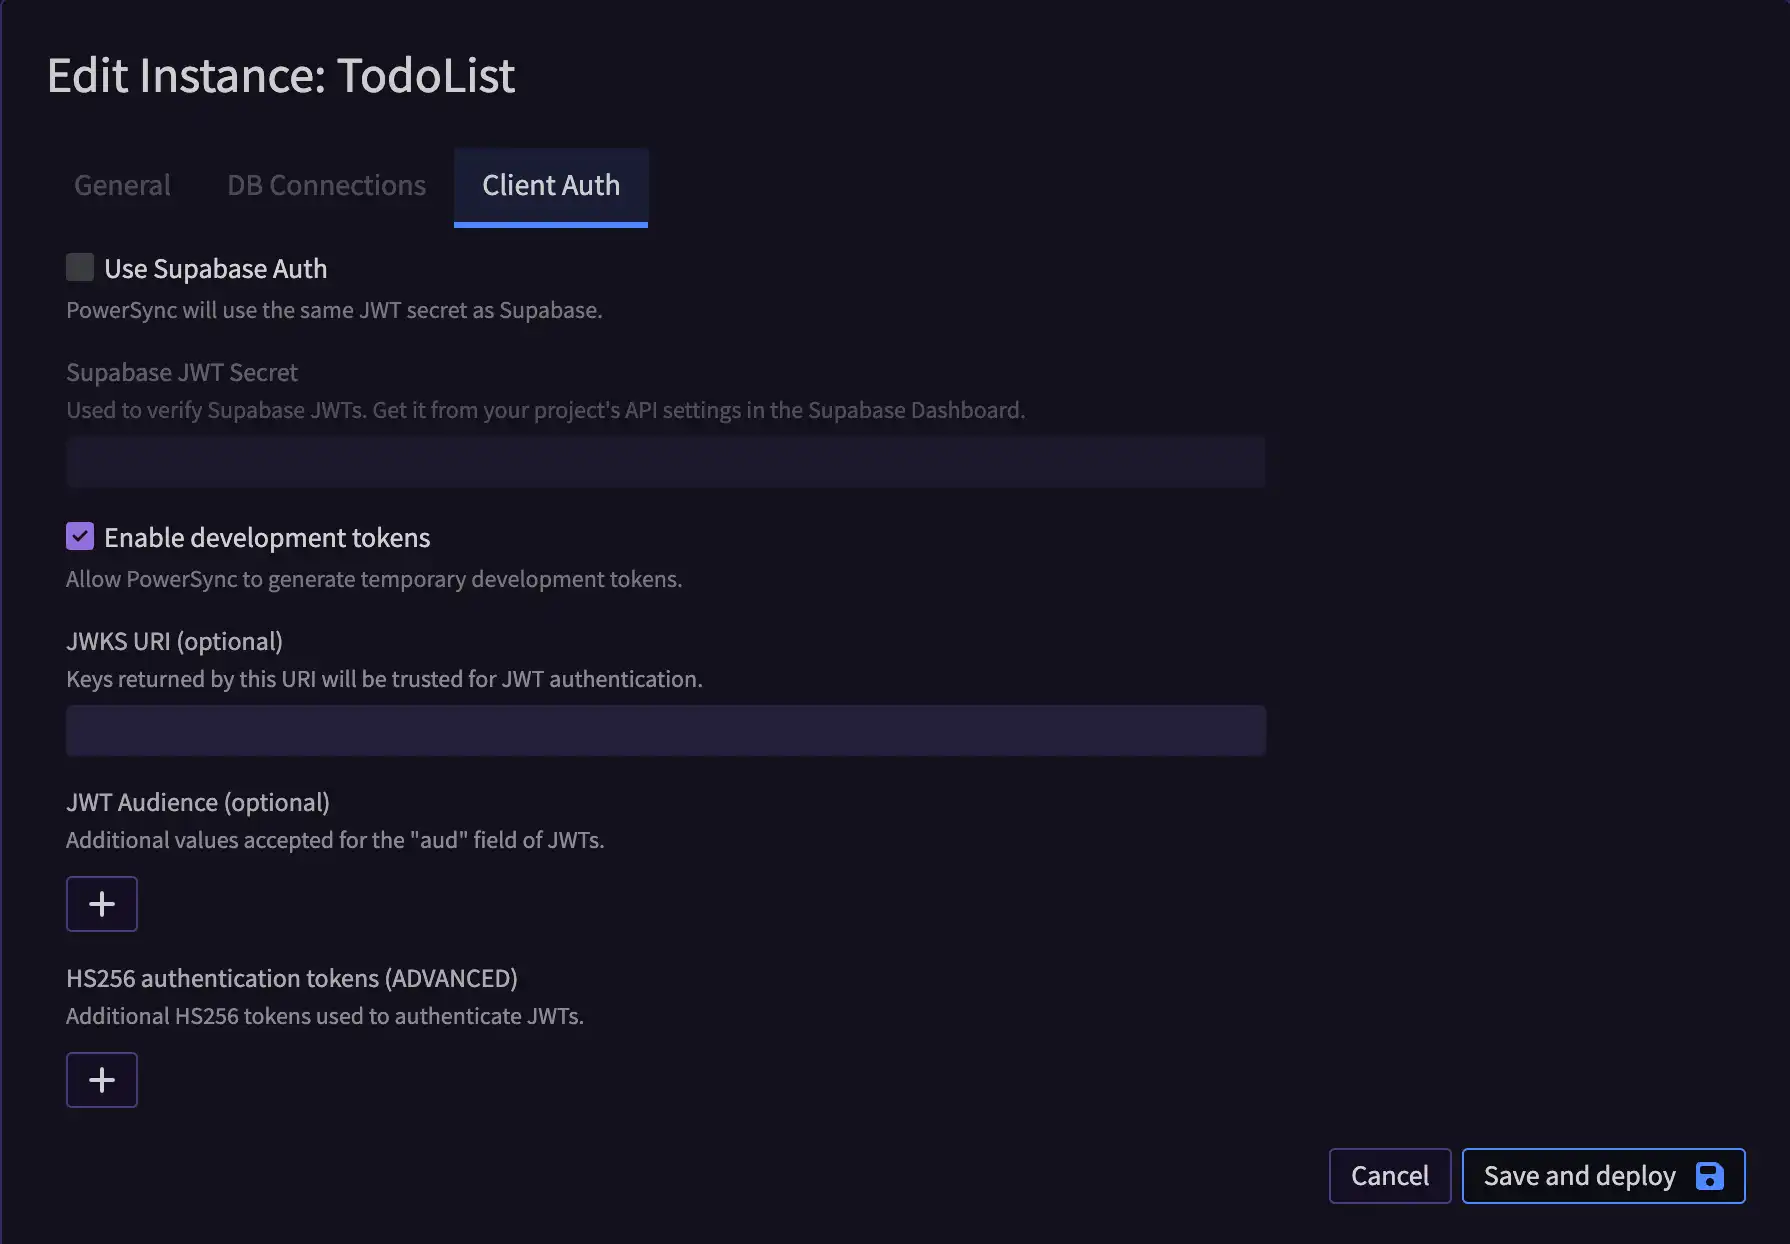
At the top of the PowerSync page, click
Manage Instances.In the left sidebar, click the ellipsis (…) next to TodoList to open the context menu for this instance, and then select Edit Instance.
Select the Client Auth tab, and click Enable development tokens.
Click Save and deploy.

Click the ellipsis (…) next to TodoList to open the context menu for this instance again, and select Generate Development Token.
You will be asked to provide a token subject/user_id. This will act as the
user_id, and you can set up your sync rules to act upon it.
With the sync rules we defined earlier, you can set the subject/user_id to
global to generate a token that will have access to the entire dataset. You
can also set this to mockUserId or mockUserId2 to sync on a specific
owner_id.
Copy the generated token, then open the Diagnostics App and paste in the Development Token.
Note
The Development Token will expire in 12 hours. The diagnostics tool will stop syncing with Atlas after expiry, so you must generate a new token if you want it to resume syncing.
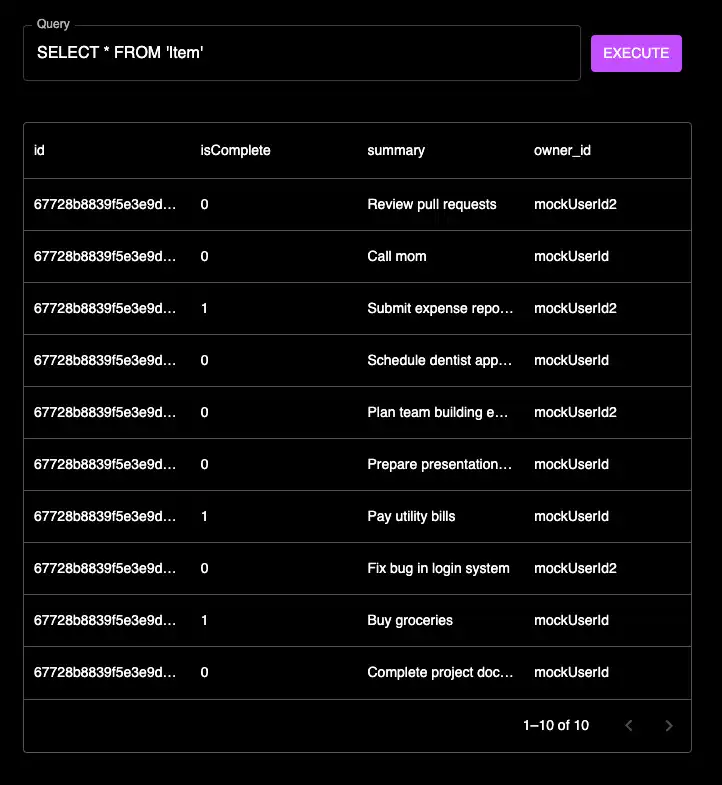
You should see a page similar to this one.

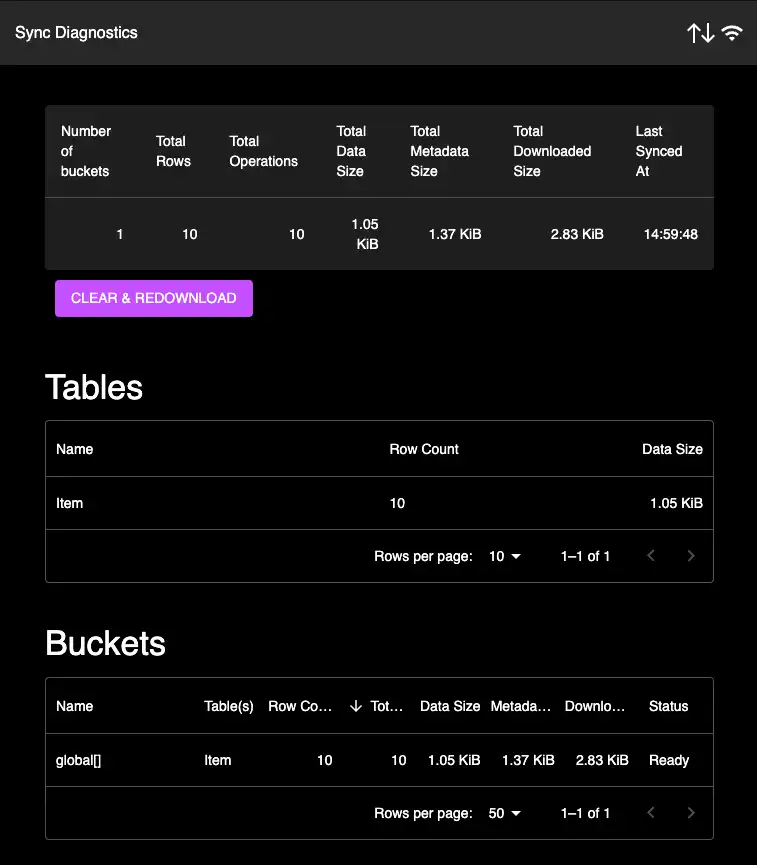
In the left sidebar, click SQL Console.
Create a SELECT query to view all items:
SELECT * FROM Item

You now have all the services necessary to sync your MongoDB database to a mobile application.
Phase 2: Prepare Realm App for Migration
Clone Initial Project
In this phase, you are going to clone a Realm todo list application for React
Native. The main branch of the example repository
contains the final result of the migration.
To follow along with this guide using the example repo, checkout the 00-Start-Here
branch:
git clone https://github.com/takameyer/realm2powersync cd realm2powersync git checkout 00-Start-Here
Next, install the dependencies, so that the editor can pick up any imports and ensure there are no errors as you're editing this project.
Important
This tutorial assumes you have the latest version of Node.js installed.
npm install
Because the application assumes there is an Atlas cluster with an active Device Sync service, it is not yet runnable. In the next steps, you will make the modifications needed to run the project as a local-only application.
Refactor Device Sync Project to Local Only
You must remove the Atlas Device Sync parts so that the application is running with local-only data.
First, open source/AppWrapper.txs, and remove the AppProvider,
UserProvider, and sync configuration.
The updated AppWrapper.txs file should resemble the following:
import React from 'react'; import { StyleSheet, View, ActivityIndicator } from 'react-native'; import { RealmProvider } from '@realm/react'; import { App } from './App'; import { Item } from './ItemSchema'; const LoadingIndicator = () => { return ( <View style={styles.activityContainer}> <ActivityIndicator size="large" /> </View> ); }; export const AppWrapper = () => { return ( <RealmProvider schema={[Item]} fallback={LoadingIndicator}> <App /> </RealmProvider> ); }; const styles = StyleSheet.create({ activityContainer: { flex: 1, flexDirection: 'row', justifyContent: 'space-around', padding: 10, }, });
Next, open source/App.tsx, and remove the parts about dataExplorerLink
and the header buttons for OfflineMode and Logout (this will be implemented
later).
The updated App.tsx file should resemble the following:
import React from 'react'; import { SafeAreaProvider } from 'react-native-safe-area-context'; import { StyleSheet, Text, View } from 'react-native'; import { NavigationContainer } from '@react-navigation/native'; import { createStackNavigator } from '@react-navigation/stack'; import { LogoutButton } from './LogoutButton'; import { ItemListView } from './ItemListView'; import { OfflineModeButton } from './OfflineModeButton'; const Stack = createStackNavigator(); const headerRight = () => { return <OfflineModeButton />; }; const headerLeft = () => { return <LogoutButton />; }; export const App = () => { return ( <> {/* All screens nested in RealmProvider have access to the configured realm's hooks. */} <SafeAreaProvider> <NavigationContainer> <Stack.Navigator> <Stack.Screen name="Your To-Do List" component={ItemListView} options={{ headerTitleAlign: 'center', //headerLeft, //headerRight, }} /> </Stack.Navigator> </NavigationContainer> <View style={styles.footer}> <Text style={styles.footerText}> Log in with the same account on another device or simulator to see your list sync in real time. </Text> </View> </SafeAreaProvider> </> ); }; const styles = StyleSheet.create({ footerText: { fontSize: 12, textAlign: 'center', marginVertical: 4, }, hyperlink: { color: 'blue', }, footer: { paddingHorizontal: 24, paddingVertical: 12, }, });
Finally, open source/ItemListView.tsx, and make the following updates:
Remove the flexible sync subscription code
Replace user with a mock user: -
const user={ id: 'mockUserId' };Remove any
dataExplorererreferencesRemove functionality of the
Show All Tasksswitch (this will be implemented later)
The updated ItemListView.tsx file should resemble the following:
import React, { useCallback, useState, useEffect } from 'react'; import { BSON } from 'realm'; import { useRealm, useQuery } from '@realm/react'; import { SafeAreaProvider } from 'react-native-safe-area-context'; import { Alert, FlatList, StyleSheet, Switch, Text, View } from 'react-native'; import { Button, Overlay, ListItem } from '@rneui/base'; import { CreateToDoPrompt } from './CreateToDoPrompt'; import { Item } from './ItemSchema'; import { colors } from './Colors'; export function ItemListView() { const realm = useRealm(); const items = useQuery(Item).sorted('_id'); const user = { id: 'mockUserId' }; const [showNewItemOverlay, setShowNewItemOverlay] = useState(false); const [showAllItems, setShowAllItems] = useState(true); // createItem() takes in a summary and then creates an Item object with that summary const createItem = useCallback( ({ summary }: { summary: string }) => { // if the realm exists, create an Item realm.write(() => { return new Item(realm, { summary, owner_id: user?.id, }); }); }, [realm, user], ); // deleteItem() deletes an Item with a particular _id const deleteItem = useCallback( (id: BSON.ObjectId) => { // if the realm exists, get the Item with a particular _id and delete it const item = realm.objectForPrimaryKey(Item, id); // search for a realm object with a primary key that is an objectId if (item) { if (item.owner_id !== user?.id) { Alert.alert("You can't delete someone else's task!"); } else { realm.write(() => { realm.delete(item); }); } } }, [realm, user], ); // toggleItemIsComplete() updates an Item with a particular _id to be 'completed' const toggleItemIsComplete = useCallback( (id: BSON.ObjectId) => { // if the realm exists, get the Item with a particular _id and update it's 'isCompleted' field const item = realm.objectForPrimaryKey(Item, id); // search for a realm object with a primary key that is an objectId if (item) { if (item.owner_id !== user?.id) { Alert.alert("You can't modify someone else's task!"); } else { realm.write(() => { item.isComplete = !item.isComplete; }); } } }, [realm, user], ); return ( <SafeAreaProvider> <View style={styles.viewWrapper}> <View style={styles.toggleRow}> <Text style={styles.toggleText}>Show All Tasks</Text> <Switch trackColor={{ true: '#00ED64' }} onValueChange={() => { setShowAllItems(!showAllItems); }} value={showAllItems} /> </View> <Overlay isVisible={showNewItemOverlay} overlayStyle={styles.overlay} onBackdropPress={() => setShowNewItemOverlay(false)}> <CreateToDoPrompt onSubmit={({ summary }) => { setShowNewItemOverlay(false); createItem({ summary }); }} /> </Overlay> <FlatList keyExtractor={item => item._id.toString()} data={items} renderItem={({ item }) => ( <ListItem key={`${item._id}`} bottomDivider topDivider> <ListItem.Title style={styles.itemTitle}> {item.summary} </ListItem.Title> <ListItem.Subtitle style={styles.itemSubtitle}> <Text>{item.owner_id === user?.id ? '(mine)' : ''}</Text> </ListItem.Subtitle> <ListItem.Content> {!item.isComplete && ( <Button title="Mark done" type="clear" onPress={() => toggleItemIsComplete(item._id)} /> )} <Button title="Delete" type="clear" onPress={() => deleteItem(item._id)} /> </ListItem.Content> </ListItem> )} /> <Button title="Add To-Do" buttonStyle={styles.addToDoButton} onPress={() => setShowNewItemOverlay(true)} /> </View> </SafeAreaProvider> ); } const styles = StyleSheet.create({ viewWrapper: { flex: 1, }, sectionContainer: { marginTop: 32, paddingHorizontal: 24, }, addToDoButton: { backgroundColor: colors.primary, borderRadius: 4, margin: 5, }, completeButton: { backgroundColor: colors.primary, borderRadius: 4, margin: 5, }, showCompletedButton: { borderRadius: 4, margin: 5, }, showCompletedIcon: { marginRight: 5, }, itemTitle: { flex: 1, }, itemSubtitle: { color: '#979797', flex: 1, }, toggleRow: { flexDirection: 'row', alignItems: 'center', padding: 12, }, toggleText: { flex: 1, fontSize: 16, }, overlay: { backgroundColor: 'white', }, status: { width: 40, height: 40, justifyContent: 'center', borderRadius: 5, borderWidth: 1, borderColor: '#d3d3d3', backgroundColor: '#ffffff', alignSelf: 'flex-end', }, delete: { alignSelf: 'flex-end', width: 65, marginHorizontal: 12, }, statusCompleted: { borderColor: colors.purple, }, statusIcon: { textAlign: 'center', fontSize: 17, color: colors.purple, }, });
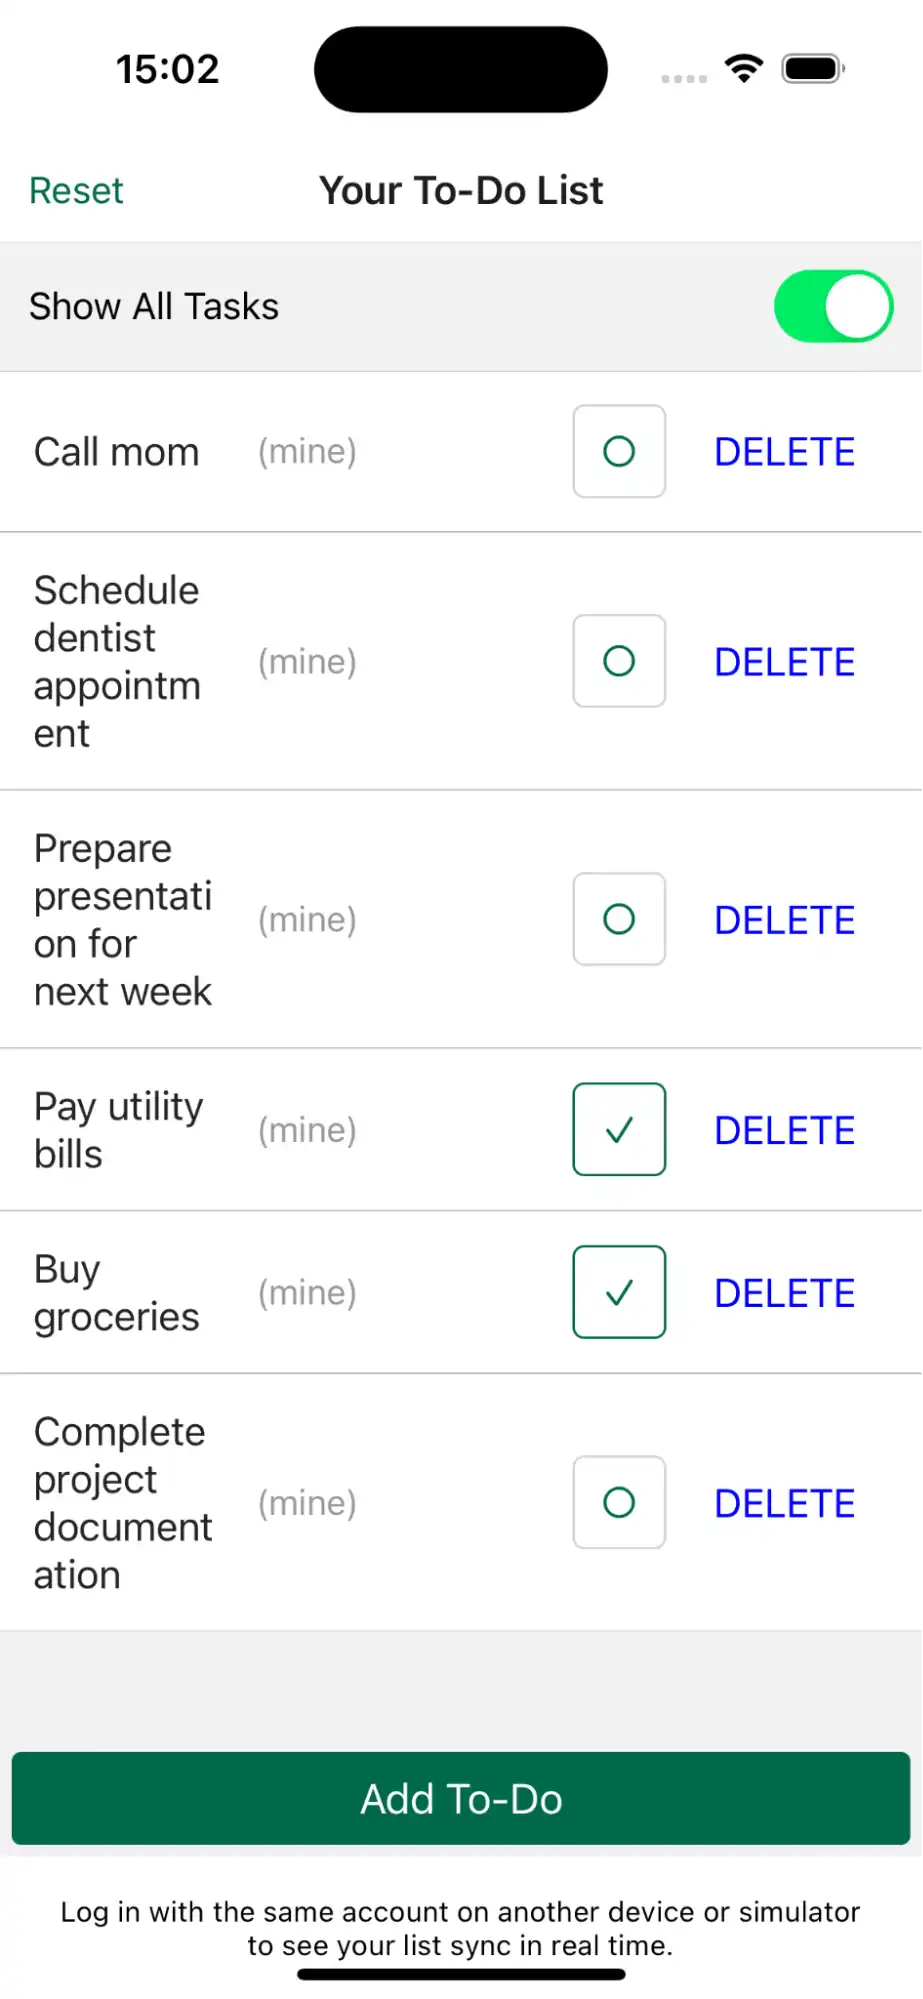
With these changes, the app should work against a local database.
Run and Verify Changes
Before you begin the migration, you need to build and run the updated application to verify that it works as intended.
For iOS, run the following commands:
npx pod-install npm run ios
For Android, run the following command:
npm run android
Note that any build errors are out of the scope of this documentation. If you are experiencing build-related issues, consult the React Native documentation to ensure that your environment is set up correctly.
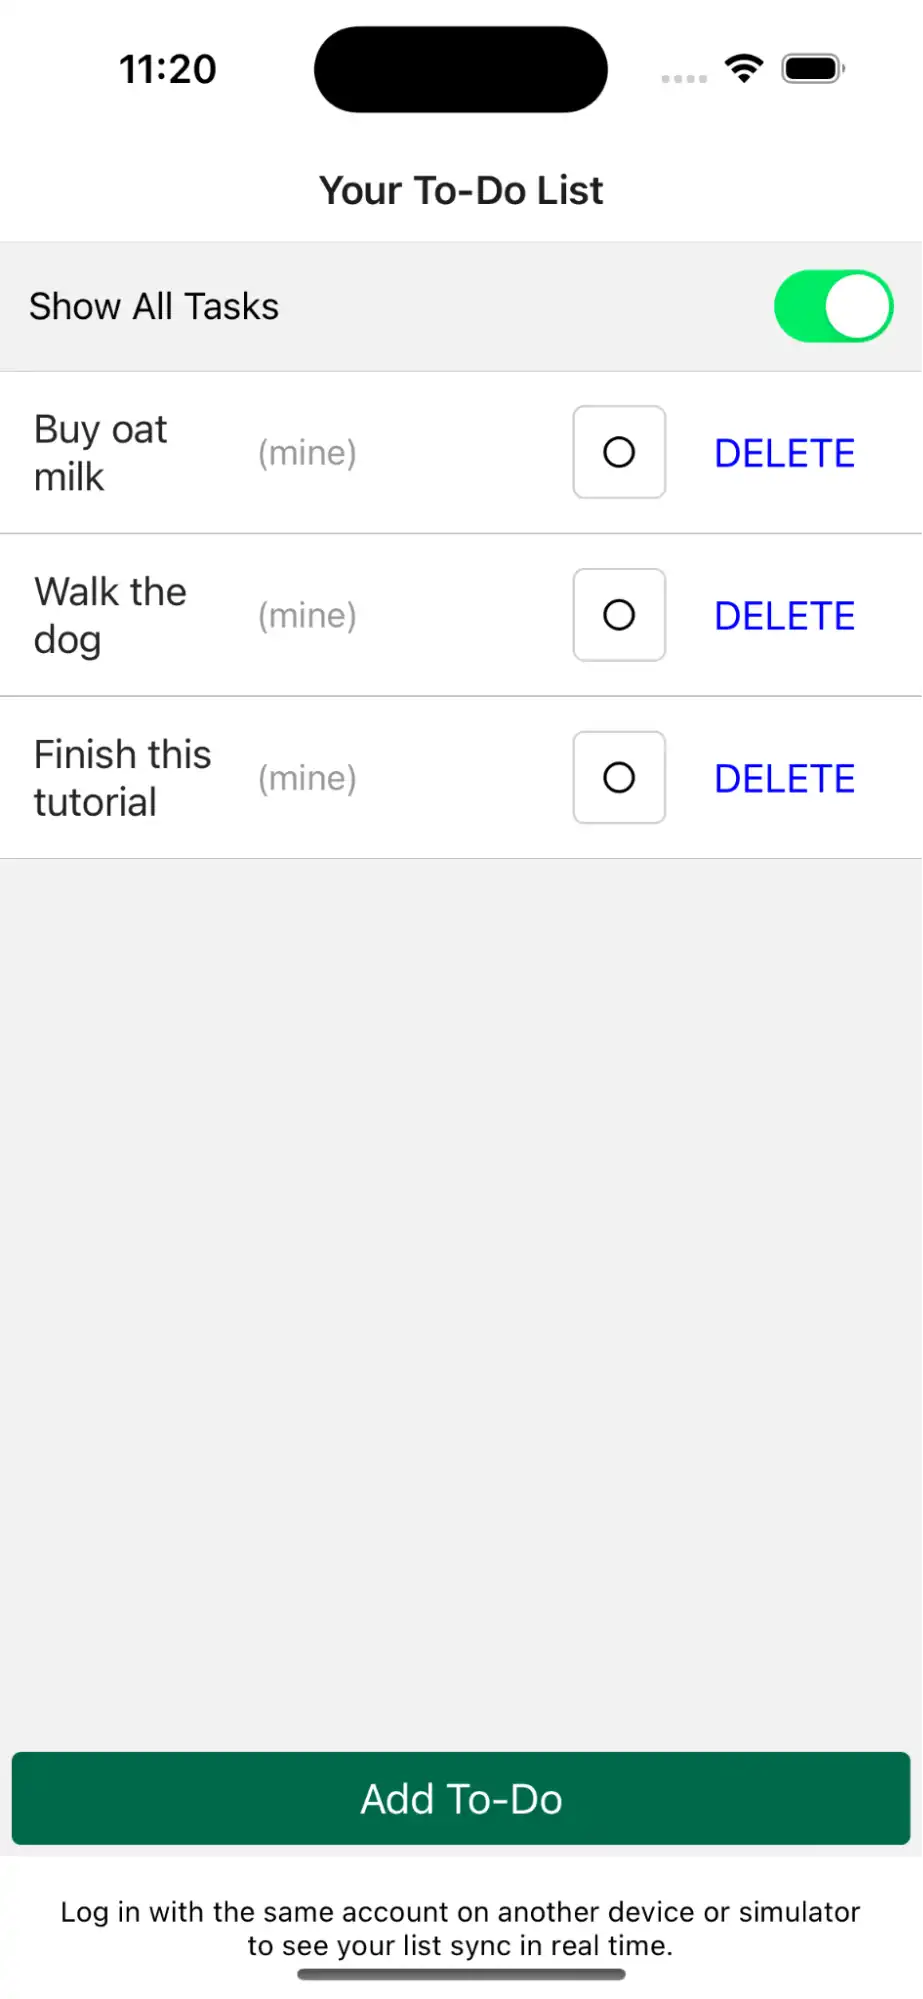
While your app is running, you can verify the basic functionality. You should be able to:
Create new items
Mark items as done
Delete items

Phase 3: Migrate from Realm to the PowerSync Client
Install Dependencies
Now that you have a local-only Realm application running, you can begin to convert this application to use a local-only version of the PowerSync client.
PowerSync uses an SQLite-based database, so you will need to make some modifications to the schema to ensure that it is compatible.
To accomplish this, you'll need to set up the PowerSync client. For detailed instructions, you can refer to the @powersync/react-native npm repository or the PowerSync React Native Setup documentation.
First, run the following command to add dependencies for the PowerSync React Native
Client, the backing SQLite database, an async iterator polyfill (required as per
instructions), as well as the bson dependency (used to generate ObjectId``s for
inserting documents into MongoDB):
npm install @powersync/react-native @journeyapps/react-native-quick-sqlite @azure/core-asynciterator-polyfill bson
To setup the polyfill, open index.js, and add import '@azure/core-asynciterator-polyfill';
to the top of the file.
The updated index.js file should resemble the following:
import '@azure/core-asynciterator-polyfill'; import 'react-native-get-random-values'; import {AppRegistry} from 'react-native'; import {AppWrapper} from './source/AppWrapper'; import {name as appName} from './app.json'; AppRegistry.registerComponent(appName, () => AppWrapper);
Now that the dependencies are added, you need to rebuild the application:
For iOS, run
pod-install.For Android, update the minimum required SDK to 24 to be compatible with
react-native-quick-sqlite. To do this, openandroid/build.gradleand changeminSdkVersionfrom 21 to 24.
Migrate Data Schema
Now you will set up the data types and schemas for the local database.
Refer to the PowerSync MongoDB Type Mapping documentation to determine how to set up your specific schema. The following is a quick reference of the available types:
Type | Description |
|---|---|
null | undefined, or unset values |
integer | a 64-bit signed integer |
real | a 64-bit floating point number |
text | a UTF-8 text string |
blob | binary data |
For this tutorial, you will modify source/ItemSchema.tsx as follows:
import {column, Schema, Table} from '@powersync/react-native'; export const ItemSchema = new Table({ isComplete: column.integer, summary: column.text, owner_id: column.text, }); export const AppSchema = new Schema({ Item: ItemSchema, }); export type Database = (typeof AppSchema)['types']; export type Item = Database['Item'];
Important
The property name passed into Schema represents the name of the
local table and the MongoDB collection. In this case, ensure it is named
Item.
Note that this code exports the types directly out of the AppSchema, instead
of having to define them manually.
Refactor Application Code
To get access to PowerSync and bind your data, you will need access to the hooks and providers for the PowerSync client. This functionality is provided through the PowerSyncContext component.
First, update source/AppWrapper.tsx to use the PowerSyncContext and
initialize your PowerSync client:
import React from 'react'; import {App} from './App'; import {AppSchema} from './ItemSchema'; import {PowerSyncContext, PowerSyncDatabase} from '@powersync/react-native'; const powerSync = new PowerSyncDatabase({ schema: AppSchema, database: { dbFilename: 'powersync.db', }, }); powerSync.init(); export const AppWrapper = () => { return ( <PowerSyncContext.Provider value={powerSync}> <App /> </PowerSyncContext.Provider> ); };
Next, update ItemListView.tsx to use the PowerSync client. To achieve this, you
must update the hooks used at the top of this component:
To get access to the local database for making writes and updates, use the
usePowerSynchook.To get a list of todo list items that automatically rerender on update, use the
useQueryhook.
Make the following changes:
Remove
import { BSON } from 'realm';Add
import { ObjectId } from 'bson';Change the first two lines of the
ItemListViewfunction to match the following:export function ItemListView() { const db = usePowerSync(); const {data: items} = useQuery<Item>('SELECT * FROM Item');
Next, you need to update the createItem, deleteItem, and
toggleItemIsComplete methods.
For each of these methods, you will be using the db object returned from
usePowerSync. As with Realm, the local database opens a transaction
to perform any mutable operations, such as insert, update, or delete. You will
also add try/catch blocks to propagate any errors to the frontend of the application.
Note that the code is importing ObjectId from bson to
create the unique ids for each item. Keep in mind that PowerSync expects the
primary key items to be named id.
The create code also implements the default values for the items directly in this logic.
In this case, isComplete is initialized to false, and the id is initialized
with the string result of the newly created ObjectId.
The createItem method can be implemented as follows:
// createItem() takes in a summary and then creates an Item object with that summary const createItem = useCallback( async ({summary}: {summary: string}) => { try { // start a write transaction to insert the new Item db.writeTransaction(async tx => { await tx.execute( 'INSERT INTO Item (id, summary, owner_id, isComplete) VALUES (?, ?, ?, ?)', [new ObjectId().toHexString(), summary, user?.id, false], ); }); } catch (ex: any) { Alert.alert('Error', ex?.message); } }, [db], );
The deleteItem and toggleItemIsComplete methods are similar, so implement
them as follows:
// deleteItem() deletes an Item with a particular _id const deleteItem = useCallback( async (id: String) => { // start a write transaction to delete the Item try { db.writeTransaction(async tx => { await tx.execute('DELETE FROM Item WHERE id = ?', [id]); }); } catch (ex: any) { Alert.alert('Error', ex?.message); } }, [db], ); // toggleItemIsComplete() updates an Item with a particular _id to be 'completed' const toggleItemIsComplete = useCallback( async (id: String) => { // start a write transaction to update the Item try { db.writeTransaction(async tx => { await tx.execute( 'UPDATE Item SET isComplete = NOT isComplete WHERE id = ?', [id], ); }); } catch (ex: any) { Alert.alert('Error', ex?.message); } }, [db], );
Finally, update the rendered FlatList. You will:
Replace instances of
_idwithidUpdate the
keyExtractorof theFlatListto use theidstring directly.Previously, the database was returning an
ObjectId. This will need to be converted into a string.
The updated FlatList now resembles the following:
<FlatList keyExtractor={item => item.id} data={items} renderItem={({item}) => ( <ListItem key={`${item.id}`} bottomDivider topDivider> <ListItem.Title style={styles.itemTitle}> {item.summary} </ListItem.Title> <ListItem.Subtitle style={styles.itemSubtitle}> <Text>{item.owner_id === user?.id ? '(mine)' : ''}</Text> </ListItem.Subtitle> <ListItem.Content> <Pressable accessibilityLabel={`Mark task as ${ item.isComplete ? 'not done' : 'done' }`} onPress={() => toggleItemIsComplete(item.id)} style={[ styles.status, item.isComplete && styles.statusCompleted, ]}> <Text style={styles.statusIcon}> {item.isComplete ? '✓' : '○'} </Text> </Pressable> </ListItem.Content> <ListItem.Content> <Pressable accessibilityLabel={'Remove Item'} onPress={() => deleteItem(item.id)} style={styles.delete}> <Text style={[styles.statusIcon, {color: 'blue'}]}> DELETE </Text> </Pressable> </ListItem.Content> </ListItem> )} />
Run and Verify Changes
After you are done updating the code, you should be able to use a local PowerSync client.
To verify, rebuild the application. If you are using iOS, don't forget to update
the Pods with npx pod-install.
You should now have a working application that enables you to add, update, and delete todo list items using PowerSync.
If you encounter issues, you can view the changes made up to this point in the 02-Migrate-Local-Client branch of the example repository.
Your mobile application is now ready to sync data in real-time from MongoDB.
Note
You have probably noticed that the Realm data has not yet been migrated. This guide assumes that the MongoDB cluster hosted in Atlas is the source of truth for the data and sync this to the application. Migrating local data is out of scope for this tutorial but may be addressed in future documentation.
Phase 4: Sync Data from Atlas to PowerSync
Initial Setup
You should now have a running PowerSync service that contains synchronized data from Atlas, which has been verified using the PowerSync diagnostics tool.
In this phase, you will get this data to sync into the React Native application.
To get started, you need to create a way to set some environment variables for tokens and endpoints.
First, install react-native-dotenv to your dev dependencies. This is a babel
plugin that takes a .env file from the root of the project and enables you to
import environment variables directly into the application.
npm install -D react-native-dotenv
Next, add the following line to the babel.config.js file:
module.exports = { presets: ['module:metro-react-native-babel-preset'], plugins: ['module:react-native-dotenv'], };
Create a new directory called types, and in that, create a new file named
env.d.ts that contains the following variables we want to import:
declare module '@env' { export const AUTH_TOKEN: string; export const POWERSYNC_ENDPOINT: string; }
You need to retrieve the values you need for the environment variables from PowerSync.
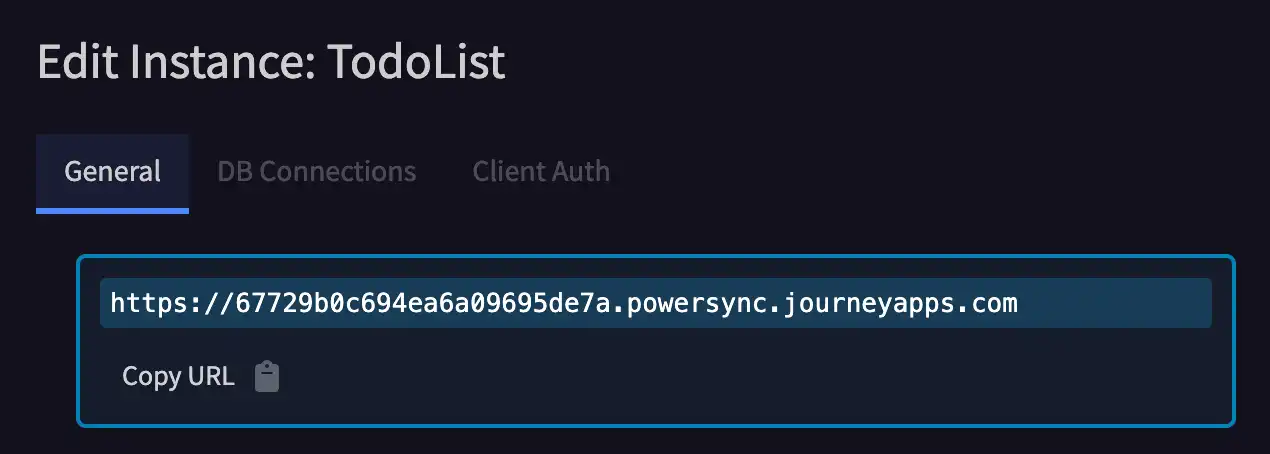
In the PowerSync console, in the left sidebar, click … next to TodoList to open the context menu.
Select Edit Instance.
Copy and save the URL.

Next, generate a new dev token for your instance with the subject/user_id
mockUserId. Copy and save the generated token.
From your application project, create a .env file at the root directory, and
paste the PowerSync endpoint and token that you just generated:
POWERSYNC_ENDPOINT=<endpoint> AUTH_TOKEN=<dev-token>
Refactor Client Code
You will need to refactor your application slightly so that it can connect to your PowerSync instance.
First, create a new file in source called PowerSync.ts and paste in the following:
import { AppSchema } from './ItemSchema'; import { AbstractPowerSyncDatabase, PowerSyncDatabase, } from '@powersync/react-native'; import { AUTH_TOKEN, POWERSYNC_ENDPOINT } from '@env'; const powerSync = new PowerSyncDatabase({ schema: AppSchema, database: { dbFilename: 'powersync.db', }, }); powerSync.init(); class Connector { async fetchCredentials() { return { endpoint: POWERSYNC_ENDPOINT, token: AUTH_TOKEN, }; } async uploadData(database: AbstractPowerSyncDatabase) { console.log('Uploading data'); } } export const setupPowerSync = (): PowerSyncDatabase => { const connector = new Connector(); powerSync.connect(connector); return powerSync; }; export const resetPowerSync = async () => { await powerSync.disconnectAndClear(); setupPowerSync(); };
This file does the following:
Creates a new
Connectorclass, which will be used to set the dev token and PowerSync endpoint in our PowerSync client.Defines a mocked-out
uploadDatafunction, which will be used in the following phase to push changes to Atlas.Defines methods to set and reset our PowerSync client. Resetting the client will be useful for development right now, as any changes made will be placed in a queue. Until these changes are processed, you won't be receiving any new updates.
Next, update AppWrapper.tsx to use the new setupPowerSync method:
import { PowerSyncContext } from '@powersync/react-native'; import React from 'react'; import { App } from './App'; import { setupPowerSync } from './PowerSync'; const powerSync = setupPowerSync(); export const AppWrapper = () => { return ( <PowerSyncContext.Provider value={powerSync}> <App /> </PowerSyncContext.Provider> ); };
Then, refactor LogoutButton.tsx to implement the resetPowerSync method.
Rename it to ResetButton.tsx and update its contents as follows:
import React, { useCallback } from 'react'; import { Pressable, Alert, View, Text, StyleSheet } from 'react-native'; import { colors } from './Colors'; import { resetPowerSync } from './PowerSync'; export function ResetButton() { const signOut = useCallback(() => { resetPowerSync(); }, []); return ( <Pressable onPress={() => { Alert.alert('Reset Database?', '', [ { text: 'Yes, Reset Database', style: 'destructive', onPress: () => signOut(), }, { text: 'Cancel', style: 'cancel' }, ]); }}> <View style={styles.buttonContainer}> <Text style={styles.buttonText}>Reset</Text> </View> </Pressable> ); } const styles = StyleSheet.create({ buttonContainer: { paddingHorizontal: 12, }, buttonText: { fontSize: 16, color: colors.primary, }, });
Then, modify App.tsx to show the Reset button in the left side of the header:
Replace
import { LogoutButton } from './LogoutButton';withimport { ResetButton } from './ResetButton';In the
headerLeft, replace the existing line withreturn <ResetButton />;Uncomment the line
//headerLeftso that the Reset button will be displayed.
Your changes will look like the following:
import React from 'react'; import { SafeAreaProvider } from 'react-native-safe-area-context'; import { StyleSheet, Text, View } from 'react-native'; import { NavigationContainer } from '@react-navigation/native'; import { createStackNavigator } from '@react-navigation/stack'; import { ResetButton } from './ResetButton'; import { ItemListView } from './ItemListView'; import { OfflineModeButton } from './OfflineModeButton'; const Stack = createStackNavigator(); const headerRight = () => { return <OfflineModeButton />; }; const headerLeft = () => { return <ResetButton />; }; export const App = () => { return ( <> {/* All screens nested in RealmProvider have access to the configured realm's hooks. */} <SafeAreaProvider> <NavigationContainer> <Stack.Navigator> <Stack.Screen name="Your To-Do List" component={ItemListView} options={{ headerTitleAlign: 'center', headerLeft, //headerRight, }} /> </Stack.Navigator> </NavigationContainer> <View style={styles.footer}> <Text style={styles.footerText}> Log in with the same account on another device or simulator to see your list sync in real time. </Text> </View> </SafeAreaProvider> </> ); }; const styles = StyleSheet.create({ footerText: { fontSize: 12, textAlign: 'center', marginVertical: 4, }, hyperlink: { color: 'blue', }, footer: { paddingHorizontal: 24, paddingVertical: 12, }, });
Run and Verify Changes
Lastly, the react-native-dotenv library requires our React Native server to be
reset with a cleared cache, which is normal when adding functionality to Babel.
To do this, bring down any currently running React Native instances with ctrl-c,
then enter the following to run the instance with a cleared cache:
npm start -- --reset-cache
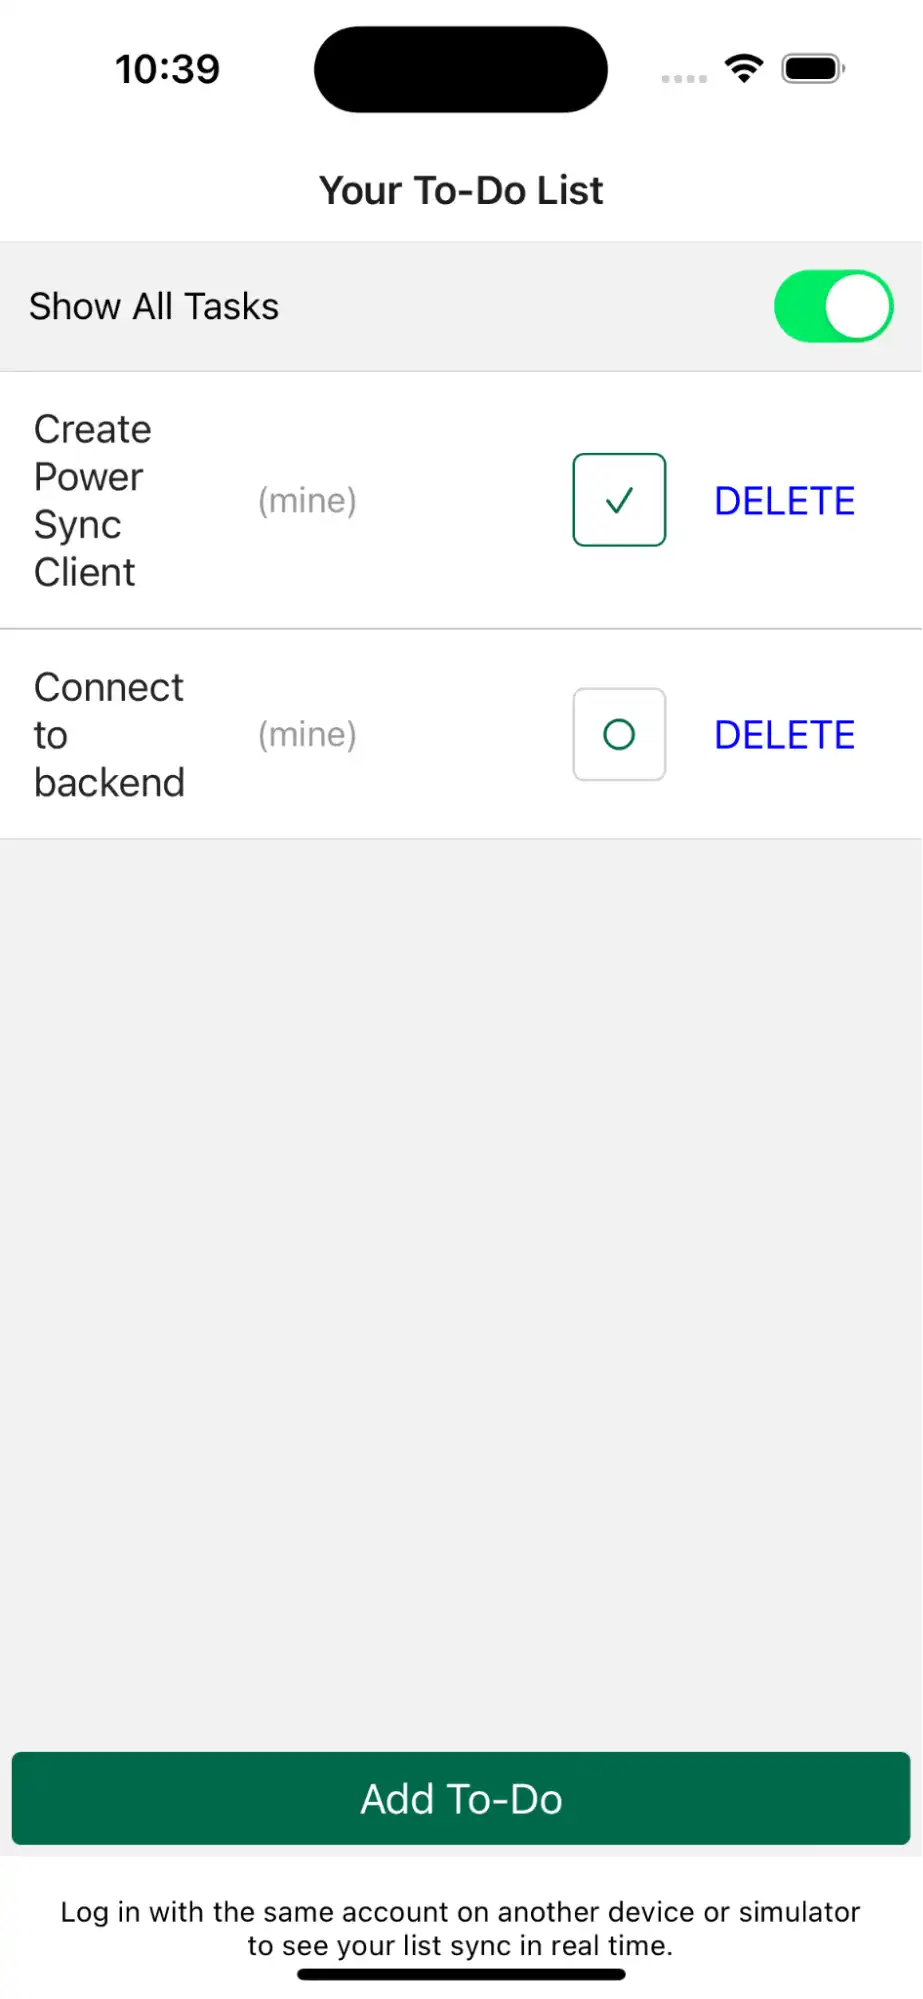
You should now be all set up to sync your Atlas data into your React Native application.
Now reset the application. If you made modifications to the application's local
database before, you will need to click the new Reset button to reset the local
database with the contents of what is stored in Atlas.
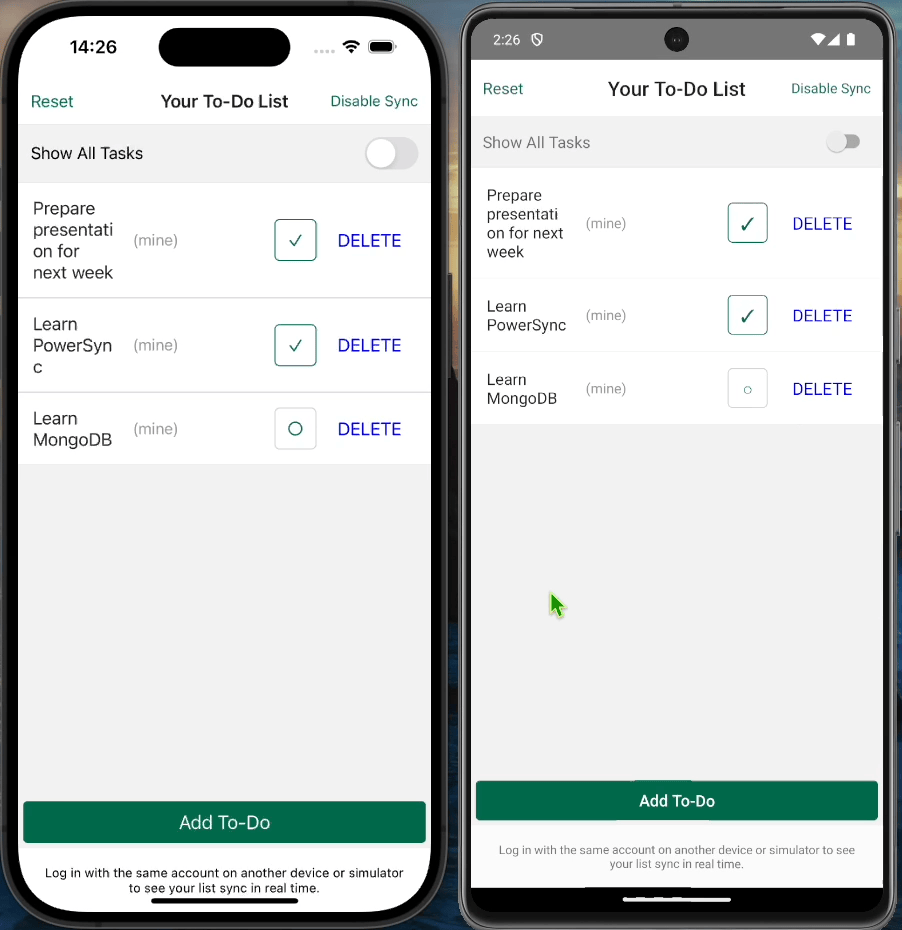
You should now see all the todo list items for mockUserId:
If you encounter issues, delete the application in your emulator/simulator and rebuild it to start from scratch.
If you are still encountering issues, you can view the changes made up to this point in the 03-Sync-Data-From-Atlas branch of the example repository.
Phase 5: Implement Backend API
Inspect Connector
Now that your data is syncing into the mobile application, the next step is to create a way to propagate local changes to Atlas.
In this phase, you will:
Implement the
uploadDatamethod in yourConnectorCreate a simple backend server to handle operations from the mobile device
For the sake of simplicity, this guide will run the server locally. For production use cases, you should consider using a cloud service to handle these requests (e.g. JourneyApps offers serverless cloud functions to help with this).
Implement Upload Method
Begin by looking at the operations sent to the uploadData method when local changes
are made in the mobile application.
Make the following changes to source/PowerSync.ts:
async uploadData(database: AbstractPowerSyncDatabase) { const batch = await database.getCrudBatch(); console.log('batch', JSON.stringify(batch, null, 2)); }
Next, you'll make changes in the mobile application that include:
Deleting an item
Toggling an item as complete or incomplete
Adding a new item
Finish implementing the uploadData method to send this information in a fetch
request.
First, add a new value to your .env:
BACKEND_ENDPOINT=http://localhost:8000
and types/env.d.ts:
declare module '@env' { export const AUTH_TOKEN: string; export const POWERSYNC_ENDPOINT: string; export const BACKEND_ENDPOINT: string; }
If you are using the Android emulator, you must ensure that requests to
localhost on port 8000 are being forwarded out of the emulator and into your
local machine. To enable this, run the following command:
adb reverse tcp:8000 tcp:8000
Next, add BACKEND_ENDPOINT to the import statement in source/PowerSync.ts:
import { AUTH_TOKEN, POWERSYNC_ENDPOINT, BACKEND_ENDPOINT } from '@env';
Then update the uploadData method:
async uploadData(database: AbstractPowerSyncDatabase) { const batch = await database.getCrudBatch(); if (batch === null) { return; } const result = await fetch(`${BACKEND_ENDPOINT}/update`, { method: 'POST', headers: { 'Content-Type': 'application/json', }, body: JSON.stringify(batch.crud), }); if (!result.ok) { throw new Error('Failed to upload data'); } batch.complete(); }
The updated method will now send an array of CRUD operations to the backend endpoint:
If the application is offline, it will simply fail.
If the application receives a positive response, it will mark the operations as complete and the batch of operations will be removed from the mobile application.
Create Backend Server
Now, create a new folder in your project called backend:
mkdir backend
Then, create a package.json file:
{ "main": "index.js", "scripts": { "start": "node --env-file=.env index.js" }, "dependencies": { "express": "^4.21.2", "mongodb": "^6.12.0" } }
This package.json includes a start script that adds variables from a
.env into the service.
Create a new .env with your Atlas connection string from earlier:
MONGODB_URI=<connection_string>
Now, install the dependencies:
npm install
Note that this guide will not include how to add TypeScript and other tooling to this service, but you can feel free to do so. Additionally, the guide keeps validation to a minimum and only implements the changes required to prepare the data coming from the mobile application to be inserted into MongoDB.
First, create an index.js with the following contents:
const express = require("express"); const { MongoClient, ObjectId } = require("mongodb"); const app = express(); app.use(express.json()); // MongoDB setup const client = new MongoClient( process.env.MONGODB_URI || "mongodb://localhost:27017", ); // Helper function to coerce isComplete to boolean function coerceItemData(data) { if (data && "isComplete" in data) { data.isComplete = !!Number(data.isComplete); } return data; } async function start() { await client.connect(); const db = client.db("PowerSync"); const items = db.collection("Item"); app.post("/update", async (req, res) => { const operations = req.body; try { for (const op of operations) { console.log(JSON.stringify(op, null, 2)); switch (op.op) { case "PUT": await items.insertOne({ ...coerceItemData(op.data), _id: new ObjectId(op.id), }); break; case "PATCH": await items.updateOne( { _id: new ObjectId(op.id) }, { $set: coerceItemData(op.data) }, ); break; case "DELETE": await items.deleteOne({ _id: new ObjectId(op.id), }); break; } } res.json({ success: true }); } catch (error) { res.status(500).json({ error: error.message }); } }); app.listen(8000, () => { console.log("Server running on port 8000"); }); } start().catch(console.error);
Note from the service above that the isComplete is coerced into a boolean
value. This ensures that the new todolist items arrive into MongoDB with true or
false instead of a 1 or 0. An ObjectId instance is also being
created out of the op.id. Setting this to the _id property will shape the
data to MongoDB requirements and best practices.
Run and Verify Changes
Now you can spin up the server:
npm start
The mobile application should already be trying to send operations to this endpoint.
The console.log statement should show the requests as they are being sent,
and the changes should be propagating to Atlas.
You can verify this by viewing your MongoDB collection in the Atlas UI or in MongoDB Compass.
You should now have a fully functional mobile application that syncs data to and from Atlas. You can also try turning off the wifi to test how the app functions when it is offline.
If you encounter issues, you can view the changes made up to this point in the 04-Write-To-Backend branch of the example repository.
Phase 6: Final Touches and Clean Up
This final phase covers how to implement two optional app-testing features as well as how to clean up your project of any unneeded code and dependencies.
In the process of creating this application, the following features were omitted: Show All Tasks and the Offline mode switch. These features are useful for testing app functionality and are not- intended to be used in a production application.
Note
The steps related to these features are marked as optional. Feel free to skip these optional steps if this is not of interest to you.
Implement the Show All Toggle (Optional)
To implement the optional Show All toggle, a second bucket will be created
that will be activated based on a
client parameter.
You will apply this by disconnecting the current sync session and
reconnecting with a new value set. This value will be a boolean called
view_all, which will be used as an insecure backdoor to show all the
todo list items ever created in the cluster. This functionality helps
showcase that the buckets can be dynamically created based on certain
parameters.
Note
The methodology used here is insecure, so the
accept_potentially_dangerous_queries flag will need to be activated
on the bucket to perform this. A secure way of accomplishing this would
be to base it on a user role and update the users authorizations in
their backing database, which is out of scope for this guide.
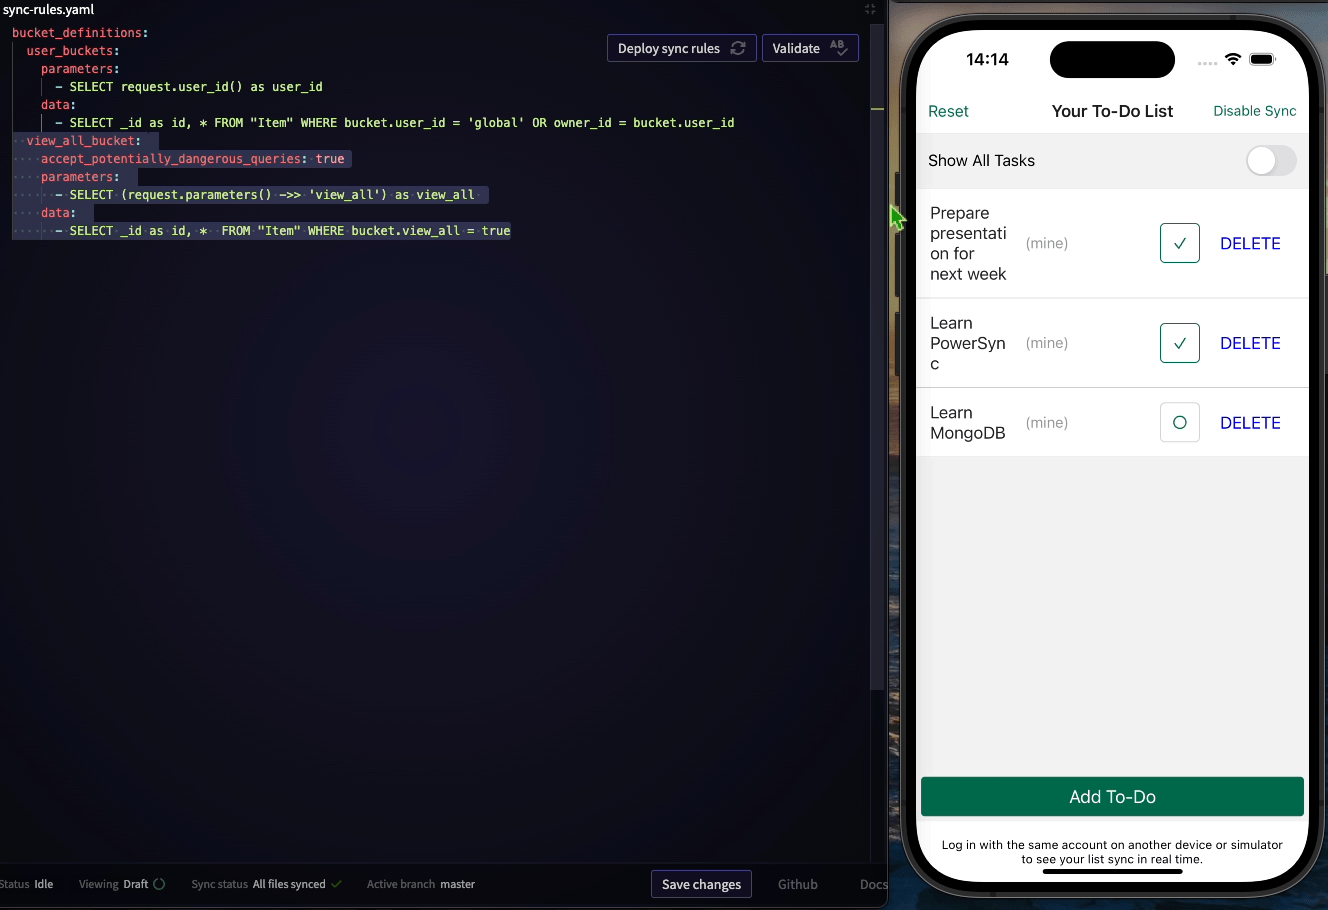
To get started, navigate to your PowerSync dashboard and update the
sync-rules to include a bucket based on the view_all parameter being
set:
bucket_definitions: user_buckets: parameters: - SELECT request.user_id() as user_id data: - SELECT _id as id FROM "Item" WHERE bucket.user_id = 'global' OR owner_id = bucket.user_id view_all_bucket: accept_potentially_dangerous_queries: true parameters: - SELECT (request.parameters() ->> 'view_all') as view_all data: - SELECT _id as id FROM "Item" WHERE bucket.view_all = true
Note that bucket definitions are combined together, so when the
view_all_bucket is active, it will be added to the user_buckets
data.
Next, update source/PowerSync.ts in your project to include a local
variable to determine the view_all flag state, and apply it to the
parameters of the connection instance.
First, add a viewAll parameter and update the setupPowerSync function:
let viewAll = false; export const setupPowerSync = (): PowerSyncDatabase => { const connector = new Connector(); powerSync.connect(connector, {params: {view_all: viewAll}}); return powerSync; };
Then, add the following two functions:
export const resetPowerSync = async () => { await powerSync.disconnectAndClear(); setupPowerSync(); }; export const toggleViewAll = () => { viewAll = !viewAll; resetPowerSync(); };
Finally, update source/ItemListView.tsx.
First, import toggleViewAll from PowerSync:
import { toggleViewAll } from './PowerSync';
Then modify the onValueChange attribute of the "Show All Tasks"
switch to invoke the toggleViewAll method. Use the following code to
replace the Text and Switch components:
<Text style={styles.toggleText}>Show All Tasks</Text> <Switch trackColor={{true: '#00ED64'}} onValueChange={() => { setShowAllItems(!showAllItems); toggleViewAll(); }} value={showAllItems} />
Now restart your application and verify the app works as intended:
Implement Offline Mode Toggle (Optional)
To implement the optional Offline Mode toggle, you will need to disconnect the sync session and reconnect it. This will allow you to make local changes while not connected to sync and verify that they are sent when the sync session is reestablished.
You will add a variable for the connection state, then create a method to
toggle this and invoke the connect and disconnect methods on the
PowerSync client.
First, add the following to source/PowerSync.ts:
let connection = true; export const toggleConnection = () => { if (connection) { powerSync.disconnect(); } else { setupPowerSync(); } connection = !connection; };
Next, refactor the source/OfflineModeButton.tsx to remove the Realm
functionality and replace it by invoking the new toggleConnection method.
You will also need to add some import``s:
import { useState } from 'react'; import { Pressable, Text, StyleSheet } from 'react-native'; import { colors } from './Colors'; import {toggleConnection} from './PowerSync'; export function OfflineModeButton() { const [pauseSync, togglePauseSync] = useState(false); return ( <Pressable onPress={() => { toggleConnection(); togglePauseSync(!pauseSync); }}> <Text style={styles.buttonText}> {pauseSync ? 'Enable Sync' : 'Disable Sync'} </Text> </Pressable> ); } const styles = StyleSheet.create({ buttonText: { padding: 12, color: colors.primary, }, });
Finally, open source/App.tsx and uncomment the headerRight
component back into the Stack.Screen of the application:
<Stack.Screen name="Your To-Do List" component={ItemListView} options={{ headerTitleAlign: 'center', headerLeft, headerRight, }} />
Now, verify the updates by opening a second instance of the app, then making some changes:
Cleanup Project
Finally, you can clean up your project.
The following files can safely be deleted:
atlasConfig.jsonsource/WelcomeView.tsx
You can also remove the following dependencies from your package.json:
@realm/reactrealm
Conclusion and Next Steps
This guide should have provided you with the building blocks to begin your migration journey to PowerSync.
To summarize, by following this guide, you should have accomplished the following:
Deployed a MongoDB database with sample data
Deployed a PowerSync service that syncs the sample data
Learned how to view and query this data using the Diagnostics Tool
Converted a Device Sync mobile application to local only
Migrated from a local-only Realm database to PowerSync
Set up syncing from PowerSync to a mobile database
Created a backend to push changes from the PowerSync client to MongoDB
For next steps, try taking a small piece of your mobile application and converting it to use PowerSync. And keep an eye out for future documentation that goes over more advanced use cases.