Estimated time to complete: 30 minutes
In this tutorial, you will use Atlas App Services to build a serverless application that monitors GitHub repositories and tracks contributions.
The App Services App that you build will have several features:
Keep track of users that have contributed to your project in a MongoDB Atlas collection.
Leave a comment that welcomes new contributors when they open a pull request or file an issue.
Generate and send a weekly report that summarizes contributions to your repository.
After completing this tutorial, you will know how to do the following tasks:
Write and run serverless functions that handle your App's logic.
Automate scheduled tasks and respond to changing data with Atlas Triggers.
Store and access static data, like API keys, in Values.
Connect to an external service through an API
Prerequisites
You need the following before you can begin this tutorial:
A GitHub repository. The App you build will track contributions to this repository. You can create a new repository for this tutorial or use an existing repo that you have admin access to.
A MongoDB Atlas cluster. If you don't already have a cluster, sign up for MongoDB Atlas and create one for free.
Also note that this tutorial doesn't use the deployment draft workflow. A deployment draft is a collection of App changes that you can deploy or discard as a single unit. Unless you disabled deployment drafts, you may need to save your changes to a draft and then deploy them manually.
Create a New App
First, you need to create an application in App Services.
To create the App:
Open your Atlas project at cloud.mongodb.com.
In the top navigation, click App Services.
Click Create a New App.
Name the App
github-tracker-tutorial.Select your cluster to link it to the new App.
Click Create App Service.
Welcome New GitHub Contributors
We'll connect the app to your GitHub repository using a GitHub repository webhook. Webhooks let your App know whenever some event, like a new commit or pull request, happens in your repository. Each event runs a serverless function where you can do something in response.
For this tutorial, we'll use the GitHub REST API to send a welcome message to contributors whenever they open their first pull request or issue on a repository.
Create an Endpoint
Webhooks work by sending a request about the event to a URL that your App controls. In your App, you'll need to expose a custom endpoint with a unique URL to receive and handle the webhook requests.
To create the endpoint:
In the left navigation menu, click HTTPS Endpoints.
Click Add An Endpoint.
Name the endpoint route
/greetNewContributors.Under Operation Type, copy the endpoint callback URL. You'll need it to set up the GitHub webhook later.
Leave the HTTP method set to POST.
For authorization, choose Require a Secret.
Enter a new secret name and click Create to create a new secret. Then, enter
tutorialas the secret value. This requires all incoming requests to include the query parametersecret=tutorialin the request URL.Create a new Atlas Function for the endpoint and name it
endpoints/greetNewContributors.For now, set up a basic handler that only responds to incoming calls without doing other work. Copy the following code into the Function body:
exports = async function greetNewContributors(request, response) { return response .setStatusCode(200) .setBody("Successfully received a GitHub webhook event") } Click Save and deploy the endpoint.
Update Your Endpoint Function's Authentication Settings
Now that you've created the endpoint in your App, you need to change the authentication settings for the endpoint's Function so that the GitHub webhook is accepted.
To update your Function's authentication settings:
In the left navigation menu, click Functions.
Find your endpoint Function and select it.
Click Settings.
Under Authentication, change the authentication method to System.
Click Save to deploy the Function.
Connect the Endpoint to a GitHub Webhook
With your endpoint Function ready to go, you need to set up a webhook in your GitHub repository that sends events to the endpoint.
To create the webhook in your repository:
Open the repository's settings and select Webhooks in the left navigation menu.
Add a new webhook and set the Payload URL to the URL of the endpoint that you just created, plus a
secretquery parameter set to the secret value, such as:?secret=tutorial. Your payload URL will look similar to the following, with some differences depending on your app's deployment model. Note the?secret=tutorialappended to the end of the URL:https://us-west-2.aws.data.mongodb-api.com/app/<App ID>/endpoint/greetNewContributors?secret=tutorial Set the webhook content type to application/json.
Leave the Secret empty. Any value entered here is ignored by the HTTPS endpoint, which is why we append the secret as a query parameter on the payload URL in the preceding steps.
Choose to select individual events and configure the webhook to only send events for Issues and Pull requests.
Click Add webhook to save the new webhook.
To confirm that the webhook successfully calls your endpoint, check your application logs
in App Services for entries with the type Endpoint. You can get there by clicking Logs
in the left navigation menu.
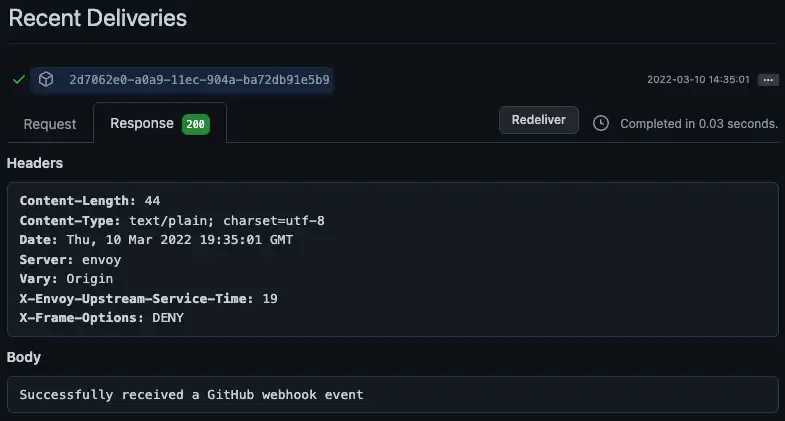
You can also check the webhook's request logs in GitHub under Recent Deliveries on the webhook's settings page. Each successful request has a green checkmark next to it.

Get a GitHub Access Token
The webhook is now set up to send events from GitHub to your endpoint. However, to respond to events in the endpoint with the GitHub API you'll need an access token. This tutorial uses personal access tokens, but you could also set up a GitHub app and use that token instead.
To create a personal access token:
Open your GitHub user settings (not your repository settings) and select Developer settings in the left navigation menu.
In the left navigation menu, select Personal access tokens and then click Generate new token.
Configure the token with a descriptive name and a reasonable expiration time. Since this is a tutorial, consider expiring the token after 7 days.
Select the
reposcope.Click Generate token.
Copy the token somewhere secure where you can access it again. GitHub will never show you the token again after this point.
Store the Token as a Value
Back in your App, add a new Value to hold the personal access token you just generated. You'll be able to reference the Value from your endpoint without hardcoding the token into your Functions.
To create the Value:
In the left navigation menu, click Values.
Click Create New Value.
Name the Value
GitHubAccessToken.Leave the type set to Value.
Paste the personal access token into the Value's input. The Value must be valid JSON, so make sure you have surrounding quotation marks.
Click Save.
Install the GitHub API Client
The endpoint will interact with GitHub's REST API to leave comments. You
could write and send HTTP requests directly to the API using the
built-in context.http client or an external library. However, in
this tutorial we use GitHub's official Node.js library called
Octokit that wraps the API. Once installed,
you'll be able to import the library from any Function in your App.
To add the Octokit library to your App:
In the left navigation menu, click Functions.
Select the Dependencies tab.
Click Add Dependency.
Enter the package name:
@octokit/request.Click Add.
Wait for App Services to install the package. The installation should complete in a few seconds, but may take up to a minute.
Write the Endpoint Logic
Now that you have an access token and have installed Octokit, you can update the endpoint Function to actually do something when it receives events. Specifically, the Function should:
Parse the incoming webhook event
Log the contribution in MongoDB
Add a comment through the GitHub API
Send an informative response back to GitHub
To update the Function:
In the left navigation menu, click Functions.
Click endpoints/greetNewContributors to open the endpoint Function editor.
Replace the basic Function with the following code:
functions/endpoints/greetNewContributors.jsexports = async function greetNewContributors(request, response) { // Parse the webhook event from the incoming request. const event = JSON.parse(request.body.text()); // Don't do anything unless this is a new issue or pull request if (event.action !== "opened") { return response.setStatusCode(200); } // Get data from the GitHub webhook event. // Based on the webhook configuration the event will be one of the following: // - issues: https://docs.github.com/en/developers/webhooks-and-events/webhooks/webhook-events-and-payloads#issues // - pull_request: https://docs.github.com/en/developers/webhooks-and-events/webhooks/webhook-events-and-payloads#pull_request const sender = event.sender; const repo = event.repository; const contribution = event.issue || event.pull_request; const contribution_url = event.issue ? event.issue.url : event.pull_request.issue_url; const issue_number = contribution.number; // Record this contribution in the user's contributor document. // If this user hasn't contributed to the repo before, create a document for them. const atlas = context.services.get("mongodb-atlas"); const contributors = atlas.db("community").collection("contributors"); const contributor = await contributors.findOneAndUpdate( // Look up the user by their GitHub login { login: sender.login }, // Add this issue or pull request to their list of contributions { $push: { contributions: { date: new Date(), type: event.issue ? "issue" : "pull_request", url: contribution_url, }, }, }, // If they haven't contributed before, add them to the database { upsert: true, returnNewDocument: true } ); // Send a welcome message to first time contributors on their issue or pull request const isFirstTimeContributor = contributor.contributions.length === 1; if (isFirstTimeContributor) { const octokit = require("@octokit/request"); await octokit.request( "POST /repos/{owner}/{repo}/issues/{issue_number}/comments", { headers: { authorization: `token ${context.values.get("GitHubAccessToken")}`, }, owner: repo.owner.login, repo: repo.name, issue_number: issue_number, body: `Hi there ${sender.login} 👋 Thanks for your first contribution!`, } ); } // Configure the HTTP response sent back to GitHub return response .setStatusCode(200) .setHeader("Content-Type", "application/json") .setBody( isFirstTimeContributor ? `This is ${sender.login}'s first contribution!` : `${sender.login} has contributed before.` ); }; Click Save and deploy the endpoint.
Test the Endpoint
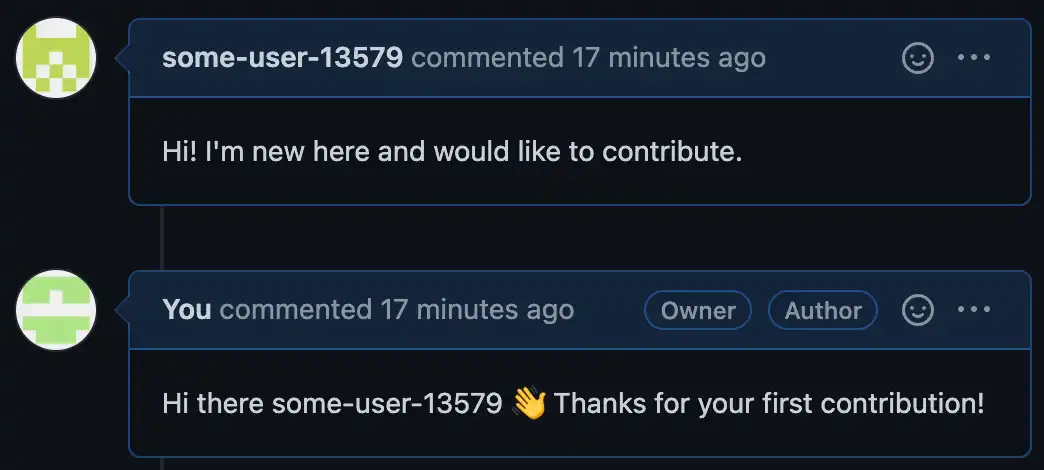
The welcome message endpoint should now be fully set up. To test that it works correctly, open a new issue or pull request on the repository. The endpoint will add a new comment to the thread the first time you do this but won't add a welcome message on subsequent attempts.

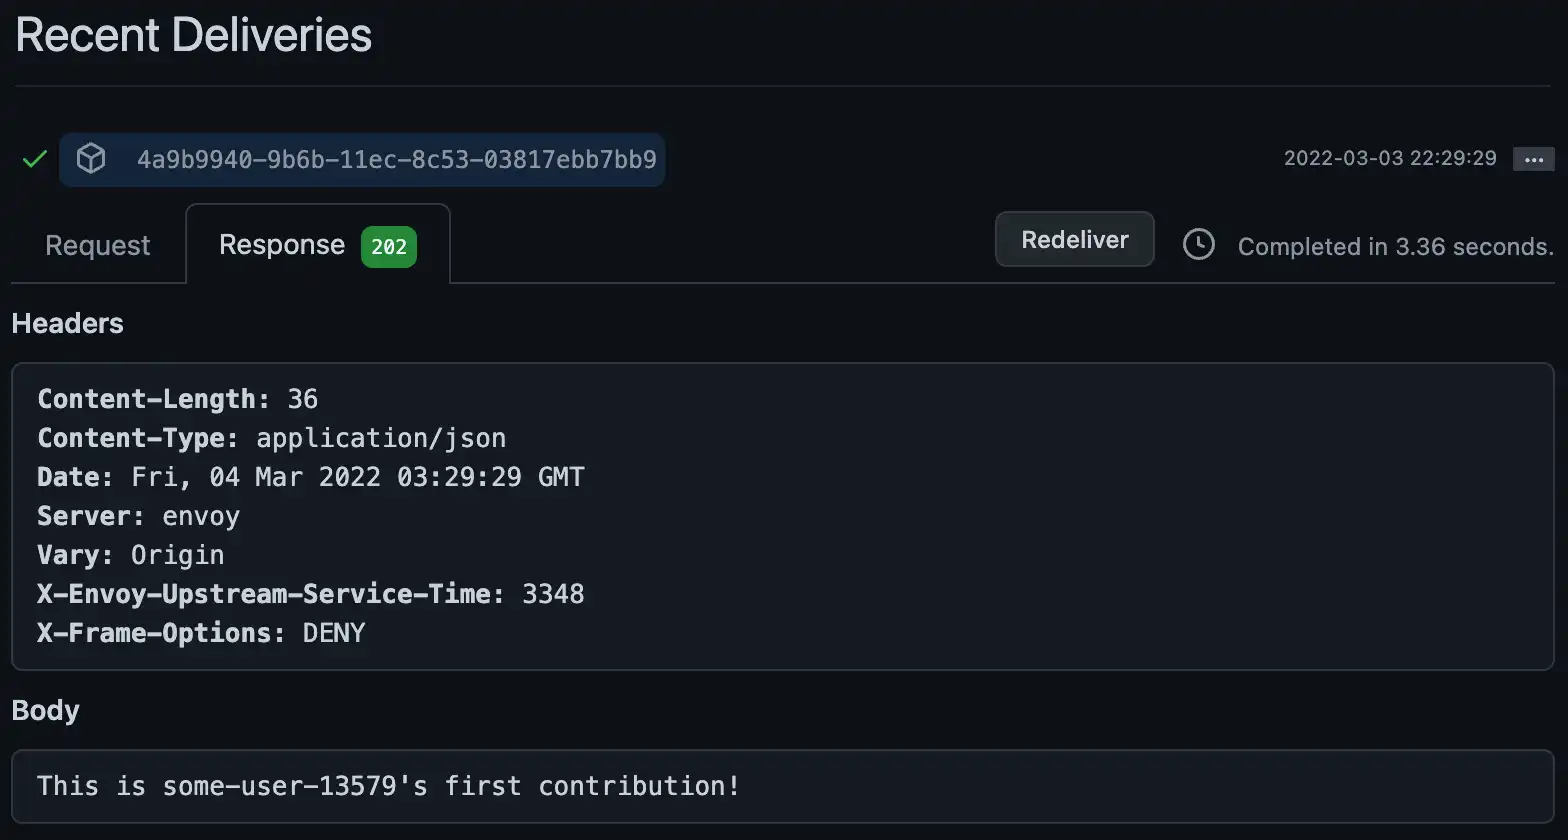
GitHub logs repository webhook requests, so you can also check the log entry in GitHub to confirm that everything is working properly. Each request log includes a response message from the endpoint.

Tip
If you want to reset the test, delete the document with your GitHub
username from community.contributions. This lets the App "forget"
that you've contributed before and it will welcome you on your next
contribution.
Generate a Weekly Community Report
Your App is connected to GitHub, stores information about contributions, and welcomes new contributors. Now we'll extend it to automatically analyze and generate reports for your repository.
Specify Which Repos Should Generate Reports
Your App needs a way to know which repositories it should generate reports for every week. For this tutorial, we'll hardcode the list in a Value.
Create a new Value called GitHubProjects that contains an array of
objects. Each object specifies the owner and repo name of a
GitHub repository. Make sure to include an entry for your repository.
[ { "owner": "<GitHub Username>", "repo": "<Repository Name>" } ]
Create a Function that Generates Reports
A report is a document that summarizes the contributions to a repository for some time period. We'll use a Function to create on-demand reports for a repo.
Create a new Function named generateCommunityReport and add the
following code:
exports = async function generateCommunityReport({ owner, repo, startDate }) { // Look up issues and pull requests that had activity const octokit = require("@octokit/request"); const { data: issuesWithActivity } = await octokit.request( "GET /repos/{owner}/{repo}/issues", { headers: { authorization: `token ${context.values.get("GitHubAccessToken")}`, }, owner: owner, repo: repo, since: startDate, } ); // Look up users that contributed to the repo const atlas = context.services.get("mongodb-atlas"); const contributors = atlas.db("community").collection("contributors"); const allContributors = await contributors .find({ contributions: { $elemMatch: { date: { $gt: new Date(startDate) }, owner: owner, repo: repo, }, }, }) .toArray(); // Keep track of users who made their first contribution const newContributors = allContributors.filter((c) => { new Date(c.contributions[0].date) > new Date(startDate); }); // Return a report with the data return { owner, repo, startDate, issuesWithActivity, allContributors, newContributors, }; };
Generate And Save Reports Every Week
The Function you just created creates a report for a repository on-demand. However, at this point nothing calls the Function and the generated reports are not saved anywhere. To actually use it, we'll create a scheduled Atlas Trigger that calls the Function once every week and saves the generated reports in your linked cluster.
To create the Trigger:
In the left navigation menu, click Triggers.
Click Add a Trigger.
Choose Scheduled for the Trigger type.
Name the Trigger
generateAndSaveCommunityReportsChoose the Advanced schedule type
Enter the following cron schedule to run once a week on Monday at 5 AM UTC:
0 5 * * 1 Create a new Function for the Trigger and name it
triggers/generateAndSaveCommunityReports.Click Add Dependency and install
moment, which we use to work with dates in the Function.Copy the following code into the Function body:
functions/triggers/generateAndSaveCommunityReports.jsexports = async function generateAndSaveCommunityReports() { const projects = context.values.get("GitHubProjects"); const lastMonday = getLastMonday(); // e.g. "2022-02-21T05:00:00.000Z" // Generate a report for every tracked repo const reportsForLastWeek = await Promise.all( // Call the `generateCommunityReport` function for each project projects.map(async (project) => { return context.functions.execute("generateCommunityReport", { owner: project.owner, repo: project.repo, startDate: lastMonday, }); }) ); // Save the generated reports in Atlas const atlas = context.services.get("mongodb-atlas"); const reports = atlas.db("community").collection("reports"); return await reports.insertMany(reportsForLastWeek); }; // Get an ISO string for last Monday at 5AM UTC function getLastMonday() { const moment = require("moment"); return moment(new Date().setUTCHours(5, 0, 0, 0)) .utc() .day(1 - 7) .toISOString(); } Click Save.
Update your new Function's authentication settings to match the new Endpoint's Function from earlier in this tutorial.
Send Report Notifications
Your App will now automatically generate and save reports every week. However, the reports won't be very useful if nobody sees them. We'll create a database Trigger that listens for new reports and creates a formatted message that you can send to end users.
To set up the messages:
In the left navigation menu, click Triggers.
Click Add a Trigger.
Leave the Trigger type set to Database.
Name the Trigger
sendCommunityReport.Add the Trigger to the
community.reportscollection and listen for Insert events.Enable Full Document to include each new report document in the change event passed to the Trigger Function.
Create a new Function for the Trigger and name it
triggers/sendCommunityReport.Copy the following code into the Function body:
functions/triggers/sendCommunityReport.jsexports = async function sendCommunityReport(changeEvent) { // Pull out the report document from the database change event const report = changeEvent.fullDocument; // Format values from the report to include in the message const projectName = `${report.owner}/${report.repo}`; const moment = require("moment"); const formattedDate = moment(report.startDate).utc().format("MMMM Do, YYYY"); const numIssuesWithActivity = report.issuesWithActivity.length; const numContributors = report.allContributors.length; const numNewContributors = report.newContributors.length; // Create a message string that describes the data in the report const message = [ `# Community contributions to ${projectName} since ${formattedDate}`, `Last week, there was activity on ${numIssuesWithActivity} issues and pull requests.`, `We had ${numContributors} people contribute, including ${numNewContributors} first time contributors.`, ].join("\n"); // For this tutorial we'll just log the message, but you could use a // service to send it as an email or push notification instead. console.log(message); }; Click Save and deploy the Trigger.
Test the Report Triggers
Your App is set up to automatically generate, save, and send reports every week. To make sure that everything works, you can run this report flow manually.
Open the Function editor for your scheduled Trigger,
triggers/generateAndSaveCommunityReports, and then click the
Run button. This should generate and save on-demand reports
for every repo that you listed in the GitHubProjects Value.
To confirm:
Check
community.reportsfor the new report documents.Check your App's database Trigger logs to find the formatted message for each report
What's Next?
Congratulations! You've succesfully set up a serverless GitHub contribution tracker and reached the end of this tutorial.
Keep Building
If you want to keep developing, you can try to add some new features to the tracker. For example, you could:
Update the endpoint to handle more webhook event types like issue_comment or pull_request_review.
Update the weekly reports to include more information from the GitHub API.
Connect to an external service like Twilio or SendGrid to actually send the report via email or SMS instead of just logging it.
Explore the Documentation
App Services includes many services that can power your App. Check out the rest of the documentation to learn more about these services and how you can use them.
Give Us Feedback
We're always working to improve our docs and tutorials. If you have a suggestion or had issues with this tutorial, click Give Feedback at the bottom of this page to rate the tutorial and send us a comment.
MongoDB Communities
For questions, discussions, or general technical support, visit the MongoDB communities on Reddit or Stack Overflow. These platforms are great places to connect with other MongoDB users, ask questions, and get answers.
To showcase your MongoDB projects, share content, learn about our community programs, get feedback from peers, and connect with other developers, visit the MongoDB Community Forum.