Docs Home → Atlas App Services
Tutorial: Atlas Device Sync for Flutter
On this page
- Learning Objectives
- Prerequisites
- Start with the Template
- Set up the Template App
- Open the App
- Explore the App Structure
- Run the App
- Check the Backend
- Modify the Application
- Add a New Property
- Add a New Property to the Model
- Set the Priority when Creating and Updating Items
- Run and Test
- Change the Subscription
- Update the subscription
- Run and Test
- Conclusion
- What's Next?
Estimated time to complete: 30 minutes, depending on your experience with Flutter
The Atlas Device SDK for Flutter allows you to create a multi-platform
applications with Dart and Flutter. This tutorial is based on the
Flutter Flexible Sync Template App, named flutter.todo.flex, which illustrates
the creation of a Todo application. This application enables users to:
Register their email as a new user account.
Sign in to their account with their email and password (and sign out later).
View, create, modify, and delete task items.
View all tasks, even where the user is not the owner.
The template app also provides a toggle that simulates the device being in "Offline Mode." This toggle lets you quickly test Device Sync functionality, emulating the user having no internet connection. However, you would likely remove this toggle in a production application.
This tutorial adds on to the template app. You will add a new priority field
to the existing Item model and update the Flexible Sync subscription to only show items within a range of priorities.
Learning Objectives
This tutorial illustrates how you might adapt the template app for your own needs. You would not necessarily make this change given the current structure of the template app.
In this tutorial, you will learn how to:
Update a Realm object model with a non-breaking change.
Update a Device Sync subscription
Add a queryable field to the Device Sync configuration on the server to change which data is synchronized.
If you prefer to get started with your own application rather than follow a guided tutorial, check out the Flutter Quick Start. It includes copyable code examples and the essential information that you need to set up a Flutter SDK application.
Prerequisites
You should have previous experience deploying a Flutter app to an Android Emulator, iOS Simulator, and/or a physical device.
This tutorial starts with a Template App. You need an Atlas Account, an API key, and appservices to create a Template App.
You can learn more about creating an Atlas account in the Atlas Getting Started documentation. For this tutorial, you need an Atlas account with a free-tier cluster.
You also need an Atlas API key for the MongoDB Cloud account you wish to log in with. You must be a Project Owner to create a Template App using appservices.
To learn more about installing appservices, see Install App Services CLI. After installing, run the login command using the API key for your Atlas project.
Note
Supported Platforms
You can build this tutorial app on the following platforms:
iOS
Android
macOS
Windows
Linux
The Flutter SDK does not support building web applications.
Start with the Template
This tutorial is based on the Flutter Flexible Sync Template App named
flutter.todo.flex. We start with the default app and build new features
on it.
To learn more about the Template Apps, see Template Apps.
If you don't already have an Atlas account, sign-up to deploy a Template App.
Set up the Template App
Open the App
Open the Flutter app with your code editor.
If you downloaded the client as a .zip file or cloned the client
GitHub repository, you must manually insert the App Services App ID
in the appropriate place in your client. Follow the
Configuration instructions in the client README.md
to learn where to insert your App ID.
Explore the App Structure
In your code editor, take a few minutes to explore how the project is organized. This is a standard multi-platform Flutter application that has been modified for our specific use. Specifically, the following files contain important uses of the Flutter SDK:
File | Purpose |
|---|---|
lib/main.dart | Entry point into the app. Contains routing and state management. |
lib/realm/schemas.dart | Defines Realm Database schema. |
lib/realm/schemas.realm.dart | Generated Realm object class. |
lib/realm/app_services.dart | Handles interaction with Atlas App Services. |
lib/realm/realm_services.dart | Handles interaction with Realm Database and Atlas Device Sync. |
lib/components/ | Component parts of app featuring Flutter widgets. |
lib/screens/ | Pages of the app. |
Run the App
Without making any changes to the code, you should be able to run the app in either the Android emulator, iOS Simulator, physical mobile device, or desktop emulator.
First, install all dependencies by running the following in your terminal:
flutter pub get
Then, attach to a device and run the Flutter application.
Once the app is running, register a new user account, and then add a new Item to your todo list.
Tip
For more information on running a Flutter app with development tools, refer to the Flutter Test Drive documentation.
Check the Backend
Log in to MongoDB Atlas. In the Data Services tab, click on Browse Collections. In the list of databases, find and expand the todo database, and then the Item collection. You should see the document you created in this collection.
Modify the Application
Add a New Property
Add a New Property to the Model
Now that you have confirmed everything is working as expected, we can add changes. In this tutorial, we have decided that we want to add a "priority" property to each Item so that we can filter Items by their priorities.
To do this, follow these steps:
In the
flutter.todo.flexproject, open the filelib/realm/schemas.dart.Add the following property to the
_Itemclass:lib/realm/schemas.dartlate int? priority; Regenerate the
ItemRealm object class:dart run realm generate
Set the Priority when Creating and Updating Items
In
lib/realm/realm_services.dart, add logic to set and updatepriority. Also add aPriorityLevelabstract class below theRealmServicesclass to constrain the possible values.lib/realm/realm_services.dart// ... imports class RealmServices with ChangeNotifier { static const String queryAllName = "getAllItemsSubscription"; static const String queryMyItemsName = "getMyItemsSubscription"; bool showAll = false; bool offlineModeOn = false; bool isWaiting = false; late Realm realm; User? currentUser; App app; // ... RealmServices initializer and updateSubscriptions(), // sessionSwitch() and switchSubscription() methods void createItem(String summary, bool isComplete, int? priority) { final newItem = Item(ObjectId(), summary, currentUser!.id, isComplete: isComplete, priority: priority); realm.write<Item>(() => realm.add<Item>(newItem)); notifyListeners(); } void deleteItem(Item item) { realm.write(() => realm.delete(item)); notifyListeners(); } Future<void> updateItem(Item item, {String? summary, bool? isComplete, int? priority}) async { realm.write(() { if (summary != null) { item.summary = summary; } if (isComplete != null) { item.isComplete = isComplete; } if (priority != null) { item.priority = priority; } }); notifyListeners(); } Future<void> close() async { if (currentUser != null) { await currentUser?.logOut(); currentUser = null; } realm.close(); } void dispose() { realm.close(); super.dispose(); } } abstract class PriorityLevel { static int severe = 0; static int high = 1; static int medium = 2; static int low = 3; } Add a new file to contain a widget to set the priority for an Item. Create the file
lib/components/select_priority.dart.lib/components/select_priority.dartimport 'package:flutter/material.dart'; import 'package:flutter_todo/realm/realm_services.dart'; class SelectPriority extends StatefulWidget { int priority; void Function(int priority) setFormPriority; SelectPriority(this.priority, this.setFormPriority, {Key? key}) : super(key: key); State<SelectPriority> createState() => _SelectPriorityState(); } class _SelectPriorityState extends State<SelectPriority> { Widget build(BuildContext context) { return Padding( padding: const EdgeInsets.only(top: 15), child: Column( crossAxisAlignment: CrossAxisAlignment.start, children: [ const Text('Priority'), DropdownButtonFormField<int>( onChanged: ((int? value) { final valueOrDefault = value ?? PriorityLevel.low; widget.setFormPriority(valueOrDefault); setState(() { widget.priority = valueOrDefault; }); }), value: widget.priority, items: [ DropdownMenuItem( value: PriorityLevel.low, child: const Text("Low")), DropdownMenuItem( value: PriorityLevel.medium, child: const Text("Medium")), DropdownMenuItem( value: PriorityLevel.high, child: const Text("High")), DropdownMenuItem( value: PriorityLevel.severe, child: const Text("Severe")), ], ), ], ), ); } } Now add the
SelectPrioritywidget to theCreateItemandModifyItemwidgets. You also need to add some additional logic to handle setting the priority. The code you must add is shown below.Some sections of the files you are adding to are replaced with comments in the below code examples to focus on the relevant sections of code that are changed.
Edit the
CreateItemFormwidget inlib/components/create_item.dart:lib/components/create_item.dart// ... other imports import 'package:flutter_todo/components/select_priority.dart'; // ... CreateItemAction widget class CreateItemForm extends StatefulWidget { const CreateItemForm({Key? key}) : super(key: key); createState() => _CreateItemFormState(); } class _CreateItemFormState extends State<CreateItemForm> { final _formKey = GlobalKey<FormState>(); late TextEditingController _itemEditingController; int _priority = PriorityLevel.low; void _setPriority(int priority) { setState(() { _priority = priority; }); } // ... initState() and dispose() @override functions Widget build(BuildContext context) { TextTheme theme = Theme.of(context).textTheme; return formLayout( context, Form( key: _formKey, child: Column( mainAxisAlignment: MainAxisAlignment.center, mainAxisSize: MainAxisSize.min, children: <Widget>[ // ... Text and TextFormField widgets SelectPriority(_priority, _setPriority), // ... Padding widget ], ), )); } void save(RealmServices realmServices, BuildContext context) { if (_formKey.currentState!.validate()) { final summary = _itemEditingController.text; realmServices.createItem(summary, false, _priority); Navigator.pop(context); } } } Edit the
ModifyItemFormwidget inlib/components/modify_item.dart:lib/components/modify_item.dart// ... other imports import 'package:flutter_todo/components/select_priority.dart'; class ModifyItemForm extends StatefulWidget { final Item item; const ModifyItemForm(this.item, {Key? key}) : super(key: key); _ModifyItemFormState createState() => _ModifyItemFormState(item); } class _ModifyItemFormState extends State<ModifyItemForm> { final _formKey = GlobalKey<FormState>(); final Item item; late TextEditingController _summaryController; late ValueNotifier<bool> _isCompleteController; late int? _priority; void _setPriority(int priority) { setState(() { _priority = priority; }); } _ModifyItemFormState(this.item); void initState() { _summaryController = TextEditingController(text: item.summary); _isCompleteController = ValueNotifier<bool>(item.isComplete) ..addListener(() => setState(() {})); _priority = widget.item.priority; super.initState(); } void dispose() { _summaryController.dispose(); _isCompleteController.dispose(); super.dispose(); } Widget build(BuildContext context) { TextTheme myTextTheme = Theme.of(context).textTheme; final realmServices = Provider.of<RealmServices>(context, listen: false); return formLayout( context, Form( key: _formKey, child: Column( mainAxisAlignment: MainAxisAlignment.center, mainAxisSize: MainAxisSize.min, children: <Widget>[ // ... Text and TextFormField widgets SelectPriority(_priority ?? PriorityLevel.medium, _setPriority), // ... StatefulBuilder widget Padding( padding: const EdgeInsets.only(top: 15), child: Row( mainAxisAlignment: MainAxisAlignment.center, children: [ cancelButton(context), deleteButton(context, onPressed: () => delete(realmServices, item, context)), okButton(context, "Update", onPressed: () async => await update( context, realmServices, item, _summaryController.text, _isCompleteController.value, _priority)), ], ), ), ], ))); } Future<void> update(BuildContext context, RealmServices realmServices, Item item, String summary, bool isComplete, int? priority) async { if (_formKey.currentState!.validate()) { await realmServices.updateItem(item, summary: summary, isComplete: isComplete, priority: priority); Navigator.pop(context); } } void delete(RealmServices realmServices, Item item, BuildContext context) { realmServices.deleteItem(item); Navigator.pop(context); } } Now add a visual indicator for priority in the
ItemCardwidget inlib/components/todo_item.dart. Create a new widget_PriorityIndicatorthat gives a visual indicator of the Item's priority.Add a
_PriorityIndicatorwidget you just created to theTodoItemwidget.lib/components/todo_item.dart// ... imports enum MenuOption { edit, delete } class TodoItem extends StatelessWidget { final Item item; const TodoItem(this.item, {Key? key}) : super(key: key); Widget build(BuildContext context) { final realmServices = Provider.of<RealmServices>(context); bool isMine = (item.ownerId == realmServices.currentUser?.id); return item.isValid ? ListTile( // ... leading property and child content title: Row( children: [ Padding( padding: const EdgeInsets.only(right: 8.0), child: _PriorityIndicator(item.priority), ), SizedBox(width: 175, child: Text(item.summary)), ], ), // ... subtitle, trailing, and shape properties with child content ) : Container(); } // ... handleMenuClick() function } class _PriorityIndicator extends StatelessWidget { final int? priority; const _PriorityIndicator(this.priority, {Key? key}) : super(key: key); Widget getIconForPriority(int? priority) { if (priority == PriorityLevel.low) { return const Icon(Icons.keyboard_arrow_down, color: Colors.blue); } else if (priority == PriorityLevel.medium) { return const Icon(Icons.circle, color: Colors.grey); } else if (priority == PriorityLevel.high) { return const Icon(Icons.keyboard_arrow_up, color: Colors.orange); } else if (priority == PriorityLevel.severe) { return const Icon( Icons.block, color: Colors.red, ); } else { return const SizedBox.shrink(); } } Widget build(BuildContext context) { return getIconForPriority(priority); } }
Run and Test
Before you run the application again, perform a hot restart. This makes sure that the sync session restarts with the new schema and prevents sync errors.
Then, Log in using the account you created earlier in this tutorial.
You will see the one Item you previously created.
Add a new Item, and you will see that you can now set the priority.
Choose High for the priority and save the Item.
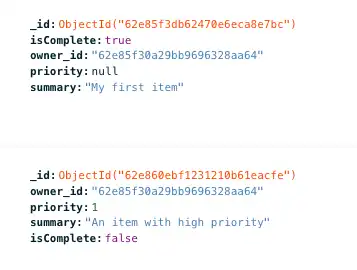
Now switch back to the Atlas data page in your browser, and refresh the
Item collection. You should now see the new Item with the priority
field added and set to 1. You will also notice that the existing Item
now also has a priority field, and it is set to null, as shown in
the following screenshot:

Note
Why Didn't This Break Sync?
Adding a property to a Realm object is not a breaking change and therefore does not require a client reset. The template app has Development Mode enabled, so changes to the client Realm object are reflected in the server-side schema. For more information, see Development Mode and Update Your Data Model.
Change the Subscription
Now that we added the priority field, we want to update the Device Sync subscription to only sync Items marked as a High or Severe priority.
Update the subscription
In the lib/realm/realm_services.dart file, we define the Flexible Sync
subscription that defines which documents we sync with the user's device
and account. Currently, we are syncing all all documents where
the owner property matches the authenticated user.
The current subscription:
Future<void> updateSubscriptions() async { realm.subscriptions.update((mutableSubscriptions) { mutableSubscriptions.clear(); if (showAll) { mutableSubscriptions.add(realm.all<Item>(), name: queryAllName); } else { mutableSubscriptions.add( realm.query<Item>(r'owner_id == $0', [currentUser?.id]), name: queryMyItemsName); } }); await realm.subscriptions.waitForSynchronization(); }
Now we're going to change the subscription to only sync High and Severe
priority Items.
As you may recall, the priority field is of type int, where the highest
priority ("Severe") has a value of 0, and the lowest priority ("Low") has
a value of 3.
We can make direct comparisons between an int and the priority property.
To do so, we're going to refactor the subscription query
to include Items where the priority is less than or equal to
PriorityLevel.high (or 1). We will also give the subscription the new name
"getMyHighPriorityItemsSubscription".
Update the subscription to delete the old subscription and add a new one that uses priority:
// ... imports class RealmServices with ChangeNotifier { static const String queryAllName = "getAllItemsSubscription"; static const String queryMyItemsName = "getMyItemsSubscription"; static const String queryMyHighPriorityItemsName = "getMyHighPriorityItemsSubscription"; bool showAll = false; bool offlineModeOn = false; bool isWaiting = false; late Realm realm; User? currentUser; App app; RealmServices(this.app) { if (app.currentUser != null || currentUser != app.currentUser) { currentUser ??= app.currentUser; realm = Realm(Configuration.flexibleSync(currentUser!, [Item.schema])); showAll = (realm.subscriptions.findByName(queryAllName) != null); // Check if subscription previously exists on the realm final subscriptionDoesNotExists = (realm.subscriptions.findByName(queryMyHighPriorityItemsName) == null); if (realm.subscriptions.isEmpty || subscriptionDoesNotExists) { updateSubscriptions(); } } } Future<void> updateSubscriptions() async { realm.subscriptions.update((mutableSubscriptions) { mutableSubscriptions.clear(); if (showAll) { mutableSubscriptions.add(realm.all<Item>(), name: queryAllName); } else { mutableSubscriptions.add( realm.query<Item>( r'owner_id == $0 AND priority <= $1', [currentUser?.id, PriorityLevel.high], ), name: queryMyHighPriorityItemsName); } }); await realm.subscriptions.waitForSynchronization(); } // ... other methods }
Run and Test
Run the application again. Log in using the account you created earlier in this tutorial.
After an initial moment when Realm resyncs the document collection, you might see an error message resembling the following:
The following RangeError was thrown building StreamBuilder<RealmResultsChanges<Item>>(dirty, state: _StreamBuilderBaseState<RealmResultsChanges<Item>, AsyncSnapshot<RealmResultsChanges<Item>>>#387c4): RangeError (index): Invalid value: Only valid value is 0: 3
This error can occur with the StreamBuilder widget as the subscription updates.
In a production app, you could add error handling. But for the sake of
this tutorial, just perform a hot refresh and the error will go away.
Now you should see the new Item of High priority that you created.
If you want to further test the functionality, you can create Items of various priorities. You will see that a new Item with a lower priority briefly appears in the list of Items and then disappears. Realm creates the Item locally, syncs it with the backend, and then deletes the Item because it doesn't meet the subscription rules. This is called a compensating write.
You'll note, too, that the document you initially created is not synced,
because it has a priority of null.
If you want this Item to be synced,
you can edit the document in the Atlas UI and add a value for the priority
field, or you can change your subscription to include documents with null
values. We will also give the subscription the new name
"getUserItemsWithHighOrNoPriority".
class RealmServices with ChangeNotifier { static const String queryAllName = "getAllItemsSubscription"; static const String queryMyItemsName = "getMyItemsSubscription"; static const String queryMyHighPriorityItemsName = "getMyHighPriorityItemsSubscription"; static const String queryMyHighOrNoPriorityItemsName = "getMyHighOrNoPriorityItemsSubscription"; bool showAll = false; bool offlineModeOn = false; bool isWaiting = false; late Realm realm; User? currentUser; App app; RealmServices(this.app) { if (app.currentUser != null || currentUser != app.currentUser) { currentUser ??= app.currentUser; realm = Realm(Configuration.flexibleSync(currentUser!, [Item.schema])); // Check if subscription previously exists on the realm final subscriptionDoesNotExists = realm.subscriptions.findByName(queryMyHighOrNoPriorityItemsName) == null; if (realm.subscriptions.isEmpty || subscriptionDoesNotExists) { updateSubscriptions(); } } } Future<void> updateSubscriptions() async { realm.subscriptions.update((mutableSubscriptions) { mutableSubscriptions.clear(); if (showAll) { mutableSubscriptions.add(realm.all<Item>(), name: queryAllName); } else { mutableSubscriptions.add( realm.query<Item>( r'owner_id == $0 AND priority IN {$1, $2, $3}', [currentUser?.id, PriorityLevel.high, PriorityLevel.severe, null], ), name: queryMyHighPriorityItemsName); } }); await realm.subscriptions.waitForSynchronization(); } // ... other methods }
Again, when a StreamBuilder error occurs the first time you open the
app with the new subscription, perform a hot refresh to see the expected data.
Conclusion
Adding a property to an existing Realm object is a non-breaking change, and Development Mode ensures that the schema change is reflected server-side.
What's Next?
Read our Flutter SDK documentation.
Find developer-oriented blog posts and integration tutorials on the MongoDB Developer Hub.
Join the MongoDB Community forum to learn from other MongoDB developers and technical experts.
Explore engineering and expert-provided example projects.
Note
Share Feedback
How did it go? Use the Share Feedback tab at the bottom right of the page to let us know if this tutorial was helpful or if you had any issues.