Docs Home → Atlas App Services
Android With Kotlin Tutorial
On this page
- Overview
- Learning Objectives
- Prerequisites
- Start with the Template
- Set up the Template App
- Open the App
- Explore the App Structure
- Run the App
- Check the Backend
- Modify the Application
- Add a New Property
- Add a New Property to the Model
- Set the Priority when Creating a New Item
- Run and Test
- Change the Subscription
- Update the subscription
- Run and Test
- Conclusion
- What's Next?
Overview
Realm provides a Kotlin SDK that allows you to create an Android mobile
application with Kotlin using Jetpack Compose.
This tutorial is based on the Kotlin Flexible Sync
Template App, named kotlin.todo.flex, which illustrates the creation of a
To-do Item List management application. This application enables users to:
Register their email as a new user account.
Sign in to their account with their email and password (and sign out later).
View, create, modify, and delete their own tasks.
View all tasks, even where the user is not the owner.
The template app also provides a toggle that simulates the device being in "Offline Mode." This toggle lets you quickly test Device Sync functionality on the simulator, emulating the user having no internet connection. However, you would likely remove this toggle in a production application.
This tutorial adds functionality to the Template App. You will add a new Priority field
to the existing Item model and update the
Flexible Sync subscription to only show items within
a range of priorities. This example illustrates how you might adapt the
template app for your own needs.
Depending on your experience with Kotlin, this tutorial should take around 30 minutes.
Learning Objectives
This tutorial illustrates how you might adapt the template app for your own needs.
In this tutorial, you will learn how to:
Update a Realm object model with a non-breaking change.
Update a Device Sync subscription.
Add a queryable field to the Device Sync configuration on the server to change which data is synchronized.
Note
Check Out the Quick Start
If you prefer to get started with your own application rather than follow a guided tutorial, check out the Kotlin Quick Start. It includes copyable code examples and the essential information that you need to set up an Atlas App Services backend.
Prerequisites
Android Studio Bumblebee 2021.1.1 or higher.
JDK 11 or higher.
Kotlin Plugin for Android Studio, version 1.6.10 or higher.
An Android Virtual Device (AVD) using a supported CPU architecture.
This tutorial starts with a Template App. You need an Atlas Account, an API key, and appservices to create a Template App.
You can learn more about creating an Atlas account in the Atlas Getting Started documentation. For this tutorial, you need an Atlas account with a free-tier cluster.
You also need an Atlas API key for the MongoDB Cloud account you wish to log in with. You must be a Project Owner to create a Template App using appservices.
To learn more about installing appservices, see Install App Services CLI. After installing, run the login command using the API key for your Atlas project.
Start with the Template
This tutorial is based on the Kotlin SDK Flexible Sync Template App named
kotlin.todo.flex. We start with the default app and build new features
on it.
To learn more about the Template Apps, see Template Apps.
If you don't already have an Atlas account, sign-up to deploy a Template App.
Set up the Template App
Open the App
In Android Studio, open the kotlin.todo.flex folder located in the
frontend folder of the template app.
If you downloaded the client as a .zip file or cloned the client
GitHub repository, you must manually insert the App Services App ID
in the appropriate place in your client. Follow the
Configuration instructions in the client README.md
to learn where to insert your App ID.
Explore the App Structure
Take a few minutes to explore the project organization while Android
Studio indexes your project. Within the app/java/com.mongodb.app
directory, you can see a few files worth noting:
File | Purpose |
|---|---|
ComposeItemActivity.kt | Activity class that defines the layout and provides
functionality for opening a realm, writing Items to the realm,
logging a user out, and closing a realm. |
ComposeLoginActivity.kt | Activity class that defines the layout and provides
functionality for registering a user and logging a user in. |
TemplateApp.kt | Class that initializes the App Services App. |
In this tutorial, you'll be working in the following files:
File | Purpose |
|---|---|
Item.kt | Located in the domain directory. Defines the Realm object we store in the database. |
AddItem.kt | Located in the ui/tasks directory. Contains the composable function that
defines the layout used when adding an item. |
AddItemViewModel.kt | Located in the presentation/tasks directory. The view model that contains
business logic and manages state when adding an item. |
SyncRepository.kt | Located in the data directory. Repository used to access Realm Sync and
defines the Flexible Sync subscription. |
Strings.xml | Located in the res/values directory. Defines the text string resources
used in the app. |
Run the App
Without making any changes to the code, you should be able to run the app on an Android Emulator using Android Studio or on a physical device.
Run the app, register a new user account, and then add a new Item to your todo list.
Check the Backend
Log in to Atlas App Services. In the Data Services tab, click on Browse Collections. In the list of databases, find and expand the todo database, and then the Item collection. You should see the document you created in this collection.
Modify the Application
Add a New Property
Add a New Property to the Model
Now that you have confirmed everything is working as expected, we can add
changes. In this tutorial, we have decided that we want to add a
"priority" property to each Item so that we can filter Items by their
priority level. The priority property will be mapped to a PriorityLevel enum
to constrain the possible values, and we will use the ordinal of each
enum to correspond to the priority integer so we can query based on a
numeric priority level later.
To do this, follow these steps:
Within the
app/java/com.mongodb.app/domainfolder, open theItemclass file.Add a
PriorityLevelenum to constrain the possible values. Also add apriorityproperty to theItemclass, which sets the default priority to 3, indicating that it is a low-priority todo item:domain/Item.kt// ... imports enum class PriorityLevel() { Severe, // priority 0 High, // priority 1 Medium, // priority 2 Low // priority 3 } class Item() : RealmObject { var _id: ObjectId = ObjectId.create() var isComplete: Boolean = false var summary: String = "" var owner_id: String = "" var priority: Int = PriorityLevel.Low.ordinal constructor(ownerId: String = "") : this() { owner_id = ownerId } // ... equals() and hashCode() functions }
Set the Priority when Creating a New Item
From the
ui/tasksfolder, open theAddItem.ktfile. This file defines the composable functions for the UI that is displayed when a user clicks the '+' button to add a new todo item.First, add the following imports below the
package com.mongodb.app:ui/tasks/AddItem.ktimport androidx.compose.foundation.layout.fillMaxWidth import androidx.compose.foundation.layout.padding import androidx.compose.material3.DropdownMenuItem import androidx.compose.material3.ExposedDropdownMenuBox import androidx.compose.ui.Modifier import androidx.compose.ui.unit.dp import com.mongodb.app.domain.PriorityLevel Now we can add a dropdown field to the
AddItemPromptcomposable function that will enable the user to pick a priority level from a list using the PriorityLevel enums as available values:ui/tasks/AddItem.kt// ... imports fun AddItemPrompt(viewModel: AddItemViewModel) { AlertDialog( containerColor = Color.White, onDismissRequest = { viewModel.closeAddTaskDialog() }, title = { Text(stringResource(R.string.add_item)) }, text = { Column { Text(stringResource(R.string.enter_item_name)) TextField( colors = ExposedDropdownMenuDefaults.textFieldColors(containerColor = Color.White), value = viewModel.taskSummary.value, maxLines = 2, onValueChange = { viewModel.updateTaskSummary(it) }, label = { Text(stringResource(R.string.item_summary)) } ) val priorities = PriorityLevel.values() ExposedDropdownMenuBox( modifier = Modifier.padding(16.dp), expanded = viewModel.expanded.value, onExpandedChange = { viewModel.open() }, ) { TextField( readOnly = true, value = viewModel.taskPriority.value.name, onValueChange = {}, label = { Text(stringResource(R.string.item_priority)) }, trailingIcon = { ExposedDropdownMenuDefaults.TrailingIcon(expanded = viewModel.expanded.value) }, colors = ExposedDropdownMenuDefaults.textFieldColors(), modifier = Modifier .fillMaxWidth() .menuAnchor() ) ExposedDropdownMenu( expanded = viewModel.expanded.value, onDismissRequest = { viewModel.close() } ) { priorities.forEach { DropdownMenuItem( text = { Text(it.name) }, onClick = { viewModel.updateTaskPriority(it) viewModel.close() } ) } } } } }, // ... buttons ) } Android Studio will identify several errors. We'll correct these in the next steps by adding the related functions.
Next, we'll define the dropdown field label as a string resource. Open the
res/values/strings.xmlfile, and add the following before the closing of the 'resource' element:res/values/strings.xml<string name="item_priority">Item Priority</string> Now within the
presentation/tasksfolder, open theAddItemViewModel.ktfile. Here we will add the business logic related to our new dropdown field.Add the
PriorityLevelimport below thepackage com.mongodb.app, then add the variables and functions to theAddItemViewModelclass needed to handle the state changes within the dropdown:presentation/tasks/AddItemViewModel.kt// ... imports import com.mongodb.app.domain.PriorityLevel // ... events class AddItemViewModel( private val repository: SyncRepository ) : ViewModel() { private val _addItemPopupVisible: MutableState<Boolean> = mutableStateOf(false) val addItemPopupVisible: State<Boolean> get() = _addItemPopupVisible private val _taskSummary: MutableState<String> = mutableStateOf("") val taskSummary: State<String> get() = _taskSummary private val _taskPriority: MutableState<PriorityLevel> = mutableStateOf(PriorityLevel.Low) val taskPriority: State<PriorityLevel> get() = _taskPriority private val _expanded: MutableState<Boolean> = mutableStateOf(false) val expanded: State<Boolean> get() = _expanded private val _addItemEvent: MutableSharedFlow<AddItemEvent> = MutableSharedFlow() val addItemEvent: Flow<AddItemEvent> get() = _addItemEvent fun openAddTaskDialog() { _addItemPopupVisible.value = true } fun closeAddTaskDialog() { cleanUpAndClose() } fun updateTaskSummary(taskSummary: String) { _taskSummary.value = taskSummary } fun updateTaskPriority(taskPriority: PriorityLevel) { _taskPriority.value = taskPriority } fun open() { _expanded.value = true } fun close() { _expanded.value = false } // addTask() and cleanUpAndClose() functions } Now update the
addTask()andcleanUpAndClose()functions to include the newtaskPriorityparameter, update the message with the priority information, and reset the priority field to low once the Add Item view is closed:fun addTask() { CoroutineScope(Dispatchers.IO).launch { runCatching { repository.addTask(taskSummary.value, taskPriority.value) }.onSuccess { withContext(Dispatchers.Main) { _addItemEvent.emit(AddItemEvent.Info("Task '$taskSummary' with priority '$taskPriority' added successfully.")) } }.onFailure { withContext(Dispatchers.Main) { _addItemEvent.emit(AddItemEvent.Error("There was an error while adding the task '$taskSummary'", it)) } } cleanUpAndClose() } } private fun cleanUpAndClose() { _taskSummary.value = "" _taskPriority.value = PriorityLevel.Low _addItemPopupVisible.value = false } Finally, from the
datafolder, open theSyncRepository.ktfile to reflect the same changes in theaddTask()function, which writes the Item to the realm.First, add the
PriorityLevelimport below thepackage com.mongodb.app, then update theaddTask()functions to pass thetaskPriorityas a parameter and write thepriorityfield to the realm as an integer (using the enum ordinal):data/SyncRepository.kt// ... imports import com.mongodb.app.domain.PriorityLevel interface SyncRepository { // ... Sync functions suspend fun addTask(taskSummary: String, taskPriority: PriorityLevel) // ... Sync functions } class RealmSyncRepository( onSyncError: (session: SyncSession, error: SyncException) -> Unit ) : SyncRepository { // ... variables and SyncConfiguration initializer // ... Sync functions override suspend fun addTask(taskSummary: String, taskPriority: PriorityLevel) { val task = Item().apply { owner_id = currentUser.id summary = taskSummary priority = taskPriority.ordinal } realm.write { copyToRealm(task) } } override suspend fun updateSubscriptions(subscriptionType: SubscriptionType) { realm.subscriptions.update { removeAll() val query = when (subscriptionType) { SubscriptionType.MINE -> getQuery(realm, SubscriptionType.MINE) SubscriptionType.ALL -> getQuery(realm, SubscriptionType.ALL) } add(query, subscriptionType.name) } } // ... additional Sync functions } class MockRepository : SyncRepository { override fun getTaskList(): Flow<ResultsChange<Item>> = flowOf() override suspend fun toggleIsComplete(task: Item) = Unit override suspend fun addTask(taskSummary: String, taskPriority: PriorityLevel) = Unit override suspend fun updateSubscriptions(subscriptionType: SubscriptionType) = Unit override suspend fun deleteTask(task: Item) = Unit override fun getActiveSubscriptionType(realm: Realm?): SubscriptionType = SubscriptionType.ALL override fun pauseSync() = Unit override fun resumeSync() = Unit override fun isTaskMine(task: Item): Boolean = task.owner_id == MOCK_OWNER_ID_MINE override fun close() = Unit // ... companion object }
Run and Test
At this point, you can rerun the application. Log in using the account
you created earlier in this tutorial. You will see the one Item you
previously created. Add a new Item, and you will see that you can now
set the priority. Choose High for the priority and save the Item.
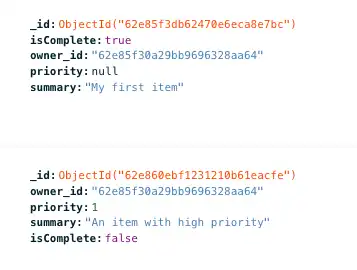
Now switch back to the Atlas data page in your browser, and refresh the
Item collection. You should now see the new Item with the priority
field added and set to 1. The existing Item does not have a priority
field.

Note
Why Didn't This Break Sync?
Adding a property to a Realm object is not a breaking change and therefore does not require a client reset. The template app has Development Mode enabled, so changes to the client Realm object are reflected in the server-side schema. For more information, see Development Mode and Update Your Data Model.
Change the Subscription
Update the subscription
Within the app/java/com.mongodb.app/data folder, open the SyncRepository.kt
file, where we define the Flexible Sync subscription. The subscription defines
which documents we sync with the user's device and account. Find the
getQuery() function. You can see that
we are currently subscribing to two subscriptions:
MINE: All documents where theownerIdproperty matches the authenticated user.ALL: All documents from all users.
We want to update the MINE subscription to only sync Items that are marked as High or Severe priority.
As you may recall, the priority field is of type int, where the highest
priority ("Severe") has a value of 0, and the lowest priority ("Low") has
a value of 3. We can make direct comparisons between an integer and the
priority property. To do so, edit the RQL statement to include documents
where the priority is equal to or less than PriorityLevel.High (or 1), as
shown here:
private fun getQuery(realm: Realm, subscriptionType: SubscriptionType): RealmQuery<Item> = when (subscriptionType) { SubscriptionType.MINE -> realm.query("owner_id == $0 AND priority <= ${PriorityLevel.High.ordinal}", currentUser.id) SubscriptionType.ALL -> realm.query() }
We'll also force the subscription query to recalculate which documents to sync every time we open the app.
To do this, find the SyncConfiguration.Builder().initialSubscriptions() function
that our application calls on start. First add the reRunOnOpen parameter set to true,
then set updateExisting to true, which allows the existing query to be updated.
config = SyncConfiguration.Builder(currentUser, setOf(Item::class)) .initialSubscriptions(rerunOnOpen = true) { realm -> // Subscribe to the active subscriptionType - first time defaults to MINE val activeSubscriptionType = getActiveSubscriptionType(realm) add(getQuery(realm, activeSubscriptionType), activeSubscriptionType.name, updateExisting = true) } .errorHandler { session: SyncSession, error: SyncException -> onSyncError.invoke(session, error) } .waitForInitialRemoteData() .build()
Run and Test
Run the application again. Log in using the account you created earlier in this tutorial.
After an initial moment when Realm re-syncs the document collection, you will see the new Item of High priority that you created.
If you want to test the functionality further, you can create Items of various priorities. You'll note that if you try to add an Item with a priority lower than High, you will get a Toast message indicating you do not have permission. And if you check your logs using Logcat, you will see a message indicating the item was "added successfully", followed by a sync error:
ERROR "Client attempted a write that is outside of permissions or query filters; it has been reverted"
That's because, in this scenario, Realm creates the Item locally, syncs it with the backend, and then reverts the write because it doesn't meet the subscription rules.
You'll note, too, that the document you initially created is not synced,
because it has a priority of null. If you want this Item to be synced,
you can edit the document in the Atlas UI and add a value for the priority
field.
Conclusion
Adding a property to an existing Realm object is a non-breaking change, and Development Mode ensures that the schema change is reflected server-side.
What's Next?
Read our Kotlin SDK documentation.
Find developer-oriented blog posts and integration tutorials on the MongoDB Developer Hub.
Join the MongoDB Community forum to learn from other MongoDB developers and technical experts.
Explore engineering and expert-provided example projects.
Note
Share Feedback
How did it go? Use the Share Feedback tab at the bottom right of the page to let us know if this tutorial was helpful or if you had any issues.