Organizations, projects, and clusters are the building blocks of your Atlas enterprise estate:
At the organization level, you can implement security controls and create users that work across one or more projects.
Projects offer a more fine-grained security isolation and authorization boundary.
Clusters are your cloud databases in Atlas.
Use the foundational guidance on this page to design the layout of your organizations, projects, and clusters based on your company's hierarchy and expected number of clusters and projects. This guidance helps you optimize your security and performance from the start while aligning with your enterprise's billing and access needs.
Features for Atlas Orgs, Projects, and Clusters
You can use the following levels of hierarchy to define security settings and governance for your Atlas enterprise estate:
Atlas Hierarchy Level | Description |
|---|---|
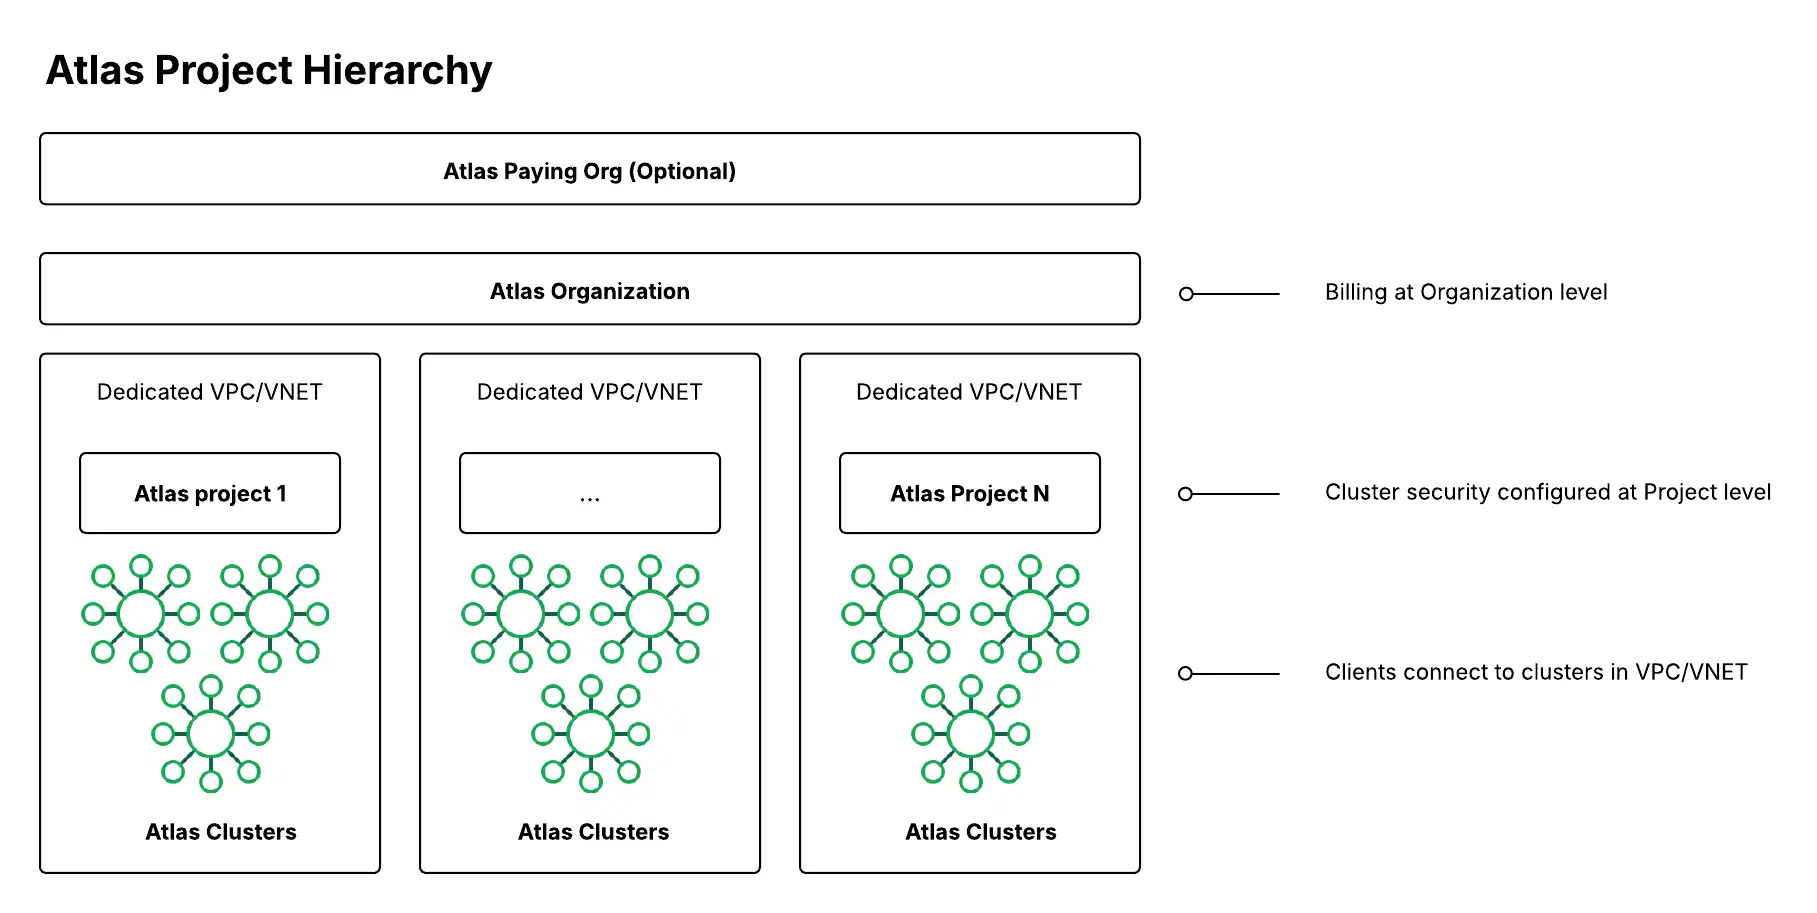
(Optional) Paying Organization | One organization can be a paying organization for other organization(s). A paying organization lets you set up cross-organization billing to share a billing subscription across multiple organizations. To learn more about setting up your paying organization when you establish the Atlas subscription, see Manage Billing. In order to enable cross-organization billing, the user performing the action must have an Org Owner or Billing Admin role of both organizations that they wish to link. To learn more, see User Roles. A paying organization is common for large enterprises with many BUs or departments that operate independently but where the contract or bill is owned by a central authority. |
An organization can contain many projects, and it provides a container to apply shared integration and security settings across those projects and the clusters therein. If you manage multiple Atlas organizations, the Atlas Federation Management Console allows users with an Org Owner role to manage IdPs for SSO, then link them to multiple organizations. An organization often maps to a BU or department within a company. The built-in Atlas Cost Explorer aggregates cloud spend at the organization level and breaks out line items at the project-level and cluster level below it. You can customize further by leveraging the billing API. | |
Security configuration for the data plane (including database clusters, network security, and other data services) occurs at the project-level. A project often maps to an application and environment (for example: Customer Portal app - Production environment). For each project, based on the selected cloud provider, there is one dedicated VPC or VNet per region in AWS and Azure. | |

Recommendations for Atlas Orgs, Projects, and Clusters
Multi-Region and Multi-Cloud Deployment Recommendations
For multi-region and multi-cloud deployments, consider the following additional recommendations to optimize performance, security, and compliance across geographic boundaries:
Network Architecture and Latency
Deploy clusters in regions closest to your application users to minimize latency.
Use dedicated VPCs/VNets per region within each project to maintain network isolation.
Configure private endpoints in each region where you deploy clusters to ensure secure, low-latency connections.
Data Locality and Compliance
Create separate projects for different regulatory jurisdictions (for example, GDPR-compliant EU project, SOX-compliant US project) to ensure data residency requirements are met.
Use Global Clusters with zone sharding to automatically route reads and writes to the appropriate geographic region based on shard key values.
Tag projects and clusters with data classification and regional compliance requirements for audit and governance purposes.
Cross-Region Disaster Recovery
Deploy clusters with read replicas in multiple regions to enable failover capabilities.
Maintain consistent backup schedules across all regions within the same application environment.
Test disaster recovery procedures regularly across regions to ensure business continuity.
Multi-Cloud Considerations
Use consistent naming conventions across cloud providers to simplify management and monitoring.
Standardize security configurations across all cloud environments within the same project.
Consider cloud provider-specific features and limitations when planning cross-cloud data replication and network connectivity.
All Deployment Paradigm Recommendations
The following recommendations apply to all deployment paradigms.
Development, Testing, Staging, and Production Environments
We recommend that you use the following four environments to isolate your sandbox and test projects and clusters from your application projects and clusters:
Environment | Description |
|---|---|
Development (Dev) | Allow developers to freely try new things in a safe sandbox environment. |
Testing (Test) | Test specific components or functions created in the dev environment. |
Staging | Stage all components and functions together to make sure the entire application works as expected before deploying to production. Staging is similar to the test environment, but ensures that new components work well with existing components. |
Production (Prod) | The back end for your application that is live for your end users. |
Local Atlas Deployments
For development and testing purposes, developers can use the Atlas CLI to create a local Atlas deployment. By working locally from their machines, developers can cut down on costs for external development and testing environments.
Developers can also run Atlas CLI commands with Docker to build, run, and manage local Atlas deployments using containers. Containers are standardized units that contain all of the software needed to run an application. Containerization allows developers to build local Atlas deployments in secure, reliable, and portable test environments. To learn more, see Create a Local Atlas Deployment with Docker.
Org and Project Hierarchies
Generally, we recommend a paying organization that is managed centrally, and one organization for each BU or department that is linked to the paying org. Then, create a project with one cluster each for your lower (dev or test) and upper environments; you can create clusters in these projects. To learn more, see the following information for Recommended Hierarchy.
If you will easily hit the 250 project limit per organization, we recommend creating one organization per environment, such as one each for lower and upper environments, or one each for dev, test, staging, and production. This setup has the benefit of additional isolation. You can also increase the limits. To learn more, see Atlas Service Limits.
Network and security configurations, such as allowed IPs and API keys, are shared at the project level, so if you need fine grained access controls for teams working on different applications, we recommend that you create separate projects for each application.
Recommended Hierarchy
Consider the following hierarchy, which creates fewer Atlas organizations, if you have common teams and permissions across the BU and less than the raiseable limit of 250 projects per organization.

Recommended Hierarchy 2: Decentralized Business Units/Departments
Consider the following hierarchy if your organization is highly decentralized without a centralized function to serve as the contract and billing owner. In this hierarchy, each BU, department, or team has their own Atlas organization. This hierarchy is useful if each of your teams is fairly independent, they don't share people or permissions within the company, or they want to buy credits themselves through the cloud provider marketplace or directly with their own contract. There is no paying organization in this hierarchy.

Cluster Hierarchy
To maintain isolation between environments, we recommend that you deploy each cluster within its own project, as shown in the following diagram. This allows administrators to maintain different project configurations between environments and uphold the principle of least privilege, which states that users should only be granted the least level of access necessary for their role.
Particularly in production environments, we recommend that you create separate projects for each application and environment pair. As these configurations are managed at the project level, this approach reduces the potential for your needing to manually transfer data between production environment clusters should these requirements change for a given application.
You can share project-level configurations such as private endpoints and CMKs across clusters with automation tooling, such as Terraform, at cluster creation. Moreover, automating cluster creation can yield cost savings by standardizing the creation of parallel higher and lower environments for production and development environments respectively.
To learn more, see When to Consider Multiple Clusters Per Project.

When to Consider Multiple Clusters Per Project
The following diagram shows an organization whose projects each contain multiple Atlas clusters, grouped by environment. Deploying multiple clusters within the same project simplifies administration when one application uses multiple backing clusters, or the same team is responsible for multiple applications across environments. This eases the setup cost for features such as private endpoints and customer-managed keys, because all clusters in the same project share the same project configuration.
However, this cluster hierarchy may violate the principle of least privilege.
Deploy multiple clusters within the same project only if both of the following are true:
Each team member with access to the project is working on all other applications and clusters in the project.
You are creating clusters for development and testing environments. In staging and production environments, we recommend that clusters in the same project should belong to the same application and be administered by the same team.

Resource Tagging
We recommend that you tag clusters or projects with the following details to enable easy parsing for reporting and integrations:
BU or Department
Team name
Application name
Environment
Version
Email contact
Criticality (indicates the tier of data stored on the cluster, including any sensitive classifications such as PII or PHI)
To learn more about parsing billing data using tags, see Features for Atlas Billing Data.
Atlas Cluster Size Guide
In a dedicated deployment (cluster size M10+), Atlas
allocates resources exclusively. We recommend dedicated deployments
for production use cases because they provide higher security and performance than shared
clusters.
The following cluster size guide uses "t-shirt sizing," a common analogy used in software development and infrastructure to describe capacity planning in a simplified manner. Use t-shirt sizing recommendations only as approximate starting points in your sizing analysis. Sizing a cluster is an iterative process based on changing resource needs, performance requirements, workload characteristics, and growth expectations.
Important
This guidance excludes mission-critical applications, high-memory workloads, and high-CPU workloads. For these use cases, contact MongoDB Support for customized guidance.
You can estimate the cluster resources that your deployment requires by using your organization's approximate data size and workload:
Total Storage Required: 50% of the total raw data size
Total RAM Required: 10% of the total raw data size
Total CPU Cores Required: expected peak read/write database operations per second ÷ 4000
Total Storage IOPS Required: expected peak read/write database operations per second (min IOPS = 5%, max IOPS = 95%)
Use the following cluster size guide to select a cluster tier that ensures performance without over-provisioning. This table displays the default storage and performance capabilities for each cluster tier, as well as whether or not the cluster tier is suitable for staging and production environments.
The cluster size guide also includes expected values for a cluster's total data size and default IOPS, which you can augment with additional configurations. Note that the following storage recommendations are per shard, not for the entire cluster. To learn more, see Guidance for Atlas Scalability.
T-Shirt Size | Cluster Tier | Storage Range: AWS/Google Cloud/Azure | CPUs (#) | Default RAM | Default IOPS | Expected Median Data Size | Expected Peak Reads / Writes | Suitable For |
|---|---|---|---|---|---|---|---|---|
Small |
| 2 GB to 128 GB | 2 | 2 GB | 1000 | 1 GB to 10 GB | 200 | Dev/Test only |
Med |
| 8 GB to 512 GB | 2 | 8 GB | 3000 | 20 GB to 50 GB | 3000 | Prod |
Large |
| 8 GB to 4 TB | 16 | 32 GB | 3000 | 360 GB to 420 GB | 11000 | Prod |
X-Large |
| 8 GB to 4 TB | 32 | 128 GB | 3000 | 1200 GB to 1750 GB | 39000 | Prod |
| [1] | M10 is a shared CPU tier. For highly-regulated industries or sensitive data, your minimum and smallest starting tier should be M30. |
For example, consider a fictional fintech company, MongoFinance, that must store a total of 400 GB of processed data.
At peak activity, MongoFinance employees and customers perform up to 3000 reads or writes to MongoFinance databases per second.
MongoFinance's storage and performance requirements are best satisfied by a large, or M50, cluster tier.
To learn more about cluster tiers and the regions that support them, see the Atlas documentation for each cloud provider:
Automation Examples: Atlas Orgs, Projects, and Clusters
Tip
For Terraform examples that enforce our recommendations across all pillars, see one of the following examples in GitHub:
The following examples create organizations, projects, and clusters using Atlas tools for automation.
These examples also apply other recommended configurations, including:
Cluster tier set to
M10for a dev/test environment. Use the cluster size guide to learn the recommended cluster tier for your application size.Single Region, 3-Node Replica Set / Shard deployment topology.
Our examples use AWS, Azure, and Google Cloud interchangeably. You can use any of these three cloud providers, but you must change the region name to match the cloud provider. To learn about the cloud providers and their regions, see Cloud Providers.
Cluster tier set to
M30for a medium-sized application. Use the cluster size guide to learn the recommended cluster tier for your application size.Single Region, 3-Node Replica Set / Shard deployment topology.
Our examples use AWS, Azure, and Google Cloud interchangeably. You can use any of these three cloud providers, but you must change the region name to match the cloud provider. To learn about the cloud providers and their regions, see Cloud Providers.
Note
Before you can create resources with the Atlas CLI, you must:
Create your paying organization and create an API key for the paying organization.
Connect from the Atlas CLI using the steps for Programmatic Use.
Create the Organizations
Run the following command for each BU. Change the IDs and names to use your actual values:
atlas organizations create ConsumerProducts --ownerId 508bb8f5f11b8e3488a0e99e --apiKeyRole ORG_OWNER --apiKeyDescription consumer-products-key
For more configuration options and info about this example, see atlas organizations create.
You can create an organization and link it to your paying organization programmatically
by using the Atlas Administration API. To do so, send a POST request to the https://cloud.mongodb.com/api/atlas/v2/orgs endpoint,
and specify the paying organization ID in the federationSettingsId field. The requesting service account or API key must have
the "Organization Owner" role and the requesting organization must be a paying organization.
The following example uses cURL to send the request:
curl --location '/api/atlas/v2/orgs?envelope=false&pretty=false' \ --header 'Content-Type: application/vnd.atlas.2023-01-01+json' \ --header 'Accept: application/vnd.atlas.2023-01-01+json' \ --data '{ "name": "<organization name>", "apiKey": { "desc": "<organization description>", "roles": [ "ORG_MEMBER" ] }, "federationSettingsId": "<ID of org to link to>", "orgOwnerId": "<organization owners ID>", "skipDefaultAlertsSettings": false }'
To learn more about the preceding API call, see the atlas organizations create API documentation.
To get the user IDs and organization IDs, see the following commands:
Create the Projects
Run the following command for each application and environment pair. Change the IDs and names to use your values:
atlas projects create "Customer Portal - Prod" --tag environment=production --orgId 32b6e34b3d91647abb20e7b8
For more configuration options and info about this example, see atlas projects create.
To get the project IDs, see the following command:
Configure Encryption with Customer Key Management
For staging and production environments, we recommend that you enable encryption with customer key management when you provision your clusters. For development and testing, consider skipping encryption with customer key management to save costs, unless you're in a highly-regulated industry or storing sensitive data. To learn more, see Recommendations for Atlas Orgs, Projects, and Clusters.
You can't use the the Atlas CLI to manage encryption with customer key management. Instead, use the following methods:
Create One Cluster Per Project
To create a single-region cluster for your development and testing environments, run the following command for each project that you created. Change the IDs and names to use your values:
Note
You can also use the clusters Atlas Admin API to create a cluster.
This example doesn't enable auto-scaling to help control costs in development and testing environments. For staging and production environments, auto-scaling should be enabled.
atlas clusters create CustomerPortalDev \ --projectId 56fd11f25f23b33ef4c2a331 \ --region EASTERN_US \ --members 3 \ --tier M10 \ --provider GCP \ --mdbVersion 8.0 \ --diskSizeGB 30 \ --tag bu=ConsumerProducts \ --tag teamName=TeamA \ --tag appName=ProductManagementApp \ --tag env=Production \ --tag version=8.0 \ --tag email=marissa@example.com \ --watch
To configure a multi-region cluster, create the following cluster.json file for each project that you created. Change the IDs and names to use your values.
{ "name": "CustomerPortalDev", "projectId": "56fd11f25f23b33ef4c2a331", "clusterType": "REPLICASET", "diskSizeGB": 30, "mongoDBMajorVersion": "8.0", "backupEnabled": true, "replicationSpecs": [ { "numShards": 1, "regionConfigs": [ { "providerName": "GCP", "regionName": "EASTERN_US", "members": 3, "priority": 7, "autoScaling": { "compute": { "enabled": true, "scaleDownEnabled": true }, "diskGB": { "enabled": true } } }, { "providerName": "GCP", "regionName": "CENTRAL_US", "members": 2, "priority": 5, "autoScaling": { "compute": { "enabled": true, "scaleDownEnabled": true }, "diskGB": { "enabled": true } } }, { "providerName": "GCP", "regionName": "WESTERN_US", "members": 2, "priority": 4, "autoScaling": { "compute": { "enabled": true, "scaleDownEnabled": true }, "diskGB": { "enabled": true } } } ] } ], "tags": [ { "key": "bu", "value": "ConsumerProducts" }, { "key": "teamName", "value": "TeamA" }, { "key": "appName", "value": "ProductManagementApp" }, { "key": "env", "value": "Production" }, { "key": "version", "value": "8.0" }, { "key": "email", "value": "marissa@example.com" } ] }
After you create the preceding configuration file, run the following command to create the cluster:
atlas clusters create --file <path to your configuration file>
To create a single-region cluster for your staging and production environments, create the following cluster.json file for each project that you created. Change the IDs and names to use your values:
{ "clusterType": "REPLICASET", "links": [], "name": "CustomerPortalProd", "mongoDBMajorVersion": "8.0", "replicationSpecs": [ { "numShards": 1, "regionConfigs": [ { "electableSpecs": { "instanceSize": "M30", "nodeCount": 3 }, "priority": 7, "providerName": "GCP", "regionName": "EASTERN_US", "analyticsSpecs": { "nodeCount": 0, "instanceSize": "M30" }, "autoScaling": { "compute": { "enabled": true, "scaleDownEnabled": true }, "diskGB": { "enabled": true } }, "readOnlySpecs": { "nodeCount": 0, "instanceSize": "M30" } } ], "zoneName": "Zone 1" } ], "tag" : [{ "bu": "ConsumerProducts", "teamName": "TeamA", "appName": "ProductManagementApp", "env": "Production", "version": "8.0", "email": "marissa@example.com" }] }
After you create the cluster.json file, run the following command for each project that you created. The command uses the cluster.json file to create a cluster.
atlas cluster create --projectId 5e2211c17a3e5a48f5497de3 --file cluster.json
To configure a multi-region cluster, modify the replicationSpecs array in the preceding cluster.json file to specify multiple regions, as shown in the following example:
{ … "replicationSpecs": [ { "numShards": 1, "regionConfigs": [ { "electableSpecs": { "instanceSize": "M30", "nodeCount": 3 }, "priority": 7, "providerName": "GCP", "regionName": "EASTERN_US", "analyticsSpecs": { "nodeCount": 0, "instanceSize": "M30" }, "autoScaling": { "compute": { "enabled": true, "scaleDownEnabled": true }, "diskGB": { "enabled": true } }, "readOnlySpecs": { "nodeCount": 0, "instanceSize": "M30" } }, { "electableSpecs": { "instanceSize": "M30", "nodeCount": 3 }, "priority": 5, "providerName": "GCP", "regionName": "CENTRAL_US", "analyticsSpecs": { "nodeCount": 0, "instanceSize": "M30" }, "autoScaling": { "compute": { "enabled": true, "scaleDownEnabled": true }, "diskGB": { "enabled": true } }, "readOnlySpecs": { "nodeCount": 0, "instanceSize": "M30" } }, { "electableSpecs": { "instanceSize": "M30", "nodeCount": 3 }, "priority": 6, "providerName": "GCP", "regionName": "WESTERN_US", "analyticsSpecs": { "nodeCount": 0, "instanceSize": "M30" }, "autoScaling": { "compute": { "enabled": true, "scaleDownEnabled": true }, "diskGB": { "enabled": true } }, "readOnlySpecs": { "nodeCount": 0, "instanceSize": "M30" } } ], "zoneName": "Zone 1" } ], … }
After you create the preceding configuration file, run the following command to create the cluster:
atlas clusters create --file <path to your configuration file>
For more configuration options and info about these examples, see atlas clusters create.
Note
Before you can create resources with Terraform, you must:
Create your paying organization and create an API key for the paying organization. Store your API key as environment variables by running the following command in the terminal:
export MONGODB_ATLAS_PUBLIC_KEY="<insert your public key here>" export MONGODB_ATLAS_PRIVATE_KEY="<insert your private key here>"
Important
The following examples use MongoDB Atlas Terraform Provider version 2.x (~> 2.2).
If you're upgrading from provider version 1.x, see the
2.0.0 Upgrade Guide
for breaking changes and migration steps. The examples use the
mongodbatlas_advanced_cluster resource with v2.x syntax.
Create the Projects and Deployments
For your development and testing environments, create the following files for each application and environment pair. Place the files for each application and environment pair in their own directory. Change the IDs and names to use your values:
main.tf
# Create a Project resource "mongodbatlas_project" "atlas-project" { org_id = var.atlas_org_id name = var.atlas_project_name } # Create an Atlas Advanced Cluster resource "mongodbatlas_advanced_cluster" "atlas-cluster" { project_id = mongodbatlas_project.atlas-project.id name = "ClusterPortalDev" cluster_type = "REPLICASET" mongo_db_major_version = var.mongodb_version replication_specs = [ { region_configs = [ { electable_specs = { instance_size = var.cluster_instance_size_name node_count = 3 } auto_scaling = { compute_enabled = true compute_scale_down_enabled = true compute_max_instance_size = "M60" compute_min_instance_size = "M10" } priority = 7 provider_name = var.cloud_provider region_name = var.atlas_region } ] } ] tags = { BU = "ConsumerProducts" TeamName = "TeamA" AppName = "ProductManagementApp" Env = "Test" Version = "8.0" Email = "marissa@example.com" } # MongoDB recommends enabling auto-scaling # When auto-scaling is enabled, Atlas may change the instance size, and this lifecycle # block prevents Terraform from reverting Atlas auto-scaling changes # that modify instance size back to the original configured value lifecycle { ignore_changes = [ replication_specs[0].region_configs[0].electable_specs.instance_size ] } } # Outputs to Display output "atlas_cluster_connection_string" { value = mongodbatlas_advanced_cluster.atlas-cluster.connection_strings.0.standard_srv } output "project_name" { value = mongodbatlas_project.atlas-project.name }
Note
To create a multi-region cluster, specify each region in its own region_configs
object and nest them in the replication_specs object. The priority
fields must be defined in descending order and must consist of values
between 7 and 1 as shown in the following example:
replication_specs = [ { region_configs = [ { electable_specs = { instance_size = "M10" node_count = 2 } auto_scaling = { compute_enabled = true compute_scale_down_enabled = true compute_max_instance_size = "M60" compute_min_instance_size = "M10" } provider_name = "GCP" priority = 7 region_name = "NORTH_AMERICA_NORTHEAST_1" }, { electable_specs = { instance_size = "M10" node_count = 3 } auto_scaling = { compute_enabled = true compute_scale_down_enabled = true compute_max_instance_size = "M60" compute_min_instance_size = "M10" } provider_name = "GCP" priority = 6 region_name = "WESTERN_US" } ] } ] # MongoDB recommends enabling auto-scaling # When auto-scaling is enabled, Atlas may change the instance size, and this lifecycle # block prevents Terraform from reverting Atlas auto-scaling changes # that modify instance size back to the original configured value lifecycle { ignore_changes = [ replication_specs[0].region_configs[0].electable_specs.instance_size, replication_specs[0].region_configs[1].electable_specs.instance_size ] }
variables.tf
# MongoDB Atlas Provider Authentication Variables # Legacy API key authentication (backward compatibility) variable "mongodbatlas_public_key" { type = string description = "MongoDB Atlas API public key" sensitive = true } variable "mongodbatlas_private_key" { type = string description = "MongoDB Atlas API private key" sensitive = true } # Recommended: Service account authentication variable "mongodb_service_account_id" { type = string description = "MongoDB service account ID for authentication" sensitive = true default = null } variable "mongodb_service_account_key_file" { type = string description = "Path to MongoDB service account private key file" sensitive = true default = null } # Atlas Organization ID variable "atlas_org_id" { type = string description = "Atlas Organization ID" } # Atlas Project Name variable "atlas_project_name" { type = string description = "Atlas Project Name" } # Atlas Project Environment variable "environment" { type = string description = "The environment to be built" } # Cluster Instance Size Name variable "cluster_instance_size_name" { type = string description = "Cluster instance size name" } # Cloud Provider to Host Atlas Cluster variable "cloud_provider" { type = string description = "AWS or GCP or Azure" } # Atlas Region variable "atlas_region" { type = string description = "Atlas region where resources will be created" } # MongoDB Version variable "mongodb_version" { type = string description = "MongoDB Version" } # Atlas Group Name variable "atlas_group_name" { type = string description = "Atlas Group Name" }
terraform.tfvars
atlas_org_id = "32b6e34b3d91647abb20e7b8" atlas_project_name = "Customer Portal - Dev" environment = "dev" cluster_instance_size_name = "M10" cloud_provider = "AWS" atlas_region = "US_WEST_2" mongodb_version = "8.0"
provider.tf
# Define the MongoDB Atlas Provider terraform { required_providers { mongodbatlas = { source = "mongodb/mongodbatlas" version = "~> 2.2" } } required_version = ">= 1.0" } # Configure the MongoDB Atlas Provider provider "mongodbatlas" { # Legacy API key authentication (backward compatibility) public_key = var.mongodbatlas_public_key private_key = var.mongodbatlas_private_key # Recommended: Service account authentication # Uncomment and configure the following for service account auth: # service_account_id = var.mongodb_service_account_id # private_key_file = var.mongodb_service_account_key_file }
For your staging and production environments, create the following files for each application and environment pair. Place the files for each application and environment pair in their own directory. Change the IDs and names to use your values:
main.tf
# Create a Group to Assign to Project resource "mongodbatlas_team" "project_group" { org_id = var.atlas_org_id name = var.atlas_group_name usernames = [ "user1@example.com", "user2@example.com" ] } # Create a Project resource "mongodbatlas_project" "atlas-project" { org_id = var.atlas_org_id name = var.atlas_project_name } # Assign the team to project with specific roles resource "mongodbatlas_team_project_assignment" "project_team" { project_id = mongodbatlas_project.atlas-project.id team_id = mongodbatlas_team.project_group.team_id role_names = ["GROUP_READ_ONLY", "GROUP_CLUSTER_MANAGER"] } # Create an Atlas Advanced Cluster resource "mongodbatlas_advanced_cluster" "atlas-cluster" { project_id = mongodbatlas_project.atlas-project.id name = "ClusterPortalProd" cluster_type = "REPLICASET" mongo_db_major_version = var.mongodb_version replication_specs = [ { region_configs = [ { electable_specs = { instance_size = var.cluster_instance_size_name node_count = 3 disk_size_gb = var.disk_size_gb } auto_scaling = { disk_gb_enabled = var.auto_scaling_disk_gb_enabled compute_enabled = var.auto_scaling_compute_enabled compute_max_instance_size = var.compute_max_instance_size } priority = 7 provider_name = var.cloud_provider region_name = var.atlas_region } ] } ] # Prevent Terraform from reverting auto-scaling changes lifecycle { ignore_changes = [ replication_specs[0].region_configs[0].electable_specs.instance_size, replication_specs[0].region_configs[0].electable_specs.disk_size_gb ] } tags = { BU = "ConsumerProducts" TeamName = "TeamA" AppName = "ProductManagementApp" Env = "Production" Version = "8.0" Email = "marissa@example.com" } } # Outputs to Display output "atlas_cluster_connection_string" { value = mongodbatlas_advanced_cluster.atlas-cluster.connection_strings.standard_srv } output "project_name" { value = mongodbatlas_project.atlas-project.name }
Note
To create a multi-region cluster, specify each region in its own region_configs
object and nest them in the replication_specs object, as shown in the
following example:
replication_specs = [ { region_configs = [ { electable_specs = { instance_size = "M10" node_count = 2 } provider_name = "GCP" priority = 7 region_name = "NORTH_AMERICA_NORTHEAST_1" }, { electable_specs = { instance_size = "M10" node_count = 3 } provider_name = "GCP" priority = 6 region_name = "WESTERN_US" } ] } ]
variables.tf
# MongoDB Atlas Provider Authentication Variables # Legacy API key authentication (backward compatibility) variable "mongodbatlas_public_key" { type = string description = "MongoDB Atlas API public key" sensitive = true } variable "mongodbatlas_private_key" { type = string description = "MongoDB Atlas API private key" sensitive = true } # Recommended: Service account authentication variable "mongodb_service_account_id" { type = string description = "MongoDB service account ID for authentication" sensitive = true default = null } variable "mongodb_service_account_key_file" { type = string description = "Path to MongoDB service account private key file" sensitive = true default = null } # Atlas Organization ID variable "atlas_org_id" { type = string description = "Atlas Organization ID" } # Atlas Project Name variable "atlas_project_name" { type = string description = "Atlas Project Name" } # Atlas Project Environment variable "environment" { type = string description = "The environment to be built" } # Cluster Instance Size Name variable "cluster_instance_size_name" { type = string description = "Cluster instance size name" } # Cloud Provider to Host Atlas Cluster variable "cloud_provider" { type = string description = "AWS or GCP or Azure" } # Atlas Region variable "atlas_region" { type = string description = "Atlas region where resources will be created" } # MongoDB Version variable "mongodb_version" { type = string description = "MongoDB Version" } # Atlas Group Name variable "atlas_group_name" { type = string description = "Atlas Group Name" }
terraform.tfvars
atlas_org_id = "32b6e34b3d91647abb20e7b8" atlas_project_name = "Customer Portal - Prod" environment = "prod" cluster_instance_size_name = "M30" cloud_provider = "AWS" atlas_region = "US_WEST_2" mongodb_version = "8.0" atlas_group_name = "Atlas Group"
provider.tf
# Define the MongoDB Atlas Provider terraform { required_providers { mongodbatlas = { source = "mongodb/mongodbatlas" version = "~> 2.2" } } required_version = ">= 1.0" } # Configure the MongoDB Atlas Provider provider "mongodbatlas" { # Legacy API key authentication (backward compatibility) public_key = var.mongodbatlas_public_key private_key = var.mongodbatlas_private_key # Recommended: Service account authentication # Uncomment and configure the following for service account auth: # service_account_id = var.mongodb_service_account_id # private_key_file = var.mongodb_service_account_key_file }
For more configuration options and info about this example, see MongoDB & HashiCorp Terraform and the MongoDB Terraform Blog Post.
After you create the files, navigate to each application and environment pair's directory and run the following command to initialize Terraform:
terraform init
Run the following command to view the Terraform plan:
terraform plan
Run the following command to create one project and one deployment for the application and environment pair. The command uses the files and the MongoDB & HashiCorp Terraform to create the projects and clusters:
terraform apply
When prompted, type yes and press Enter to apply
the configuration.
Next Steps
After you plan the hierarchy and size for your organizations, projects, and clusters, see the following suggested resources or use the left navigation to find features and best practices for each Well-Architected Framework pillar.