High availability is the ability of your application to ensure continuous operation and minimize downtime during infrastructure outages, system maintenance, and other disruptions. MongoDB's default deployment architecture is designed for high availability, with built-in features for data redundancy and automatic failover. This page describes additional configuration options and deployment architecture enhancements you can choose from to prevent disruptions and support robust failover mechanisms for zone, region, and cloud provider outages.
Atlas Features for High Availability
Database Replication
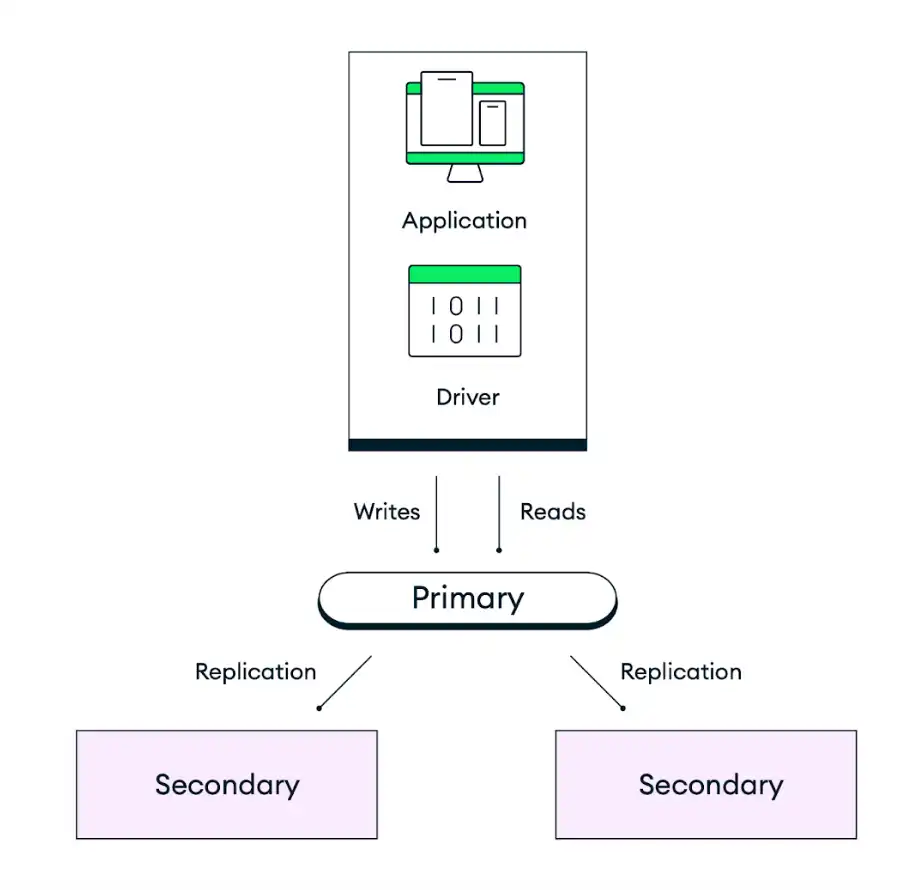
MongoDB's default deployment architecture is designed for redundancy. Atlas deploys each cluster as a replica set with a minimum of three database instances (also called nodes or replica set members), distributed across separate availability zones within your selected cloud provider regions. Applications write data to the replica set's primary node, and then Atlas replicates and stores that data across all nodes within your cluster. To control the durability of your data storage, you can adjust the write concern of your application code to complete the write only once a certain number of secondaries have committed the write. The default behavior is for data to be persisted on a majority of electable nodes before confirming the action.
The following diagram represents how replication works for a default three-node replica set:

Automatic Failover
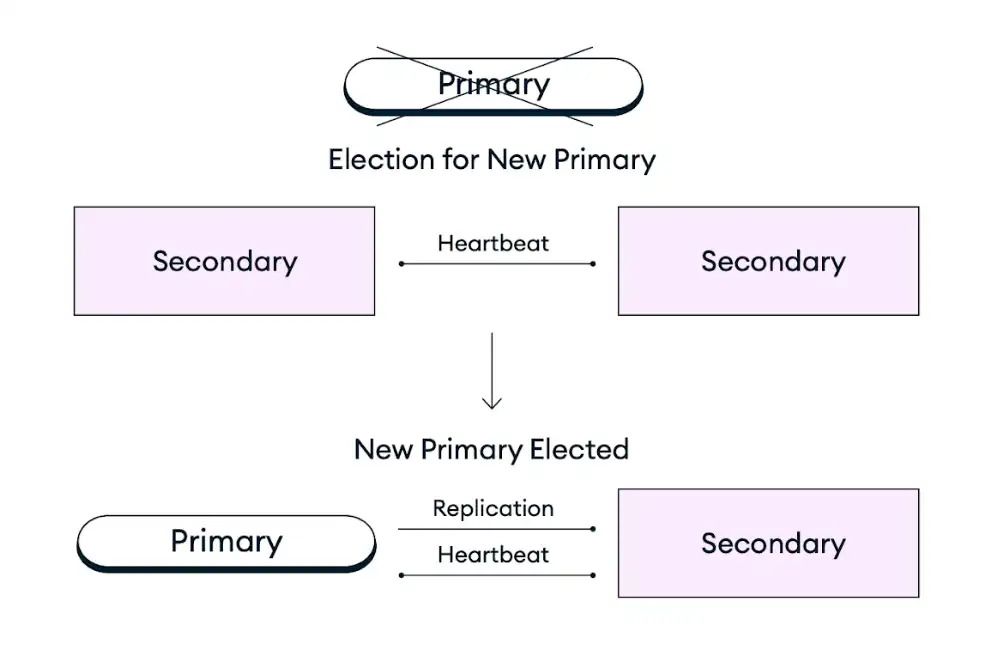
In the event that a primary node in a replica set becomes unavailable due to an infrastructure outage, scheduled maintenance, or any other disruption, Atlas clusters self-heal by promoting an existing secondary node to the role of primary node in a replica set election. This failover process is fully automatic and completes within seconds without any data loss, including operations that were in flight at the time of the failure, which are retried after the failure if retryable writes are enabled. After a replica set election, Atlas restores or replaces the failing member to ensure that the cluster is returned to its target configuration as soon as possible. The MongoDB client driver also automatically switches all client connections during and after the failure.
The following diagram represents the replica set election process:

To improve availability for your most critical applications, you can scale your deployment by adding nodes, regions, or cloud providers to withstand zone, region, or provider outages, respectively. To learn more, see the Scale Your Deployment Paradigm for Fault Tolerance recommendation below.
Recommendations for Atlas High Availability
The following recommendations describe additional configuration options and deployment architecture enhancements you can make to increase availability for your deployment.
Choose a Cluster Tier that Fits your Deployment Goals
When creating a new cluster, you can choose between a range of cluster tiers available under the Dedicated, Flex, or Free deployment types. The cluster tier in MongoDB Atlas specifies the resources (memory, storage, vCPUs, and IOPS) available for each node in your cluster. Scaling to a higher tier improves your cluster's ability to handle spikes in traffic and increases system reliability through faster response to high workloads. To determine the recommended cluster tier for your application size, see the Atlas Cluster Size Guide.
Atlas also supports auto-scaling to allow the cluster to automatically adjust to spikes in demand. Automating this action reduces the risk of an outage due to resource constraints. To learn more, see Guidance for Atlas Automated Infrastructure Provisioning.
Scale Your Deployment Paradigm for Fault Tolerance
Fault tolerance for an Atlas deployment can be measured as the number of replica set members that can become unavailable while your deployment still remains operational. In the event of an availability zone, region, or cloud provider outage, Atlas clusters self-heal by promoting an existing secondary node to the role of primary node in a replica set election. A majority of the voting nodes in a replica set must be operational in order to run a replica set election when a primary node experiences an outage.
To ensure that a replica set can elect a primary in the case of a partial-region outage, you should deploy clusters to regions with at least three availability zones. Availability zones are separated groups of datacenters within a single cloud provider region, each with its own power, cooling, and networking infrastructure. Atlas automatically distributes your cluster across availability zones when they are supported by your selected cloud provider region, so that if one zone experiences an outage, the remaining nodes in your cluster still support regional services. Most Atlas-supported cloud provider regions have at least three availability zones. These regions are marked with a star icon in the Atlas UI. For more information about recommended regions, see Cloud Providers and Regions.
To further improve fault tolerance for your most critical applications, you can scale your deployment by adding nodes, regions, or cloud providers to withstand availability zone, region, or provider outages, respectively. You can increase the node count to any odd number of nodes, with a maximum of 7 electable nodes and 50 total nodes. You can also deploy a cluster to multiple regions to enhance availability across a larger geography and enable automatic failover in the case of a full-region outage that disables all availability zones within your primary region. The same pattern applies to deploying your cluster to multiple cloud providers in order to withstand a full cloud provider outage.
For guidance on how to choose a deployment that balances your needs for high availability, low latency, compliance, and cost, see our Atlas Deployment Paradigms documentation.
Prevent Accidental Cluster Deletion
You can enable termination protection to ensure that a cluster will not be accidentally terminated and require downtime to restore from a backup. To delete a cluster that has termination protection enabled, you must first disable termination protection. By default, Atlas disables termination protection for all clusters.
Enabling termination protection is especially important when leveraging IaC tools like Terraform to ensure that a redeployment does not provision new infrastructure.
Test Automatic Failovers
Before you deploy an application to production, we strongly recommend that you simulate various scenarios that require automatic node failovers to measure your preparedness for such events. With Atlas, you can test primary node failover for a replica set and simulate regional outages for a multi-region deployment.
Use majority Write Concern
MongoDB allows you to specify the level of acknowledgment requested for
write operations by using write concern. Atlas has a default write
concern of majority, meaning that data must be replicated across
more than half of the nodes in your cluster before Atlas reports
success. Using majority instead of a definite number value like
2 allows Atlas to automatically adjust to requiring
replication across fewer nodes if you experience a temporary node
outage, allowing writes to continue after automatic failover.
This also provides a consistent setting across all environments, so your
connection string remains the same whether you have three nodes in a
test environment or a larger number of nodes in production.
Configure Retryable Database Reads and Writes
Atlas supports retryable read
and retryable write operations. When
enabled, Atlas retries read and write operations once as a
safeguard against intermittent network outages and replica set elections
in which the application temporarily cannot find a healthy primary node.
Retryable writes require an acknowledged write concern, meaning your write concern cannot be {w:
0}.
Monitor and Plan Your Resource Utilization
To avoid resource capacity issues, we recommend that you monitor resource utilization and hold regular capacity planning sessions. MongoDB's Professional Services offers these sessions. See our Resource Capacity Disaster Recovery Plan for our recommendations on how to recover from resource capacity issues.
To learn best practices for alerts and monitoring for resource utilization, see Guidance for Atlas Monitoring and Alerts.
Plan Your MongoDB Version Changes
We recommend that you run the latest MongoDB version to take advantage of new features and improved security guarantees. You should always ensure that you upgrade to the latest MongoDB major version before your current version reaches end of life.
You can't downgrade your MongoDB version using the Atlas UI. Because of this, we recommend that you work directly with MongoDB's Professional Services or Technical Services when planning and executing a major version upgrade to help you avoid any issues that might occur during the upgrade process.
Configure Maintenance Windows
Atlas maintains uptime during scheduled maintenance by applying updates in a rolling fashion to one node at a time. Whenever the current primary is taken offline for maintenance during this process, Atlas elects a new primary through an automatic replica set election. This is the same process that occurs during automatic failover in response to an unplanned primary node outage.
We recommend that you configure a custom maintenance window for your project to avoid maintenance-related replica set elections during business-critical hours. You can also set protected hours in your maintenance window settings to define a daily window of time in which standard updates cannot begin. Standard updates do not involve cluster restarts or resyncs.
Automation Examples: Atlas High Availability
The following examples configure the Single Region, 3 Node Replica Set / Shard deployment topology using Atlas tools for automation.
These examples also apply other recommended configurations, including:
Cluster tier set to
M10for a dev/test environment. Use the cluster size guide to learn the recommended cluster tier for your application size.Single Region, 3-Node Replica Set / Shard deployment topology.
Our examples use AWS, Azure, and Google Cloud interchangeably. You can use any of these three cloud providers, but you must change the region name to match the cloud provider. To learn about the cloud providers and their regions, see Cloud Providers.
Cluster tier set to
M30for a medium-sized application. Use the cluster size guide to learn the recommended cluster tier for your application size.Single Region, 3-Node Replica Set / Shard deployment topology.
Our examples use AWS, Azure, and Google Cloud interchangeably. You can use any of these three cloud providers, but you must change the region name to match the cloud provider. To learn about the cloud providers and their regions, see Cloud Providers.
Note
Before you can create resources with the Atlas CLI, you must:
Create your paying organization and create an API key for the paying organization.
Connect from the Atlas CLI using the steps for Programmatic Use.
Create One Deployment Per Project
For your development and testing environments, run the following command for each project. In the following example, change the IDs and names to use your values.
Note
The following example doesn't enable auto-scaling to help control costs in development and testing environments. For staging and production environments, auto-scaling should be enabled. See the "Staging and Prod Environments" tab for examples that enable auto-scaling.
atlas clusters create CustomerPortalDev \ --projectId 56fd11f25f23b33ef4c2a331 \ --region EASTERN_US \ --members 3 \ --tier M10 \ --provider GCP \ --mdbVersion 8.0 \ --diskSizeGB 30 \ --tag bu=ConsumerProducts \ --tag teamName=TeamA \ --tag appName=ProductManagementApp \ --tag env=dev \ --tag version=8.0 \ --tag email=marissa@example.com \ --watch
For your staging and production environments, create the following cluster.json file for each project.
Change the IDs and names to use your values:
{ "clusterType": "REPLICASET", "links": [], "name": "CustomerPortalProd", "mongoDBMajorVersion": "8.0", "replicationSpecs": [ { "numShards": 1, "regionConfigs": [ { "electableSpecs": { "instanceSize": "M30", "nodeCount": 3 }, "priority": 7, "providerName": "GCP", "regionName": "EASTERN_US", "analyticsSpecs": { "nodeCount": 0, "instanceSize": "M30" }, "autoScaling": { "compute": { "enabled": true, "scaleDownEnabled": true }, "diskGB": { "enabled": true } }, "readOnlySpecs": { "nodeCount": 0, "instanceSize": "M30" } } ], "zoneName": "Zone 1" } ], "tag" : [{ "bu": "ConsumerProducts", "teamName": "TeamA", "appName": "ProductManagementApp", "env": "Production", "version": "8.0", "email": "marissa@example.com" }] }
After you create the cluster.json file, run the
following command for each project. The
command uses the cluster.json file to create a cluster.
atlas cluster create --projectId 5e2211c17a3e5a48f5497de3 --file cluster.json
For more configuration options and info about this example, see the atlas clusters create command.
Note
Before you can create resources with Terraform, you must:
Create your paying organization and create an API key for the paying organization. Store your API key as environment variables by running the following command in the terminal:
export MONGODB_ATLAS_PUBLIC_KEY="<insert your public key here>" export MONGODB_ATLAS_PRIVATE_KEY="<insert your private key here>"
Important
The following examples use MongoDB Atlas Terraform Provider version 2.x (~> 2.2).
If you're upgrading from provider version 1.x, see the
2.0.0 Upgrade Guide
for breaking changes and migration steps. The examples use the
mongodbatlas_advanced_cluster resource with v2.x syntax.
Create the Projects and Deployments
For your development and testing environments, create the following files for each application and environment pair. Place the files for each application and environment pair in their own directory. Change the IDs and names to use your values:
main.tf
# Create a Project resource "mongodbatlas_project" "atlas-project" { org_id = var.atlas_org_id name = var.atlas_project_name } # Create an Atlas Advanced Cluster resource "mongodbatlas_advanced_cluster" "atlas-cluster" { project_id = mongodbatlas_project.atlas-project.id name = "ClusterPortalDev" cluster_type = "REPLICASET" mongo_db_major_version = var.mongodb_version replication_specs = [ { region_configs = [ { electable_specs = { instance_size = var.cluster_instance_size_name node_count = 3 } auto_scaling = { compute_enabled = true compute_scale_down_enabled = true compute_max_instance_size = "M60" compute_min_instance_size = "M10" } priority = 7 provider_name = var.cloud_provider region_name = var.atlas_region } ] } ] tags = { BU = "ConsumerProducts" TeamName = "TeamA" AppName = "ProductManagementApp" Env = "Test" Version = "8.0" Email = "marissa@example.com" } # MongoDB recommends enabling auto-scaling # When auto-scaling is enabled, Atlas may change the instance size, and this lifecycle # block prevents Terraform from reverting Atlas auto-scaling changes # that modify instance size back to the original configured value lifecycle { ignore_changes = [ replication_specs[0].region_configs[0].electable_specs.instance_size ] } } # Outputs to Display output "atlas_cluster_connection_string" { value = mongodbatlas_advanced_cluster.atlas-cluster.connection_strings.0.standard_srv } output "project_name" { value = mongodbatlas_project.atlas-project.name }
Note
To create a multi-region cluster, specify each region in its own region_configs
object and nest them in the replication_specs object. The priority
fields must be defined in descending order and must consist of values
between 7 and 1 as shown in the following example:
replication_specs = [ { region_configs = [ { electable_specs = { instance_size = "M10" node_count = 2 } auto_scaling = { compute_enabled = true compute_scale_down_enabled = true compute_max_instance_size = "M60" compute_min_instance_size = "M10" } provider_name = "GCP" priority = 7 region_name = "NORTH_AMERICA_NORTHEAST_1" }, { electable_specs = { instance_size = "M10" node_count = 3 } auto_scaling = { compute_enabled = true compute_scale_down_enabled = true compute_max_instance_size = "M60" compute_min_instance_size = "M10" } provider_name = "GCP" priority = 6 region_name = "WESTERN_US" } ] } ] # MongoDB recommends enabling auto-scaling # When auto-scaling is enabled, Atlas may change the instance size, and this lifecycle # block prevents Terraform from reverting Atlas auto-scaling changes # that modify instance size back to the original configured value lifecycle { ignore_changes = [ replication_specs[0].region_configs[0].electable_specs.instance_size, replication_specs[0].region_configs[1].electable_specs.instance_size ] }
variables.tf
# MongoDB Atlas Provider Authentication Variables # Legacy API key authentication (backward compatibility) variable "mongodbatlas_public_key" { type = string description = "MongoDB Atlas API public key" sensitive = true } variable "mongodbatlas_private_key" { type = string description = "MongoDB Atlas API private key" sensitive = true } # Recommended: Service account authentication variable "mongodb_service_account_id" { type = string description = "MongoDB service account ID for authentication" sensitive = true default = null } variable "mongodb_service_account_key_file" { type = string description = "Path to MongoDB service account private key file" sensitive = true default = null } # Atlas Organization ID variable "atlas_org_id" { type = string description = "Atlas Organization ID" } # Atlas Project Name variable "atlas_project_name" { type = string description = "Atlas Project Name" } # Atlas Project Environment variable "environment" { type = string description = "The environment to be built" } # Cluster Instance Size Name variable "cluster_instance_size_name" { type = string description = "Cluster instance size name" } # Cloud Provider to Host Atlas Cluster variable "cloud_provider" { type = string description = "AWS or GCP or Azure" } # Atlas Region variable "atlas_region" { type = string description = "Atlas region where resources will be created" } # MongoDB Version variable "mongodb_version" { type = string description = "MongoDB Version" } # Atlas Group Name variable "atlas_group_name" { type = string description = "Atlas Group Name" }
terraform.tfvars
atlas_org_id = "32b6e34b3d91647abb20e7b8" atlas_project_name = "Customer Portal - Dev" environment = "dev" cluster_instance_size_name = "M10" cloud_provider = "AWS" atlas_region = "US_WEST_2" mongodb_version = "8.0"
provider.tf
# Define the MongoDB Atlas Provider terraform { required_providers { mongodbatlas = { source = "mongodb/mongodbatlas" version = "~> 2.2" } } required_version = ">= 1.0" } # Configure the MongoDB Atlas Provider provider "mongodbatlas" { # Legacy API key authentication (backward compatibility) public_key = var.mongodbatlas_public_key private_key = var.mongodbatlas_private_key # Recommended: Service account authentication # Uncomment and configure the following for service account auth: # service_account_id = var.mongodb_service_account_id # private_key_file = var.mongodb_service_account_key_file }
After you create the files, navigate to each application and environment pair's directory and run the following command to initialize Terraform:
terraform init
Run the following command to view the Terraform plan:
terraform plan
Run the following command to create one project and one deployment for the application and environment pair. The command uses the files and the MongoDB & HashiCorp Terraform to create the projects and clusters:
terraform apply
When prompted, type yes and press Enter to apply
the configuration.
For your staging and production environments, create the following files for each application and environment pair. Place the files for each application and environment pair in their own directory. Change the IDs and names to use your values:
main.tf
# Create a Group to Assign to Project resource "mongodbatlas_team" "project_group" { org_id = var.atlas_org_id name = var.atlas_group_name usernames = [ "user1@example.com", "user2@example.com" ] } # Create a Project resource "mongodbatlas_project" "atlas-project" { org_id = var.atlas_org_id name = var.atlas_project_name } # Assign the team to project with specific roles resource "mongodbatlas_team_project_assignment" "project_team" { project_id = mongodbatlas_project.atlas-project.id team_id = mongodbatlas_team.project_group.team_id role_names = ["GROUP_READ_ONLY", "GROUP_CLUSTER_MANAGER"] } # Create an Atlas Advanced Cluster resource "mongodbatlas_advanced_cluster" "atlas-cluster" { project_id = mongodbatlas_project.atlas-project.id name = "ClusterPortalProd" cluster_type = "REPLICASET" mongo_db_major_version = var.mongodb_version replication_specs = [ { region_configs = [ { electable_specs = { instance_size = var.cluster_instance_size_name node_count = 3 disk_size_gb = var.disk_size_gb } auto_scaling = { disk_gb_enabled = var.auto_scaling_disk_gb_enabled compute_enabled = var.auto_scaling_compute_enabled compute_max_instance_size = var.compute_max_instance_size } priority = 7 provider_name = var.cloud_provider region_name = var.atlas_region } ] } ] # Prevent Terraform from reverting auto-scaling changes lifecycle { ignore_changes = [ replication_specs[0].region_configs[0].electable_specs.instance_size, replication_specs[0].region_configs[0].electable_specs.disk_size_gb ] } tags = { BU = "ConsumerProducts" TeamName = "TeamA" AppName = "ProductManagementApp" Env = "Production" Version = "8.0" Email = "marissa@example.com" } } # Outputs to Display output "atlas_cluster_connection_string" { value = mongodbatlas_advanced_cluster.atlas-cluster.connection_strings.standard_srv } output "project_name" { value = mongodbatlas_project.atlas-project.name }
Note
To create a multi-region cluster, specify each region in its own region_configs
object and nest them in the replication_specs object, as shown in the
following example:
replication_specs = [ { region_configs = [ { electable_specs = { instance_size = "M10" node_count = 2 } provider_name = "GCP" priority = 7 region_name = "NORTH_AMERICA_NORTHEAST_1" }, { electable_specs = { instance_size = "M10" node_count = 3 } provider_name = "GCP" priority = 6 region_name = "WESTERN_US" } ] } ]
variables.tf
# MongoDB Atlas Provider Authentication Variables # Legacy API key authentication (backward compatibility) variable "mongodbatlas_public_key" { type = string description = "MongoDB Atlas API public key" sensitive = true } variable "mongodbatlas_private_key" { type = string description = "MongoDB Atlas API private key" sensitive = true } # Recommended: Service account authentication variable "mongodb_service_account_id" { type = string description = "MongoDB service account ID for authentication" sensitive = true default = null } variable "mongodb_service_account_key_file" { type = string description = "Path to MongoDB service account private key file" sensitive = true default = null } # Atlas Organization ID variable "atlas_org_id" { type = string description = "Atlas Organization ID" } # Atlas Project Name variable "atlas_project_name" { type = string description = "Atlas Project Name" } # Atlas Project Environment variable "environment" { type = string description = "The environment to be built" } # Cluster Instance Size Name variable "cluster_instance_size_name" { type = string description = "Cluster instance size name" } # Cloud Provider to Host Atlas Cluster variable "cloud_provider" { type = string description = "AWS or GCP or Azure" } # Atlas Region variable "atlas_region" { type = string description = "Atlas region where resources will be created" } # MongoDB Version variable "mongodb_version" { type = string description = "MongoDB Version" } # Atlas Group Name variable "atlas_group_name" { type = string description = "Atlas Group Name" }
terraform.tfvars
atlas_org_id = "32b6e34b3d91647abb20e7b8" atlas_project_name = "Customer Portal - Prod" environment = "prod" cluster_instance_size_name = "M30" cloud_provider = "AWS" atlas_region = "US_WEST_2" mongodb_version = "8.0" atlas_group_name = "Atlas Group"
provider.tf
# Define the MongoDB Atlas Provider terraform { required_providers { mongodbatlas = { source = "mongodb/mongodbatlas" version = "~> 2.2" } } required_version = ">= 1.0" } # Configure the MongoDB Atlas Provider provider "mongodbatlas" { # Legacy API key authentication (backward compatibility) public_key = var.mongodbatlas_public_key private_key = var.mongodbatlas_private_key # Recommended: Service account authentication # Uncomment and configure the following for service account auth: # service_account_id = var.mongodb_service_account_id # private_key_file = var.mongodb_service_account_key_file }
After you create the files, navigate to each application and environment pair's directory and run the following command to initialize Terraform:
terraform init
Run the following command to view the Terraform plan:
terraform plan
Run the following command to create one project and one deployment for the application and environment pair. The command uses the files and the MongoDB & HashiCorp Terraform to create the projects and clusters:
terraform apply
When prompted, type yes and press Enter to apply
the configuration.
For more configuration options and info about this example, see MongoDB & HashiCorp Terraform and the MongoDB Terraform Blog Post.