MongoDB offers an AWS Eventbridge partner event source that lets you send Atlas Trigger events to an event bus instead of calling an Atlas Function. You can configure any Trigger type to send events to EventBridge. Database Triggers also support custom error handling, to reduce Trigger suspensions due to non-critical errors.
All you need to send Trigger events to EventBridge is an AWS account ID. This guide walks you through finding your account ID, configuring the Trigger, associating the Trigger event source with an event bus, and setting up custom error handling.
Note
Official AWS Partner Event Source Guide
This guide is based on Amazon's Receiving Events from a SaaS Partner documentation.
Procedure
Note
Individual entries for an EventBridge Trigger event must be smaller than 256 KB.
Learn how to reduce the size of your PutEvents entry in the
Performance Optimization
section.
Set Up the MongoDB Partner Event Source
To send Trigger events to AWS EventBridge, you need the AWS account ID of the account that should receive the events.
Open the Amazon EventBridge console and click Partner event sources in the navigation menu.
Search for the MongoDB partner event source and then click Set up.
From the MongoDB partner event source page, click Copy to copy your AWS account ID to the clipboard.
Configure the Trigger
After you have the AWS account ID, you can configure a Database Trigger or Scheduled Trigger to send events to EventBridge.
You can configure the Trigger in the Atlas UI or using the App Services CLI.
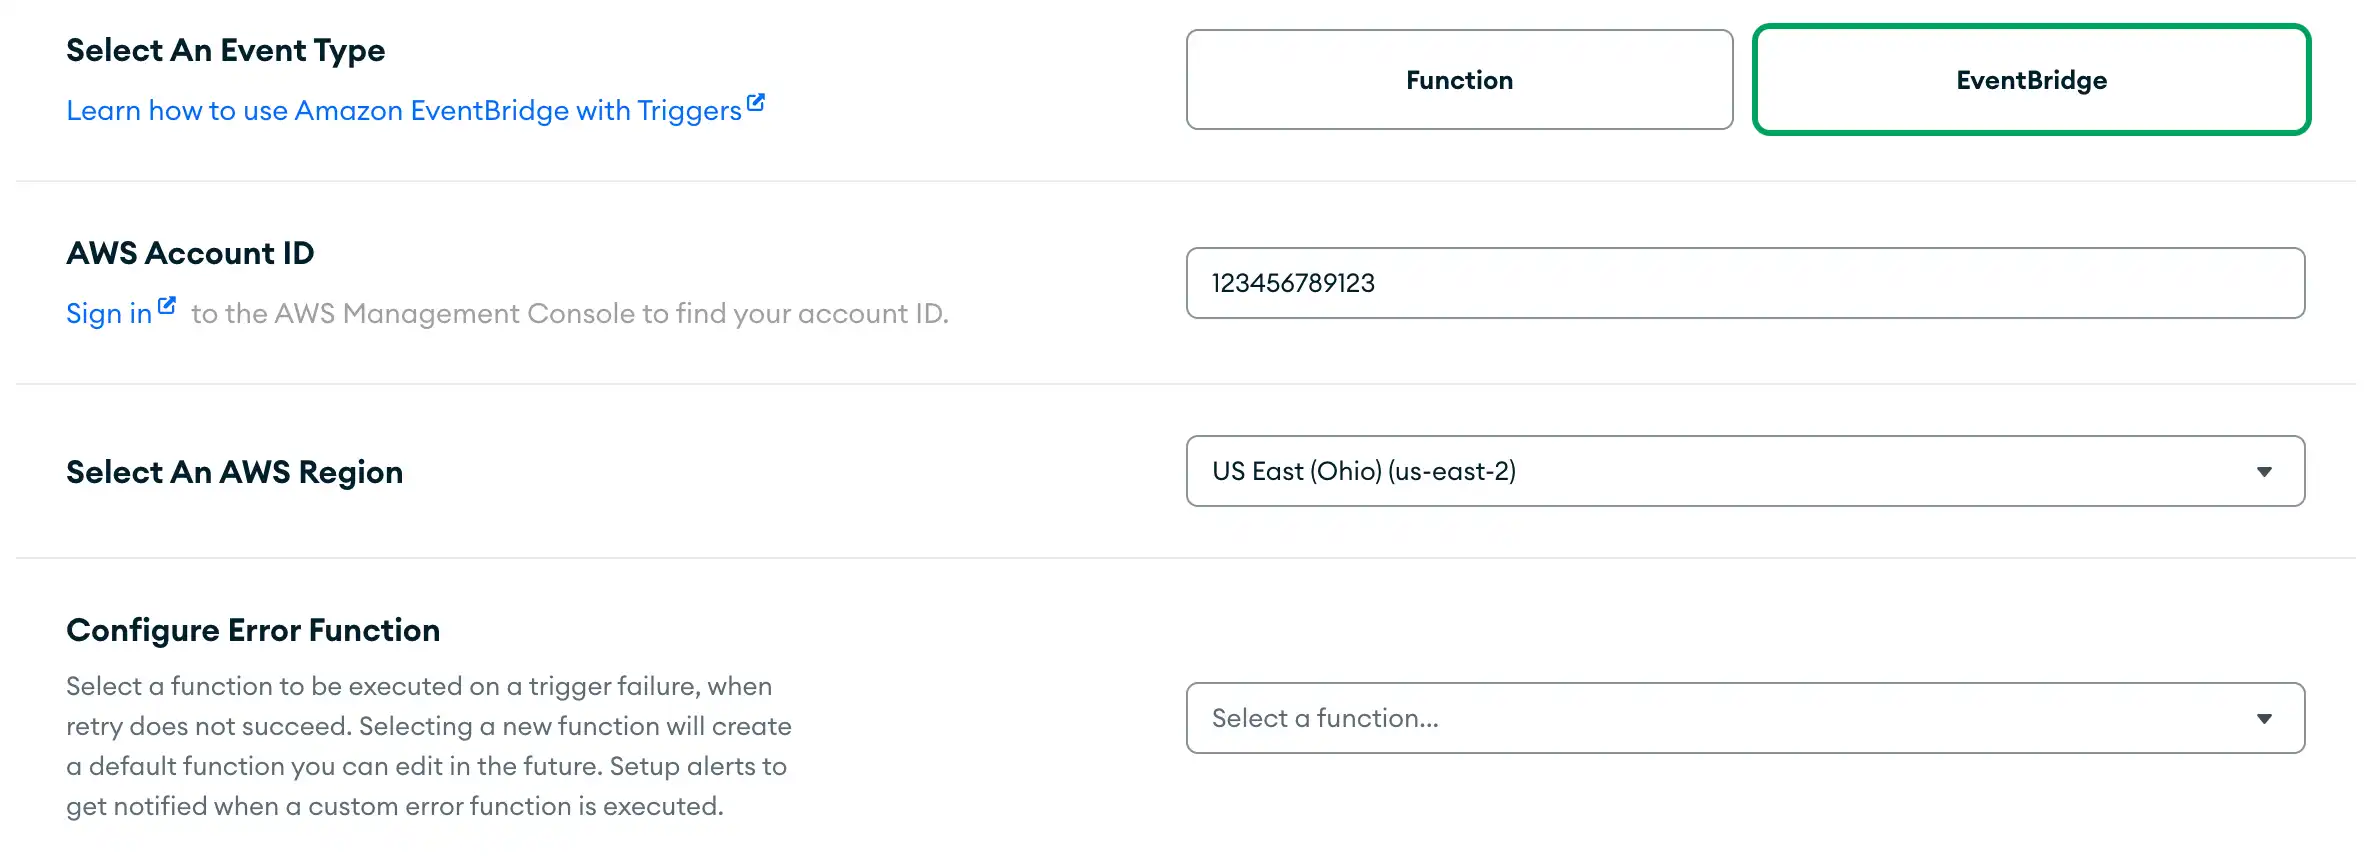
In the Atlas UI, create and configure a new Database Trigger or Scheduled Trigger with the following settings:
Select EventBridge as the event type.
Paste the AWS Account ID that you copied from EventBridge.
Select an AWS Region to send the Trigger events to.
Note
Supported AWS Regions
For a full list of supported AWS regions, refer to Amazon's Receiving Events from a SaaS Partner guide.
(Optional for Database Triggers Only) Configure a Function to handle Trigger errors.
For more details, refer to the Custom Error Handling section on this page.
![The EventBridge input boxes in the Trigger configuration.]() click to enlarge
click to enlargeTo enable Extended JSON, toggle the Enable Extended JSON setting in the Advanced (Optional) section.
By default, Triggers convert the BSON types in event objects into standard JSON types.
Enabling Extended JSON preserves BSON type information by serializing event objects into Extended JSON format instead. This preserves type information at the expense of readability and interoperability.

Authenticate a MongoDB Atlas User
Use your MongoDB Atlas Administration API Key to log in to the App Services CLI:
appservices login --api-key="<API KEY>" --private-api-key="<PRIVATE KEY>" Pull Your App's Latest Configuration Files
Run the following command to get a local copy of your configuration files:
appservices pull --remote=<App ID> By default, the command pulls files into the current working directory. You can specify a directory path with the optional
--localflag.Create a trigger configuration file in your local
/triggersdirectory. Omit thefunction_namefield and define anAWS_EVENTBRIDGEevent processor.Set the
account_idfield to the AWS Account ID that you copied from EventBridge.Set the
regionfield to an AWS Region.Note
Supported AWS Regions
For a full list of supported AWS regions, refer to Amazon's Receiving Events from a SaaS Partner guide.
To enable Extended JSON, set the
extended_json_enabledfield totrue.By default, Triggers convert the BSON types in event objects into standard JSON types.
Enabling Extended JSON preserves BSON type information by serializing event objects into Extended JSON format instead. This preserves type information at the expense of readability and interoperability.
(Optional for Database Triggers Only) Configure a Function to handle Trigger errors.
For more details, refer to the Custom Error Handling section on this page.
The Trigger configuration file should resemble the following:
{ "name": "...", "type": "...", "event_processors": { "AWS_EVENTBRIDGE": { "config": { "account_id": "<AWS Account ID>", "region": "<AWS Region>", "extended_json_enabled": <boolean> } } } }
Associate the Trigger Event Source with an Event Bus
Return to the EventBridge console.
Select Partner event sources in the navigation pane.
In the Partner event sources table, find and select the Pending Trigger source, then click Associate with event bus.
On the Associate with event bus screen, define any required access permissions for other accounts and organizations, then click Associate.
After the association is confirmed, the status of the Trigger event source changes from Pending to Active, and the name of the event bus updates to match the event source name. You can now create rules that trigger on events from that partner event source.
For more information, see Creating a Rule that Triggers on a SaaS Partner Event.
Custom Error Handling
Note
Only Database Triggers Support Custom Error Handlers
Currently, only Database Triggers support custom error handling. Authentication Triggers and Scheduled Triggers do not support custom error handling at this time.
You can create an error handler to execute on a Trigger failure when retry does not succeed. Custom error handling allows you to determine whether an error from AWS EventBridge is critical enough to suspend the Trigger, or if it is acceptable to ignore the error and continue processing other events.
For more information on suspended Database Triggers, refer to Suspended Triggers.
Create a New Custom Error Handler
You can create a new error handler in the Atlas UI, using the App Services CLI, or through the App Services Admin API.
This procedure walks you through how to create the new Function directly in the Create a Trigger page.
You can also create the Function from the Functions page. For more information on how to define Functions in Atlas, refer to Define a Function.

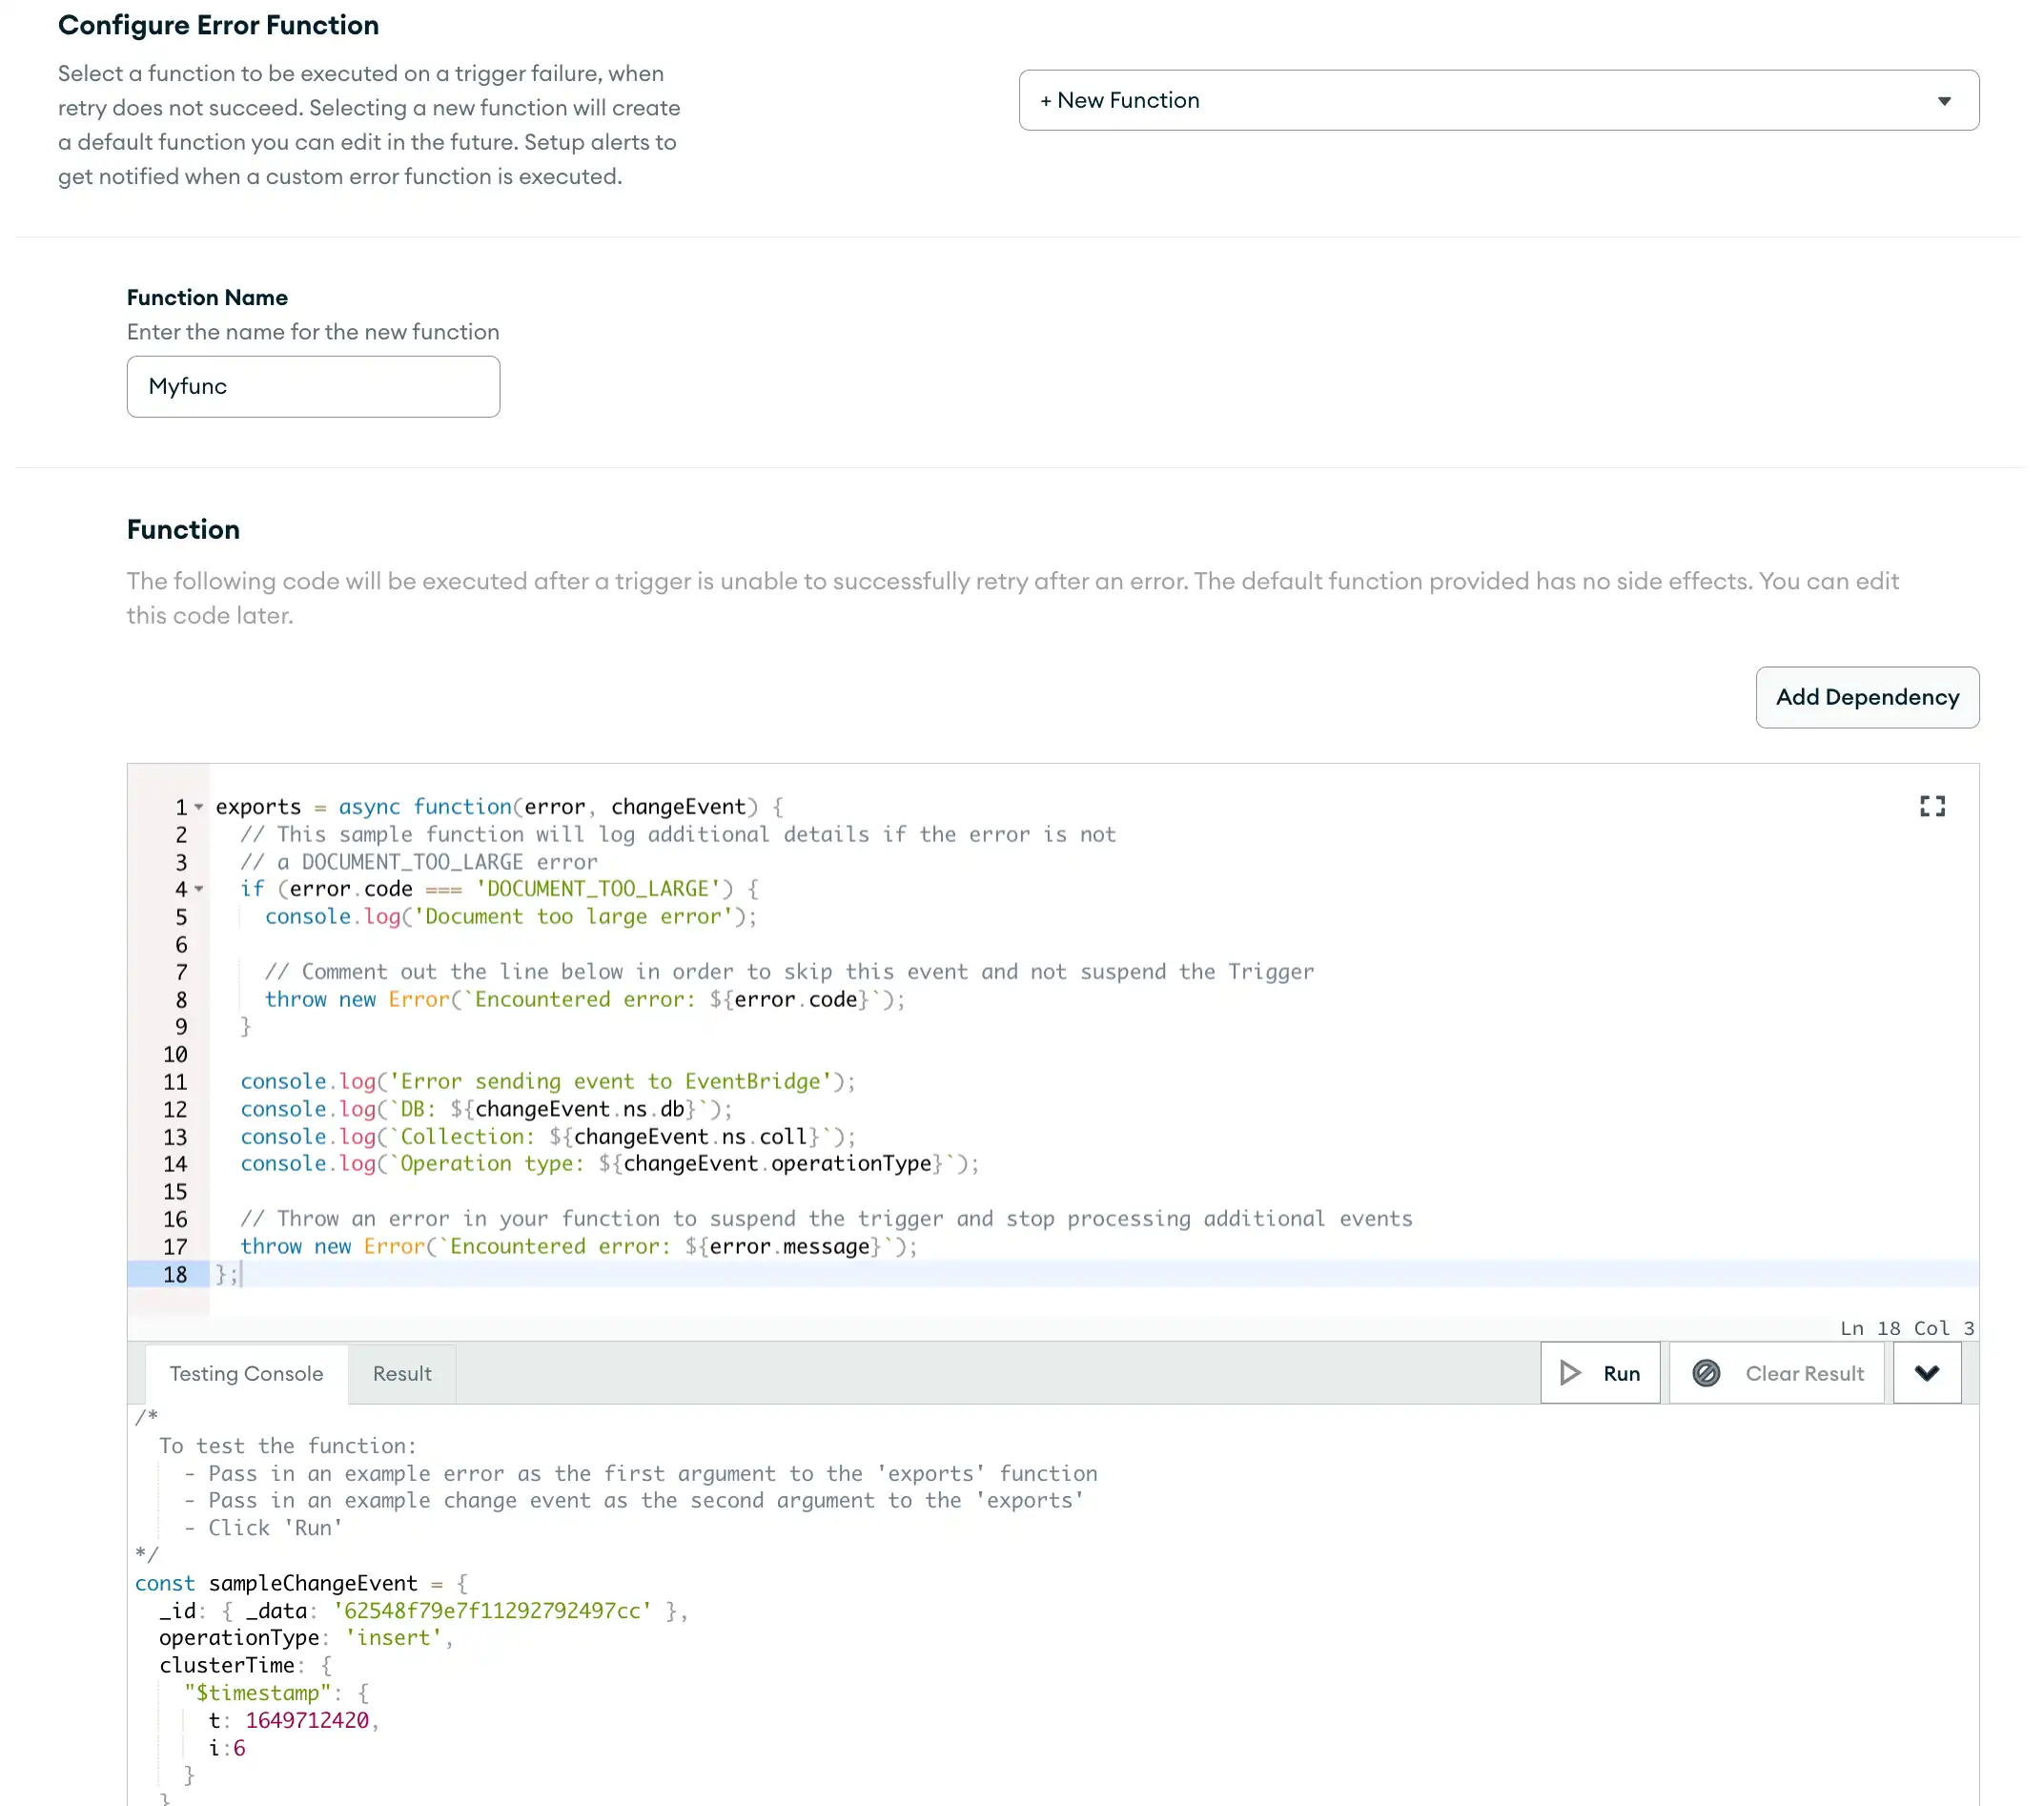
Write the Function Code
In the Function section, write the JavaScript code directly in the Function editor. The Function editor contains a default Function that you can edit as needed. For more information on creating Functions, refer to the Functions documentation.
Test the Function
In the Testing Console tab beneath the Function editor, you can
test the Function by passing in example values to the error and
changeEvent parameters, as shown in the comments of the testing console.
For more information on these parameters, refer to the Error Handler Parameters section on this page.
Click Run to run the test.
You can update your trigger's configuration with an error handler using the App Services CLI. For more information, see the Update an App procedure.
Authenticate a MongoDB Atlas User
Use your MongoDB Atlas Administration API Key to log in to the App Services CLI:
appservices login --api-key="<API KEY>" --private-api-key="<PRIVATE KEY>"
Write the Error Handler
Follow the steps in Define a Function to write your error handler source code and configuration file.
See the following template error handler as an example:
exports = async function(error, changeEvent) { // This sample function will log additional details if the error is not // a DOCUMENT_TOO_LARGE error if (error.code === 'DOCUMENT_TOO_LARGE') { console.log('Document too large error'); // Comment out the line below in order to skip this event and not suspend the Trigger throw new Error('Encountered error: ${error.code}'); } console.log('Error sending event to EventBridge'); console.log('DB: ${changeEvent.ns.db}'); console.log('Collection: ${changeEvent.ns.coll}'); console.log('Operation type: ${changeEvent.operationType}'); // Throw an error in your Function to suspend the Trigger // and stop processing additional events throw new Error('Encountered error: ${error.message}'); };
For more information on creating Functions, see Functions.
Add the Error Handler to Your Trigger Configuration
Add an error_handler attribute to your Trigger configuration
file in the Triggers folder.
The Trigger configuration file should resemble the following:
{ "name": "...", "type": "DATABASE", "event_processors": { "AWS_EVENTBRIDGE": { "config": { "account_id": "<AWS Account ID>", "region": "<AWS Region>", "extended_json_enabled": <boolean> } } }, "error_handler": { "config": { "enabled": <boolean>, "function_name": "<Error Handler Function Name>" } } }
For more information, see Trigger Configuration Files.
Deploy Your Changes
Run the following command to deploy your changes:
appservices push
Note
This procedure refers to App Services Admin API endpoints. It does not use Atlas Administration API endpoints.
Authenticate a MongoDB Atlas User
Call the Login endpoint with your MongoDB Atlas Administration API key pair:
curl -X POST \ https://services.cloud.mongodb.com/api/admin/v3.0/auth/providers/mongodb-cloud/login \ -H 'Content-Type: application/json' \ -H 'Accept: application/json' \ -d '{ "username": "<Public API Key>", "apiKey": "<Private API Key>" }'
If authentication succeeds, the response body contains a JSON object
with an access_token value:
{ "access_token": "<access_token>", "refresh_token": "<refresh_token>", "user_id": "<user_id>", "device_id": "<device_id>" }
The access_token grants access to the App Services Admin API. You
must include it as a Bearer token in the Authorization header for
all App Services Admin API requests.
Tip
App Services Admin API Authentication documentation
Create a Deployment Draft (Optional)
A draft represents a group of application changes that you can deploy or discard as a single unit. If you don't create a draft, updates automatically deploy individually.
To create a draft, send a POST request with no body to
the Create a Deployment Draft endpoint:
curl -X POST 'https://services.cloud.mongodb.com/api/admin/v3.0/groups/{groupId}/apps/{appId}/drafts' \ -H 'Content-Type: application/json' \ -H 'Authorization: Bearer <access_token>'
Create the Error Handler Function
Create the Function to handle errors for a failed AWS
EventBridge Trigger via a POST request to the
Create a new
Function endpoint.
curl -X POST \ https://services.cloud.mongodb.com/api/admin/v3.0/groups/{groupId}/apps/{appId}/functions \ -H 'Authorization: Bearer <access_token>' \ -d '{ "name": "string", "private": true, "source": "string", "run_as_system": true }'
Create the AWS EventBridge Trigger
Create the AWS EventBridge Trigger with error handling enabled via a
POST request to the
Create a Trigger
endpoint.
curl -X POST \ https://services.cloud.mongodb.com/api/admin/v3.0/groups/{groupId}/apps/{appId}/triggers \ -H 'Authorization: Bearer <access_token>' \ -d '{ "name": "string", "type": "DATABASE", "config": { "service_id": "string", "database": "string", "collection": "string", "operation_types": { "string" }, "match": , "full_document": false, "full_document_before_change": false, "unordered": true }, "event_processors": { "AWS_EVENTBRIDGE": { "account_id": "string", "region": "string", "extended_json_enabled": false }, }, "error_handler": { "enabled": true, "function_id": "string" } }'
Deploy Your Changes
If you created a draft, you can deploy all changes in
the draft by sending a POST request with no body to the
Deploy a deployment draft endpoint.
If you did not create a draft as a first step, the individual Function and Trigger requests deploy automatically.
curl -X POST \ 'https://services.cloud.mongodb.com/api/admin/v3.0/groups/{groupId}/apps/{appId}/drafts/{draftId}/deployment' \ --header 'Content-Type: application/json' \ --header 'Authorization: Bearer <access_token>' \
Error Handler Parameters
The default error handler has two parameters: error and changeEvent.
error
Has the following two attributes:
code: The code for the errored EventBridge put request. For a list of error codes used by the error handler, refer to the Error Codes section on this page.message: The unfiltered error message from an errored EventBridge put request.
changeEvent
The requested change to your data made by EventBridge. For more information on types of change events and their configurations, see Change Event Types.
Error Codes
If an error was received from EventBridge, the event processor will parse the
error as either DOCUMENT_TOO_LARGE or OTHER. This parsed error is passed
to the error handler Function through the error parameter.
DOCUMENT_TOO_LARGE
If the entry for an EventBridge Trigger event is larger than 256 KB, EventBridge will throw an error. The error will contain either:
status code: 400 and
total size of the entries in the request is over the limit.status code: 413, which indicates a too large payload.
For more information on reducing entry size, see Performance Optimization.
OTHER
The default bucket for all other errors.
Tip
Optimize Error Handling for Errors with OTHER Code
You can make special error handling cases for
your most common error messages to optimize your error handling for
errors with an OTHER code. To determine which errors need
special cases, we recommended keeping track of
the most common error messages you receive in error.message.
Error Handler Logs
You can view Trigger Error Handler logs for your EventBridge Trigger error handler in the application logs.
From the Triggers page of the Atlas UI, select
the Logs tab.
All logs display by default. To view only error handler logs, click the Show errors only toggle.
Pass the trigger_error_handler value to the --type flag to
view all error handler logs.
appservices logs list --type=trigger_error_handler
Note
This procedure refers to App Services Admin API endpoints. It does not use Atlas Administration API endpoints.
Retrieve TRIGGER_ERROR_HANDLER type logs via a GET request to
the Retrieve App Services Logs endpoint:
curl -X GET 'https://services.cloud.mongodb.com/api/admin/v3.0/groups/{groupId}/apps/{appId}/logs' \ -H 'Content-Type: application/json' \ -H 'Authorization: Bearer <access_token>' -d '{ "type": "TRIGGER_ERROR_HANDLER" }'
To learn more about viewing application logs, see View Application Logs.
Example Event
The following object configures a Trigger to send events to AWS EventBridge and handle errors:
"event_processors": { "AWS_EVENTBRIDGE": { "config": { "account_id": "012345678901", "region": "us-east-1" } } }, "error_handler": { "config": { "enabled": true, "function_name": "myErrorHandler.js" } }
Performance Optimization
Individual entries for an EventBridge Trigger event must be smaller than 256 KB.
For more information, see the AWS Documentation to calculate Amazon PutEvents event entry size. When using Database Triggers, the Project Expression can include only specified fields, reducing document size before sending messages to EventBridge. For more details about Project Expression, refer to the Database Trigger Project Expression documentation.