For BI Connector to transmit data securely, you should enable Transport
Layer Security (TLS) encryption on your MongoDB instance, your
mongosqld instance, and in your BI tool. A complete description of
TLS configuration is outside the scope of this document, but this
tutorial outlines the process for creating your own TLS certificates
for testing purposes and starting the MongoDB components with TLS
enabled.
Important
Use these procedures for testing purposes only. Your production environment should use TLS certificates that a recognized certificate authority (CA) has issued.
Prerequisites
A MongoDB user with sufficient permissions to run
mongosqld.A
mongodinstance which you can start and stop.A
mongosqldinstance which you can start and stop.The MySQL shell
Note on Cluster Availability
To ensure read availability for your MongoDB replica sets and sharded clusters while BI Connector enables TLS, use a rolling upgrade procedure. While the replica set primary upgrades, applications must wait until after failover and election cycle completes.
Create and Test Self-Signed Certificates
This tutorial contains instructions on creating several files which
allow a mongosqld process to accept OpenSSL encrypted connections
from an SQL client, such as the MySQL shell, and make an encrypted
connection with a mongod instance. We create two
.pem files. Each file
contains an encryption key and a self-signed TLS certificate.
Create a Certificates Directory.
Using the Windows
cmdprompt, create a directory to hold your certificates. This tutorial usesC:\opt\certs.mkdir C:\opt\certs cd C:\opt\certs This tutorial assumes that your OpenSSL directory is at
C:\OpenSSL. If it is located somewhere else on your system, either edit the commands appropriately or move the directory toC:\OpenSSL.If your
C:\OpenSSL\bindirectory does not contain a configuration file namedopenssl.cfg, create one.Example
This is an example configuration file.
# # OpenSSL configuration file. # # Establish working directory. dir = . [ ca ] default_ca = CA_default [ CA_default ] serial = $dir/serial database = $dir/certindex.txt new_certs_dir = $dir/certs certificate = $dir/cacert.pem private_key = $dir/private/cakey.pem default_days = 365 default_md = md5 preserve = no email_in_dn = no nameopt = default_ca certopt = default_ca policy = policy_match [ policy_match ] countryName = match stateOrProvinceName = match organizationName = match organizationalUnitName = optional commonName = supplied emailAddress = optional [ req ] default_bits = 1024 default_keyfile = key.pem default_md = md5 string_mask = nombstr distinguished_name = req_distinguished_name req_extensions = v3_req [ req_distinguished_name ] # Variable name Prompt string #--------------------------- ---------------------------------- 0.organizationName = Organization Name (company) organizationalUnitName = Organizational Unit Name (department, division) emailAddress = Email Address emailAddress_max = 40 localityName = Locality Name (city, district) stateOrProvinceName = State or Province Name (full name) countryName = Country Name (2 letter code) countryName_min = 2 countryName_max = 2 commonName = Common Name (hostname, IP, or your name) commonName_max = 64 # Default values for the above, for consistency and less typing. # Variable name Value #--------------------------- ------------------------------ 0.organizationName_default = My Company localityName_default = My Town stateOrProvinceName_default = State or Providence countryName_default = US [ v3_ca ] basicConstraints = CA:TRUE subjectKeyIdentifier = hash authorityKeyIdentifier = keyid:always,issuer:always [ v3_req ] basicConstraints = CA:FALSE subjectKeyIdentifier = hash Set up an environment variable for later use.
set OPENSSL_CONF=C:\OpenSSL\bin\openssl.cfg
Generate a Self-Signed Certificate Authority.
Change directory to
C:\opt\certs.cd C:\opt\certs Start the OpenSSL application.
C:\OpenSSL\bin\openssl.exe C:\Users\username>cd C:\opt\certs C:\Users\username>C:\OpenSSL\bin\openssl.exe OpenSSL> The following command generates and outputs a private key to
mdbprivate.key.genrsa -out C:\opt\certs\mdbprivate.key -aes256 \ -passout pass:password The following command generates and outputs a certificate authority file to
mdbca.crt.The following command prompts the user to enter several pieces of information which are incorporated into the certificate request. One of the fields is called
Common Name, which is a Fully Qualified Domain Name (FQDN). TheCommon Nameentry for the certificate generated in this step of the tutorial must be different from theCommon Nameentry for the certificates generated in steps 3 and 9.req -x509 -new -key C:\opt\certs\mdbprivate.key -days 1000 -out C:\opt\certs\mdbca.crt -passin pass:password
We now have two files: The mdbca.crt certificate authority file,
and the mdbprivate.key key used to sign that request.
Generate a PEM Certificate for the MongoDB Server.
The following command generates a key for the mongod process TLS
use and a CSR. For this step, the Common Name response must be
the FQDN of the server where your mongod instance TLS such as
www.example.com.
Enter the following command at the OpenSSL prompt:
req -new -nodes -newkey rsa:2048 -keyout .\mdb.key -out .\mdb.csr
Create a PEM file for the MongoDB server.
A .pem file consists of a key and a certificate concatenated
together. To create a .pem file for your MongoDB instance to use,
exit the OpenSSL prompt and enter the following command at the
cmd prompt in the C:\opt\certs directory:
copy .\mdb.key + .\mdb.crt mdb.pem
You should now have the following files in your certificates directory:
mdb.crt mdb.csr mdb.key mdb.pem mdbca.crt mdbprivate.key
If any are missing, go back and review the previous steps, checking for errors.
Update mongod configuration file.
To configure mongod to require TLS for incoming connections,
modify your configuration file as follows. Your values may vary,
depending on where you created your TLS files.
Option | Value |
|---|---|
| |
| |
| |
| |
|
Example
The following configuration file contains directives for TLS connections and x.509 authentication.
Your configuration file may require additional or different options.
systemLog: destination: file path: 'C:\data\mongod.log' logAppend: true net: bindIp: <step-3-FQDN> port: 27017 ssl: mode: requireSSL PEMKeyFile: 'C:\opt\certs\mdb.pem' CAFile: 'C:\opt\certs\mdbca.crt' clusterFile: 'C:\opt\certs\mdb.pem' security: clusterAuthMode: x509 storage: dbPath: 'C:\data\db'
If you prefer to start mongod with command-line options instead of a
configuration file, see mongosqld for equivalent options.
Test your connection with the mongo shell.
Connect to your server with the mongo shell to test your TLS
connection. Your mongo command needs the following TLS options:
Option | Value |
|---|---|
none | |
| |
|
.\mongo.exe --ssl --host <step3-common-name> ^ --sslCAFile "C:\opt\certs\mdbca.crt" ^ --sslPEMKeyFile "C:\opt\certs\mdb.pem"
Edit your options appropriately.
Create a key and a CSR for BI Connector.
The Common Name entry for this CSR should match the FQDN of
the server where you run mongosqld.
Note
The Common Name entry for this CSR must be different from
the Common Name entry for the first CSR you created, in
step 2.
Start the OpenSSL application and enter the following command at the OpenSSL prompt:
req -new -nodes -newkey rsa:2048 -keyout .\bi.key -out .\bi.csr
Start mongosqld
Your mongosqld configuration file requires several TLS-specific
options. Your values may vary, depending on where you created your
TLS certificates and .pem files.
Option | Value |
|---|---|
| |
| |
| |
| |
| |
|
The following example configuration file uses
files located in the C:\opt\certs directory. It specifies a
username and password which correspond to a MongoDB user with
sufficient permissions to
run mongosqld and read from the test database.
systemLog: logAppend: false path: 'C:\logs\mongosqld.log' verbosity: 2 security: enabled: true mongodb: net: uri: <step-3-FQDN> auth: username: <username> password: <password> ssl: enabled: true PEMKeyFile: 'C:\opt\certs\mdb.pem' CAFile: 'C:\opt\certs\mdbca.crt' net: bindIp: localhost port: 3307 ssl: mode: 'requireSSL' PEMKeyFile: 'C:\opt\certs\bi.pem' CAFile: 'C:\opt\certs\mdbca.crt' schema: sample: namespaces: 'test.*'
Start mongosqld with the --config
option to use a configuration file.
.\mongosqld --config C:\path\to\mongosqld.conf
Test with an ODBC DSN.
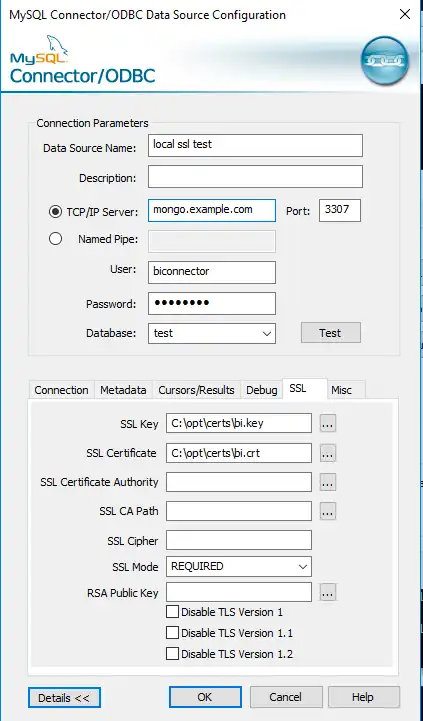
To create an ODBC DSN which connects over TLS, follow the instructions in the DSN tutorial and configure the new DSN with your TLS certificate path information.

Note
You don't need to enter a certificate path into the SSL Certificate field.
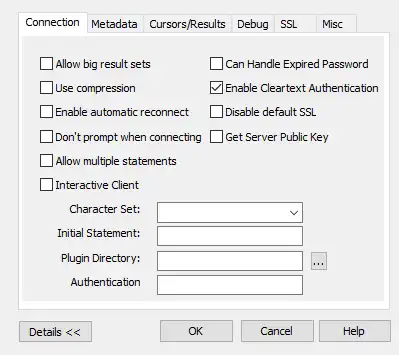
On the Connection tab of the DSN configuration screen, check the box labeled Enable Cleartext Authentication.

Click the Test button to test your ODBC connection.
Once you have set up your DSN, you can use it to connect to any of several BI tools, such as Power BI or Qlik Sense.
Generate a Self-Signed Certificate Authority.
The following command generates and outputs a private key to
mdbprivate.key.openssl genrsa -out /opt/certs/mdbprivate.key -aes256 \ -passout pass:password The following command generates and outputs a certificate authority file to
mdbca.crt.The following command prompts the user to enter several pieces of information which are incorporated into the certificate request. One of the fields is called
Common Name, which is a Fully Qualified Domain Name (FQDN). TheCommon Nameentry for the certificate generated in this step of the tutorial must be different from theCommon Nameentry for the certificates generated in steps 3 and 9.openssl req -x509 -new -key /opt/certs/mdbprivate.key \ -days 1000 -out /opt/certs/mdbca.crt \ -passin pass:password
We now have two files: The mdbca.crt certificate authority file,
and the mdbprivate.key key used to sign that request.
Generate a PEM Certificate for the MongoDB Server.
The following command generates a key for the mongod process to use
and a Certificate Signing Request (CSR). The Common Name response
must be the Fully Qualified Domain Name (FQDN) of the host where
your mongod instance runs such as www.example.com. To determine
the FQDN of your server, use hostname -f at the command prompt.
You may be prompted to enter a challenge password for the Extra
Attribute element. For the purposes of this tutorial, you can leave
this element blank.
openssl req -new -nodes -newkey rsa:2048 -keyout /opt/certs/mdb.key \ -out /opt/certs/mdb.csr
Create a PEM file for the MongoDB server.
A .pem file consists of a key and a certificate concatenated
together. To create a .pem file for your MongoDB instance to use,
enter the following command in the /opt/certs/ directory:
cat /opt/certs/mdb.key /opt/certs/mdb.crt > /opt/certs/mdb.pem
You should now have the following files in your certificates directory:
mdb.crt mdb.csr mdb.key mdb.pem mdbca.crt mdbprivate.key
If any are missing, go back and review the previous steps, checking for errors.
Update mongod configuration file.
To configure mongod to require TLS for incoming connections,
modify your configuration file as follows. Your values may vary,
depending on where you created your TLS files.
Option | Value |
|---|---|
| |
| |
| |
| |
|
|
Example
The following configuration file contains directives for TLS connections and x.509 authentication.
Your configuration file may require additional or different options.
systemLog: destination: file path: '/data/mongod.log' logAppend: true processManagement: fork: true pidFilePath: '/data/mongod.pid' net: bindIp: localhost port: 27017 ssl: mode: requireSSL PEMKeyFile: '/opt/certs/mdb.pem' CAFile: '/opt/certs/mdbca.crt' clusterFile: '/opt/certs/mdb.pem' security: clusterAuthMode: x509 storage: dbPath: '/data'
If you prefer to start mongod with command-line options instead of
a configuration file, see mongosqld for equivalent options.
Test your connection with the mongo shell.
Connect to your server with the mongo shell to test your TLS
connection. Your mongo command needs the following TLS options:
Option | Value |
|---|---|
none | |
| |
|
mongo --tls --host <step3-common-name> \ --tlsCAFile /opt/certs/mdbca.crt \ --tlsPEMKeyFile /opt/certs/mdb.pem
Edit your options appropriately.
Create a key and a CSR for BI Connector.
The Common Name entry for this CSR should match the FQDN of
the host where you run mongosqld. To determine the FQDN of your
host, use hostname -f at the command prompt.
You may be prompted to enter a challenge password for the Extra
Attribute element. For the purposes of this tutorial, you can leave
this element blank.
Note
The Common Name entry for this CSR must be different from the
Common Name entry for the first CSR you created, in step 2.
openssl req -new -nodes -newkey rsa:2048 \ -keyout /opt/certs/bi.key \ -out /opt/certs/bi.csr
Start mongosqld.
Your mongosqld configuration file requires several
TLS-specific options. Your values may vary, depending on where
you created your TLS files.
Option | Value |
|---|---|
| |
| |
| |
| |
| |
|
Example
The following configuration file uses files
located in the /opt/certs/ directory. It specifies a username
and password which correspond to a MongoDB user with sufficient
permissions to run
mongosqld and read from the test database.
systemLog: logAppend: false path: './logs/mongosqld.log' verbosity: 2 security: enabled: true mongodb: net: uri: <step9-common-name> auth: username: <username> password: <password> ssl: enabled: true PEMKeyFile: '/opt/certs/mdb.pem' CAFile: '/opt/certs/mdbca.crt' net: bindIp: localhost port: 3307 ssl: mode: 'requireSSL' PEMKeyFile: '/opt/certs/bi.pem' CAFile: '/opt/certs/mdbca.crt' schema: sample: namespaces: 'test.*'
Start mongosqld with the
--config option to use a
configuration file.
mongosqld --config /path/to/mongosqld.conf