Get Started with the C Driver
On this page
- Overview
- Download and Install
- Download the C Driver
- Create a MongoDB Deployment
- Create a Free MongoDB deployment on Atlas
- Save your Credentials
- Create a Connection String
- Find Your MongoDB Atlas Connection String
- Copy Your Connection String
- Update the Placeholders
- Run a Sample Query
- Create a Project Directory
- Create Your C Driver Application
- Assign the Connection String
- Run Your C Application
- Next Steps
Overview
The MongoDB C Driver is a C library that you can use to connect to MongoDB and interact with data stored in your deployment. This guide shows you how to create an application that uses the C driver to connect to a MongoDB cluster hosted on MongoDB Atlas and query data in your cluster.
Tip
MongoDB Atlas is a fully managed cloud database service that hosts your MongoDB deployments. You can create your own free (no credit card required) MongoDB Atlas deployment by following the steps in this guide.
Follow this guide to connect a sample C application to a MongoDB Atlas deployment. If you prefer to connect to MongoDB using a different driver or programming language, see our list of official drivers.
Download and Install
Download the C Driver
The C driver consists of two libraries: libbson and
libmongoc. In this guide, you will learn how to install libmongoc,
which comes bundled with libbson.
You can install the C driver by using a package manager, or by installing the libraries from source. Different Linux distributions install different versions of the driver when installed with a package manager. Because of this, you should check the version your distribution includes before installing the driver.
On RedHat Enterprise Linux (RHEL) distributions, you can check the version by running the following command in your shell:
sudo dnf info mongo-c-driver-devel
On Debian-based distributions, you can check the version by running the following command in your shell:
apt-cache policy libmongoc-dev
If the version of the driver that is available is not the version you want, you can install the driver from source. To learn how to install the driver from source, see the Building the C Driver Libraries from Source guide.
To learn how to install the driver by using a package manager, select the tab corresponding to your operating system:
RedHat Enterprise Linux Distributions
You can install the driver on RedHat Enterprise Linux (RHEL) distributions, version 7 or later, or distributions based on RHEL, such as:
Before you install the driver on a RHEL distribution, not including
Fedora, you must first enable the Extra Packages for Enterprise
Linux (EPEL) repository. You can enable the EPEL repository by
installing the epel-release package, as shown in the following
example:
yum install epel-release
Then, you can install the C driver
by using yum. To do so, run the following command in
your shell:
yum install mongo-c-driver-devel
Note
Developer Packages
The preceding code example installs the developer packages, which are required to build applications that use the C driver. To install only the libraries, without development files, run the following command:
yum install mongo-c-driver
If you are installing on a RHEL distribution that is version 8 or
later, we recommend running the preceding code examples by using
dnf instead of yum.
Fedora
If you are using Fedora or an enterprise Linux distribution of
version 8 or later, you can install the driver by using the same
commands as shown in the preceding example
and replacing yum with dnf.
The following example shows how to install the C driver in a Fedora distribution:
dnf install mongo-c-driver-devel
Debian-Based Distributions
In Debian-Based Linux distributions, including Ubuntu and Ubuntu derivatives, the driver libraries are available through the Advanced Packaging Tool (APT). You can install the driver with APT by running the following command in your shell:
apt install libmongoc-dev
The preceding code example installs the developer packages, which are required to build applications that use the C driver. To install only the libraries, without development files, run the following command:
apt install libmongoc-1.0-0
For Windows environments, we recommend building the C driver libraries from source to ensure maximum compatibility with the local toolchain. You can automate building from source by using a from-source library package management tool, such as vcpkg.
Tip
To learn how to get started with vcpkg, see the vcpkg Get Started guide in the Microsoft documentation.
In vcpkg manifest mode, add the
driver library to your project's vcpkg.json manifest file,
as shown in the following example:
{ // ... "dependencies": [ // ... "mongo-c-driver" ] }
When you build a CMake project with vcpkg integration and have a
vcpkg.json manifest file, vcpkg automatically installs the project's
dependencies before proceeding with configuration.
If you are using vcpkg classic mode, you can install the driver by running the following command in your shell:
vcpkg install mongo-c-driver
After you install the driver, the standard CMake configuration file
is available, as well as the generated IMPORTED targets. You can
create a CMakeLists.txt file as shown in the following example:
find_package(mongoc-1.0 CONFIG REQUIRED) target_link_libraries(my-application PRIVATE $<IF:$<TARGET_EXISTS:mongo::mongoc_shared>,mongo::mongoc_shared,mongo::mongoc_static>)
Note
You can use the $<IF:$<TARGET_EXISTS...>:...> generator
expression in the preceding example to switch the link type of
libmongoc based on the form that is available from the
find_package() command. libmongoc supports building with
both dynamic and static library types, but vcpkg
installs only one type at a time.
To configure the CMake project with vcpkg integration, set the CMake toolchain file in the configuration command by running the following commands in your shell:
cmake -S . -B _build -D CMAKE_TOOLCHAIN_FILE=$VCPKG_ROOT/scripts/buildsystems/vcpkg.cmake
You can download the C driver on MacOS by using the Homebrew package manager. To do so, run the following command in your shell:
brew install mongo-c-driver
After you complete these steps, you have the C driver installed on your machine.
Create a MongoDB Deployment
You can create a free tier MongoDB deployment on MongoDB Atlas to store and manage your data. MongoDB Atlas hosts and manages your MongoDB database in the cloud.
Create a Free MongoDB deployment on Atlas
Complete the Get Started with Atlas guide to set up a new Atlas account and load sample data into a new free tier MongoDB deployment.
After you complete these steps, you have a new free tier MongoDB deployment on Atlas, database user credentials, and sample data loaded into your database.
Create a Connection String
You can connect to your MongoDB deployment by providing a connection URI, also called a connection string, which instructs the driver on how to connect to a MongoDB deployment and how to behave while connected.
The connection string includes the hostname or IP address and port of your deployment, the authentication mechanism, user credentials when applicable, and connection options.
To connect to an instance or deployment not hosted on Atlas, see the Choose a Connection Target guide.
Find Your MongoDB Atlas Connection String
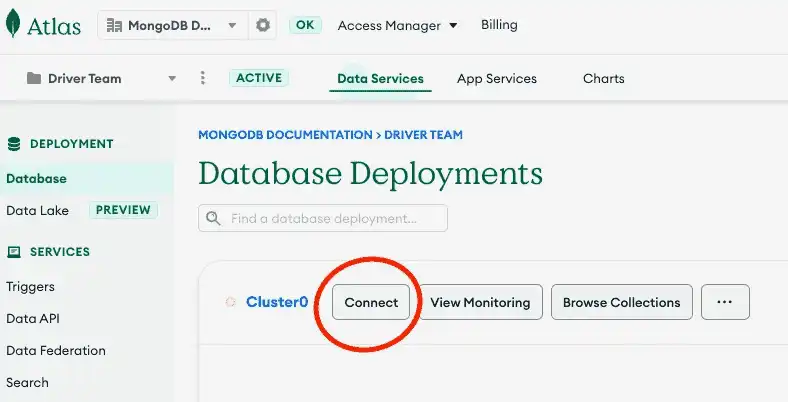
To retrieve your connection string for the deployment that you created in the previous step, log in to your Atlas account and navigate to the Database section and click the Connect button for your new deployment.

Proceed to the Connect your application section and select "C" from the Driver selection menu and the version that best matches the version you installed from the Version selection menu.
Select the Password (SCRAM) authentication mechanism.
Deselect the Include full driver code example option to view only the connection string.

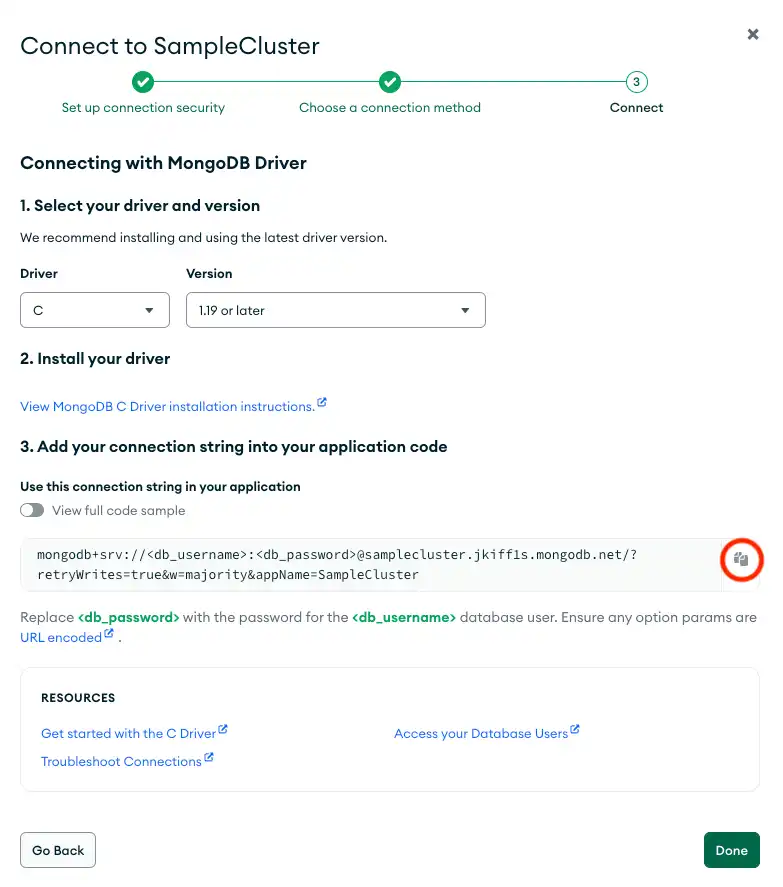
After completing these steps, you have a connection string that corresponds to your Atlas cluster.
Run a Sample Query
After you complete these steps, you have a working application that uses the driver to connect to your MongoDB deployment, runs a query on the sample data, and prints out the result.
Next Steps
Congratulations on completing the quick start tutorial!
Note
If you run into issues in this tutorial, ask for help in the MongoDB Community Forums or submit feedback by using the Rate this page tab on the right or bottom right side of this page.
In this tutorial, you created a C application that connects to a MongoDB deployment hosted on MongoDB Atlas and retrieves a document that matches a query.
Learn more about the C driver from the following resources:
Learn how to perform read operations in the Read Data section.
Learn how to perform write operations in the Write Data to MongoDB section.