Overview
The MongoDB C++ Driver is a C++ package that you can use to connect to MongoDB and interact with data stored in your deployment. This guide shows you how to create an application that uses the C++ driver to connect to a MongoDB cluster hosted on MongoDB Atlas and query data in your cluster.
Tip
MongoDB Atlas is a fully managed cloud database service that hosts your MongoDB deployments. You can create your own free (no credit card required) MongoDB Atlas deployment by following the steps in this guide.
Follow this guide to connect a sample C++ application to a MongoDB Atlas deployment. If you prefer to connect to MongoDB using a different driver or programming language, see our list of official drivers.
Download and Install
Install all dependencies.
Before you begin this tutorial, ensure you have the following dependencies installed in your development environment:
Compiler that supports C++17, such as GCC, Clang, or Visual Studio
CMake v3.15 or later
Note
Pre-C++17 Configurations
Although C++11 is the minimum supported language version, this tutorial
configures the C++ driver to use the C++17 standard library
as recommended by the C++17 Polyfill Configuration section. If you want to install
the driver for pre-C++17 configurations, set the CMAKE_CXX_STANDARD
configuration option to your C++ version. Then, the driver will automatically use
bsoncxx library polyfill implementations for required C++17 features.
Download the C++ driver.
To download the latest version of the C++ driver from the mongo-cxx-driver Github
repository, run the following commands in your shell from your root directory:
curl -OL https://github.com/mongodb/mongo-cxx-driver/releases/download/r4.1.4/mongo-cxx-driver-r4.1.4.tar.gz tar -xzf mongo-cxx-driver-r4.1.4.tar.gz cd mongo-cxx-driver-r4.1.4/build
Configure the driver for installation.
Select the tab corresponding to your operating system and run following command from your
mongo-cxx-driver-r4.1.4/build directory:
cmake .. \ -DCMAKE_BUILD_TYPE=Release \ -DCMAKE_CXX_STANDARD=17
This command instructs CMake to install mongocxx into the /usr/local directory.
'C:\<path>\cmake.exe' .. \ -G "Visual Studio <version> <year>" -A "x64" \ -DCMAKE_CXX_STANDARD=17 \ -DCMAKE_INSTALL_PREFIX=C:\mongo-cxx-driver \
This command instructs CMake to install mongocxx into the C:\mongo-cxx-driver
directory. Replace the following placeholder values:
<path>: The path to your CMake executable<version>: Your Visual Studio version number<year>: The year corresponding to your Visual Studio version
Build and install the driver.
Select the tab corresponding to your operating system and run following commands to install the driver:
cmake --build . sudo cmake --build . --target install
cmake --build . --config Release cmake --build . --config Debug cmake --install . --config Release cmake --install . --config Debug
Note
Windows Build Configurations
To avoid Windows linker errors due to conflicting build configurations,
the preceding commands build and install both the Release and Debug
configurations. To learn more about these configurations, see Shared Libraries (MSVC Only)
in the API and ABI Versioning guide.
After you complete these steps, you have the C++ driver installed on your machine.
Create a MongoDB Deployment
You can create a free tier MongoDB deployment on MongoDB Atlas to store and manage your data. MongoDB Atlas hosts and manages your MongoDB database in the cloud.
Create a Free MongoDB deployment on Atlas.
Complete the MongoDB Get Started guide to set up a new Atlas account and load sample data into a new free tier MongoDB deployment.
After you complete these steps, you have a new free tier MongoDB deployment on Atlas, database user credentials, and sample data loaded into your database.
Create a Connection String
You can connect to your MongoDB deployment by providing a connection URI, also called a connection string, which instructs the driver on how to connect to a MongoDB deployment and how to behave while connected.
The connection string includes the hostname or IP address and port of your deployment, the authentication mechanism, user credentials when applicable, and connection options.
To connect to an instance or deployment not hosted on Atlas, see the Choose a Connection Target guide.
Find your MongoDB Atlas connection string.
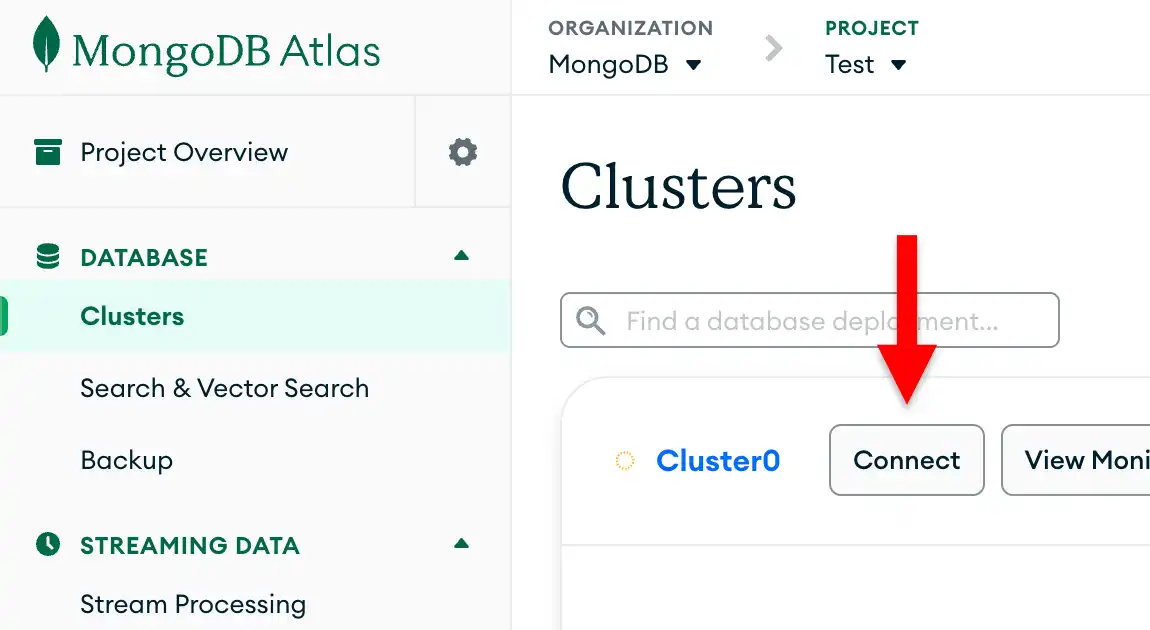
To retrieve your connection string for the deployment that you created in the previous step, log into your Atlas account and navigate to the Clusters page under the Database section. Click the Connect button for your new deployment.

If you do not already have a database user configured, MongoDB will prompt you to create and configure a new user.
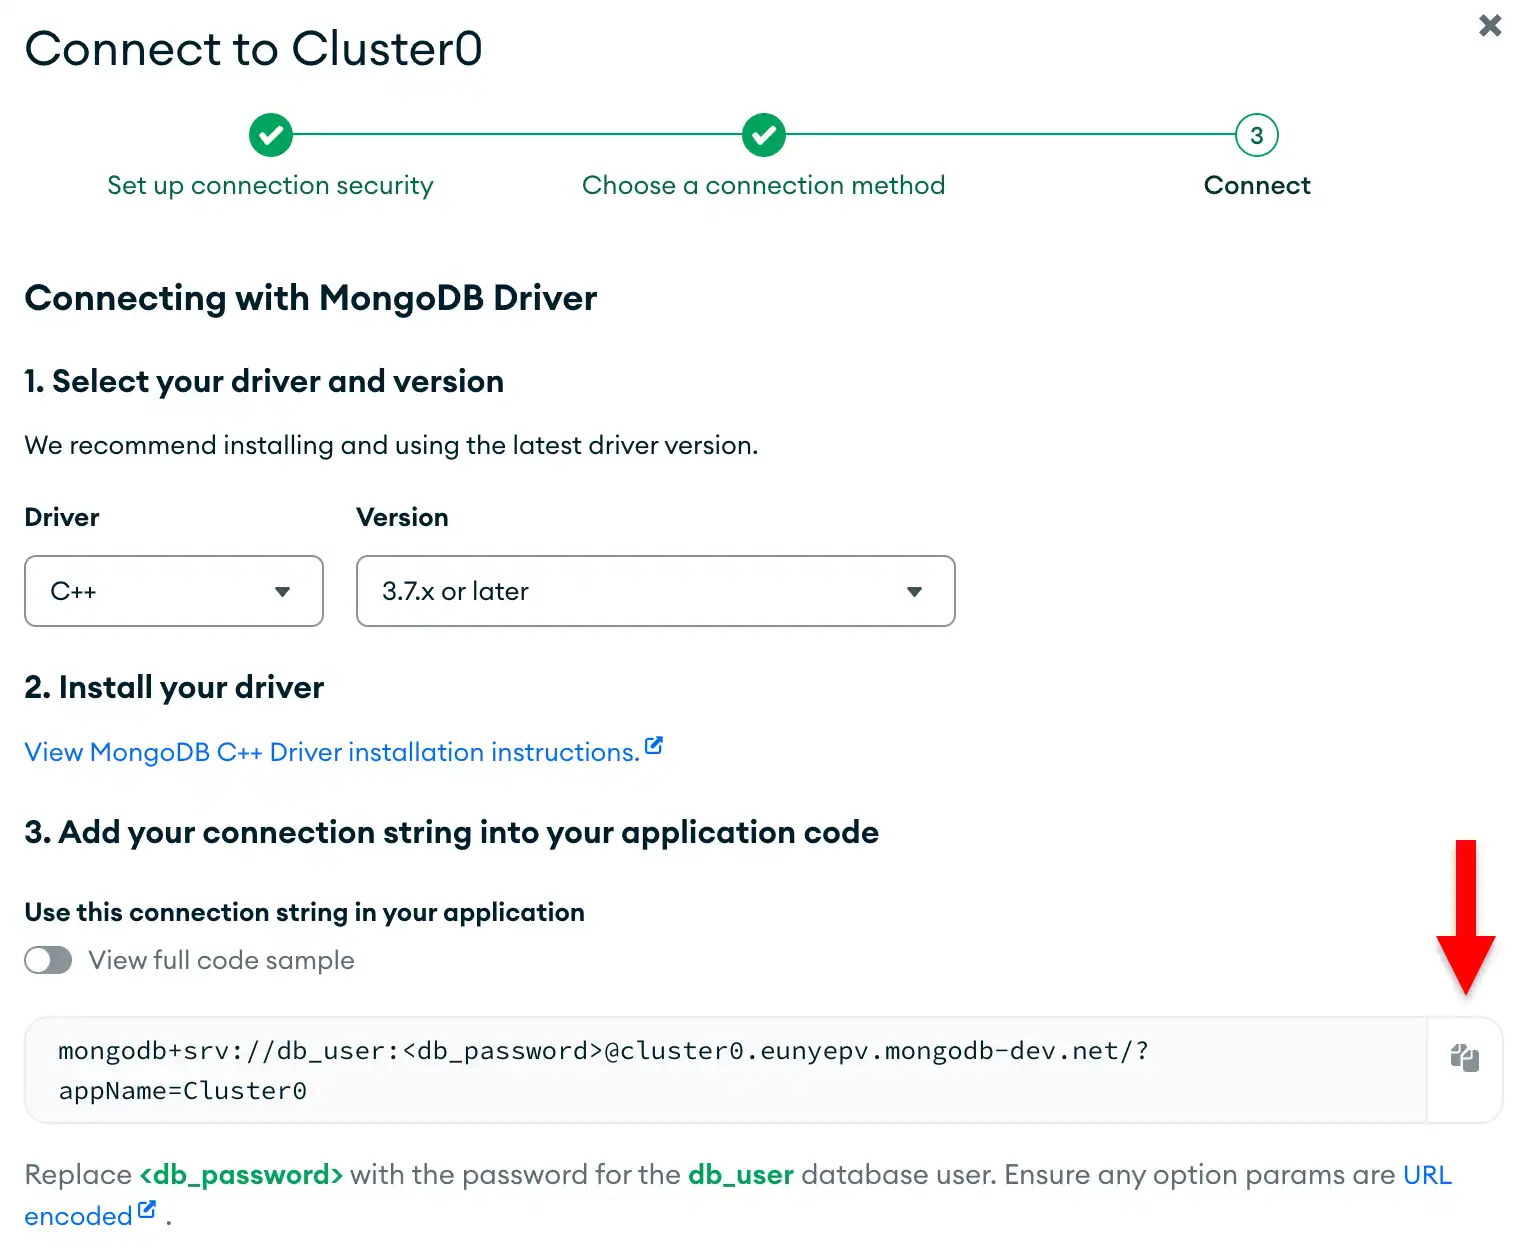
Click the Drivers button under Connect to your application section and select "C++" from the Driver selection menu and the version that best matches the version you installed from the Version selection menu.
Ensure the View full code sample option is deselected to view only the connection string.
Update the password placeholder.
Paste this connection string into a file in your preferred text editor
and replace the <db_password> placeholder with your database user's
password. The connection string is already populated with your database
user's username.
Save this file to a safe location for use in the next step.
After completing these steps, you have a connection string that corresponds to your Atlas cluster.
Run a Sample Query
Create a project directory.
From your root directory, run the following command in your shell to create a directory called
cpp-quickstart for this project:
mkdir cpp-quickstart
Run the following commands to create a quickstart.cpp application file in the cpp-quickstart
directory:
cd cpp-quickstart touch quickstart.cpp
Create your C++ driver application.
Copy and paste the following code into the quickstart.cpp file, which queries
the movies collection in the sample_mflix database:
using bsoncxx::builder::basic::kvp; using bsoncxx::builder::basic::make_document; int main() { mongocxx::instance instance; mongocxx::uri uri("<connection string>"); mongocxx::client client(uri); auto db = client["sample_mflix"]; auto collection = db["movies"]; auto result = collection.find_one(make_document(kvp("title", "The Shawshank Redemption"))); if (result) { std::cout << bsoncxx::to_json(*result) << std::endl; } else { std::cout << "No result found" << std::endl; } }
Assign the connection string.
Replace the <connection string> placeholder with the
connection string that you copied from the Create a Connection String
step of this guide.
Run your C++ application.
In your shell, run the following commands to compile and run this application:
c++ --std=c++17 quickstart.cpp $(pkg-config --cflags --libs libmongocxx) -o ./app.out ./app.out
Tip
MacOS users might see the following error after running the preceding commands:
dyld[54430]: Library not loaded: @rpath/libmongocxx._noabi.dylib
To resolve this error, use the -Wl,-rpath linker option to set the @rpath, as shown
in the following code:
c++ --std=c++17 quickstart.cpp -Wl,-rpath,/usr/local/lib/ $(pkg-config --cflags --libs libmongocxx) -o ./app.out ./app.out
The command line output contains details about the retrieved movie document:
{ "_id" : { "$oid" : "573a1399f29313caabceeb20" }, "plot" : "Two imprisoned men bond over a number of years, finding solace and eventual redemption through acts of common decency.", ... "title" : "The Shawshank Redemption", ...
If you encounter an error or if your application prints "No result found",
ensure that you specified the proper connection string in the quickstart.cpp
file and that you loaded the sample data.
After you complete these steps, you have a working application that uses the driver to connect to your MongoDB deployment, runs a query on the sample data, and prints out the result.
Next Steps
Congratulations on completing the quick start tutorial!
Note
If you run into issues in this tutorial, ask for help in the MongoDB Stack Overflow page or in the MongoDB Reddit community, or submit feedback by using the Rate this page tab on the right or bottom right side of this page.
In this tutorial, you created a C++ application that connects to a MongoDB deployment hosted on MongoDB Atlas and retrieves a document that matches a query.
Learn more about C++ driver from the following resources:
Learn how to perform read operations in the Read Data section.
Learn how to perform write operations in the Write Data to MongoDB section.
