組織、プロジェクト、クラスターは、Atlas の企業資産における基盤です。
組織レベルでは、セキュリティ制御を実装し、1 つ以上のプロジェクトに取り組むユーザーを作成できます。
プロジェクトは、より細かいセキュリティの分離と承認の境界を提供します。
クラスター は、Atlas のクラウドデータベースです。
このページの基本的なガイダンスを使用して、貴社の階層と予想されるクラスターおよびプロジェクトの数に基づいて、組織、プロジェクト、クラスターのレイアウトを設計してください。このガイダンスは、貴社の請求およびアクセスのニーズに合わせながら、セキュリティとパフォーマンスを当初から最適化するために役立ちます。
Atlas の組織、プロジェクト、およびクラスターの機能
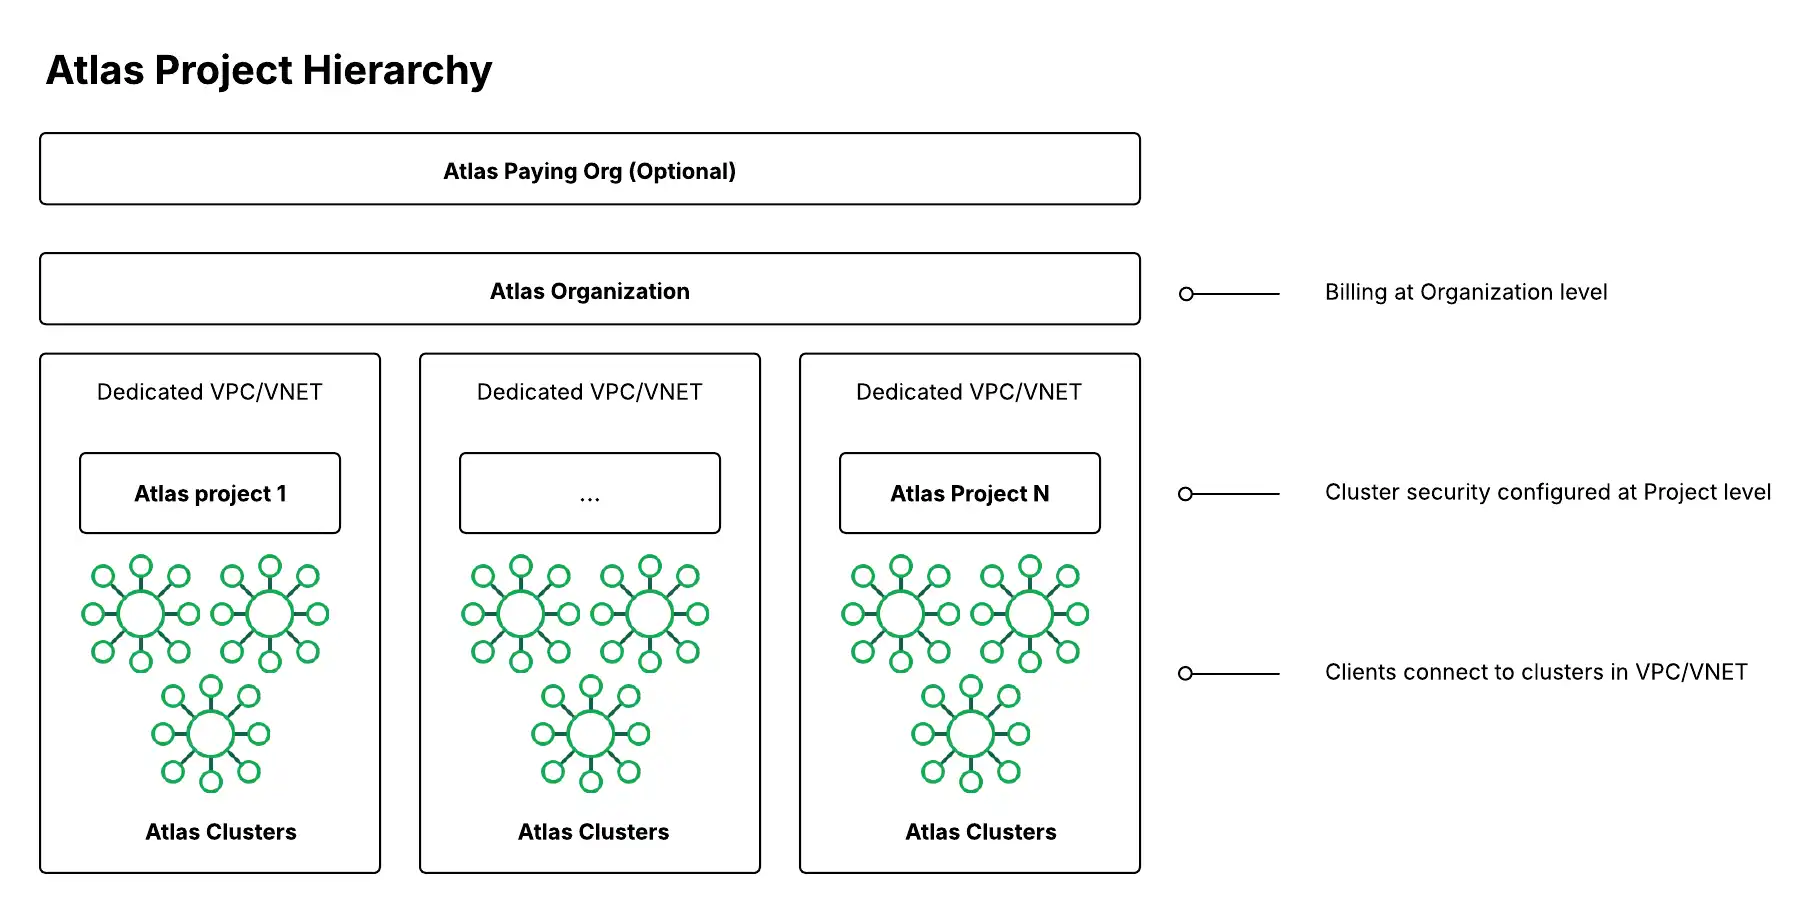
Atlas エンタープライズプロパティのセキュリティ設定とガバナンスを定義するには、次のレベルの階層を使用します。
Atlas 階層のレベル | 説明 |
|---|---|
(任意)支払い組織 | ある組織は、他の組織の支払い組織になることができます。支払い組織は、組織横断請求を設定して、複数の組織で請求サブスクリプションを共有することができます。Atlas サブスクリプションを確立する際に支払い組織を設定する方法について詳しくは、「請求を管理する」を参照してください。組織間の請求を有効にするには、アクションを実行するユーザーがリンクしたい両方の組織の組織オーナーまたは請求管理者のロールを持っている必要があります。詳しくは、「ユーザーロール」を参照してください。 支払い組織は、多数の BU または独立して運用される部門を持つ大規模なエンタープライズに一般的ですが、契約や請求書は中央認証局が所有します。 |
組織は多くのプロジェクトを含むことができ、これらのプロジェクトおよびその中のクラスター全体にわたる共有統合およびセキュリティ設定を適用するためのコンテナを提供します。複数の Atlas 組織を管理する場合、Atlas Federation Management Console は、Org Owner のロールを持つユーザーが IdP を SSO 用に管理し、それらを複数の組織にリンクすることを可能にします。多くの場合、組織は企業内の事業部(BU)または部門に対応します。組み込みの Atlas Cost Explorer は、組織レベルでクラウド支出を集計し、その下のプロジェクトレベルおよびクラスターレベルで明細項目を分けます。請求 API を活用することで、さらなるカスタマイズが可能です。 | |
データプレーンのセキュリティ構成(データベースクラスター、ネットワークセキュリティ、その他のデータサービスを含む)は、プロジェクトレベルで行われます。プロジェクトは多くの場合、アプリケーションと環境(例:カスタマーポータルアプリケーションと本番環境)にマッピングされます。各プロジェクトごとに、選択したクラウドプロバイダーに基づいて、AWS および Azure の各リージョンに 1 つの専用 VPC または VNet があります。 | |

Atlas の組織、プロジェクト、クラスターに関する推奨事項
マルチリージョンおよびマルチクラウド配置に関する推奨事項
マルチリージョンおよびマルチクラウドの配置において、地理的境界を越えてパフォーマンス、セキュリティ、コンプライアンスを最適化するために、次の追加の推奨事項をご検討ください。
ネットワークアーキテクチャとレイテンシ
レイテンシ最小化のための、アプリケーションユーザーに最も近いリージョンへのクラスターに配置します。
ネットワーク分離を維持するために、各プロジェクト内の各リージョンに専用の VPC/VNet を使用します。
クラスターを配置する各リージョンでプライベートエンドポイントを構成し、安全で低レイテンシの接続を確保します。
データ ローカリティとコンプライアンス
データレジデンシー要件を確実に満たすために、異なる規制管轄区域ごとに個別のプロジェクト(例えば、GDPR に準拠した EU プロジェクト、SOX に準拠した米国プロジェクト)を作成します。
グローバルクラスターとゾーンシャーディングを使用して、シャードキー値に基づいて読み取りおよび書き込みを適切な地理的リージョンに自動的にルーティングします。
監査およびガバナンスの目的で、データ分類とリージョンでのコンプライアンス要件に基づいてプロジェクトとクラスターにタグを付けます。
クロスリージョンの障害復旧
読み取りレプリカを持つクラスターを複数のリージョンに配置して、フェイルオーバー機能を有効にします。
同じアプリケーション環境内のすべてのリージョンで一貫したバックアップスケジュールを維持します。
ビジネスの継続性を確保するために、リージョン全体で定期的に障害復旧手順をテストします。
マルチクラウドに関する検討事項
管理とモニタリングを簡素化するために、クラウドプロバイダー間でコンシステントな命名規則を使用します。
同じプロジェクト内のすべてのクラウド環境でセキュリティ構成を標準化します。
クラウド間でのデータ レプリケーションとネットワーク接続を計画する場合、クラウドプロバイダー固有の機能と制限を考慮します。
すべての配置パラダイムに共通する推奨事項
次の推奨事項は、すべての配置パラダイムに適用されます。
開発環境、テスト環境、ステージング環境、本番環境
サンドボックス、テストプロジェクトおよびクラスターを、アプリケーションプロジェクトおよびクラスターから分離するために、次の 4 つの環境を使用することを推奨いたします。
environment | 説明 |
|---|---|
開発(Dev) | 開発者が安全なサンドボックス環境で新しいことを自由に試すことができます。 |
テスト(テスト) | 開発環境で作成された特定のコンポーネントまたは関数をテストします。 |
ステージング | すべてのコンポーネントと機能をステージングして、本番にデプロイする前にアプリケーション全体が期待どおりに動作することを確認します。ステージングはテスト環境と似ていますが、新しいコンポーネントが既存のコンポーネントと連携することが保証されます。 |
本番環境(Prod) | エンドユーザー向けに稼働中のアプリケーションのバックエンドです。 |
Atlas のローカル配置
開発者は開発やテストのために、Atlas CLI を使用してAtlas のローカル配置を作成できます。自分のマシンからローカルで作業することで、外部の開発・テスト環境にかかるコストを削減できます。
開発者は、Dockerで Atlas CLI コマンドを実行し、コンテナを使用してローカル Atlas 配置を構築、実行、管理することもできます。コンテナは、アプリケーションの実行に必要なすべてのソフトウェアを含む標準化されたユニットです。コンテナ化により、開発者は、安全、信頼、移植性のあるテスト環境でローカル Atlas 配置を構築できます。詳細については、 Dockerを使用したローカル Atlas 配置の作成 を参照してください。
組織およびプロジェクトの階層
一般的には、一元的に管理される支払い組織と、支払い組織にリンクされている BU または部門ごとに 1 つの組織とすることを推奨します。次に、下位環境(開発環境またはテスト環境)と上位環境用にそれぞれ1つのクラスターを含むプロジェクトを作成してください。これらのプロジェクトでクラスターを作成できます。詳細については、推奨階層に関する次の情報を参照してください。
組織ごとに 250プロジェクトの制限に簡単に達する場合は、環境ごとに 1 つの組織を作成することをお勧めします。たとえば、下位環境と上位環境用に 1 つずつ、または開発、テスト、ステージング、本番環境でそれぞれ 1 つなどです。この設定には、追加の分離の利点があります。制限を増やすこともできます。詳細については、「 Atlas サービスの制限 」を参照してください。
許可された IP や API キーなどのネットワークとセキュリティの構成はプロジェクトレベルで共有されるため、異なるアプリケーションを操作するチームに対してきめ細かなアクセス制御が必要な場合は、アプリケーションごとに個別のプロジェクトを作成することをお勧めします。
推奨階層
BU全体で共通のチームと権限を持ち、組織ごとに発生可能な プロジェクトの上限より小さい場合は、Atlas250 組織の作成数が少なくなる次の階層を考慮してください。

推奨階層 2:分散型ビジネスユニット/部門
組織が非常に分散化されており、契約および請求の責任者としての役割を果たすための一元化された機能がない場合は、次の階層を検討してください。この階層では、各 BU、部門、またはチームがそれぞれの Atlas 組織を持っています。この階層は、各チームがかなり独立しており、社内で人員や権限を共有していない場合、またはクラウドプロバイダーのマーケットプレイスを通じて、もしくは独自の契約で直接クレジットを購入したい場合に役立ちます。この階層には支払い組織が存在しません。

Cluster Hierarchy
各環境が分離している状態を維持するには、各クラスターをその独自のプロジェクト内に配置することをお勧めします(下図を参照)。このように配置することで、管理者は各環境で異なるプロジェクト構成を維持したうえで、役割に最小限必要なアクセス権のみをユーザーに付与するという最小権限の原則を徹底できます。
特に本番環境では、アプリケーションと環境のペアごとに別々のプロジェクトを作成することをお勧めします。これらの構成はプロジェクトレベルで管理されるため、特定のアプリケーションの要件が変更された場合でも、本番環境のクラスター間でデータを手動で転送する必要を軽減できます。
プロジェクト レベルの構成(プライベート エンドポイントや CMK など)をクラスター全体で共有し、Terraform などのオートメーション ツールを使用してクラスター作成時に適用できます。さらに、クラスターの作成を自動化することで、コスト削減を実現できます。これは、運用環境と開発環境それぞれに対して、上位環境と下位環境の作成を標準化することによる効果です。
詳細については、「単一プロジェクトに複数のクラスターが効果的なケース」を参照してください。

単一プロジェクトに複数のクラスターが効果的なケース
次の図は、それぞれのプロジェクトに複数の Atlas クラスターが環境別にグループ化されている組織を示しています。同じプロジェクト内に複数のクラスターを配置すると、1 つのアプリケーションが複数のバッキング クラスターを使用する場合や、同じチームが環境全体で複数のアプリケーションを担当する場合に、管理が簡素化されます。これにより、同じプロジェクト内のすべてのクラスターが同じプロジェクト構成を共有するため、プライベートエンドポイントやカスタマーが管理するキーなどの機能のセットアップコストが簡素化されます。
しかし、このクラスター階層は最小権限の原則に違反する可能性があります。
次の両方が当てはまる場合にのみ、同じプロジェクト内に複数のクラスターを配置します。
プロジェクトにアクセスできる各チームノードは、プロジェクト内の他のすべてのアプリケーションとクラスターで作業しています。
開発環境およびテスト環境用のクラスターを作成しています。ステージング環境と本番環境では、同じプロジェクト内のクラスターは同じアプリケーションに属し、 同じチームによって管理される ことをお勧めします。

リソースタグの付与
レポートおよび統合のための解析を容易にするために、次の詳細を使用してクラスターまたはプロジェクトにタグを付けることをお勧めします。
BU または部門
teamName
ApplicationName
environment
バージョン
メールでの問い合わせ
重要度(PII や PHI などの機密性の高い分類を含む、クラスターに保存されているデータの階層を示す)
タグを使用した請求データの解析について詳しくは、「Atlas 請求データの機能」を参照してください。
Atlas クラスター サイズ ガイド
専用配置(クラスター サイズ M10 以上)では、Atlas はリソースを排他的に割り当てます。共有クラスターより安全性とパフォーマンスに優れているため、本番環境でのユースケースには専用配置がお勧めです。
次のクラスター サイズガイドでは、ソフトウェア開発やインフラストラクチャに使用される一般的な例えである「t シャット サイジング」を使用して、簡素化された方法でキャパシティープランニングを説明します。T シャットのサイズ設定に関する推奨事項は、サイズ分析のおおよその開始点としてのみ使用してください。クラスターのサイズ設定は、リソースニーズ、パフォーマンス要件、ワークロード特性、増加予想の変化に基づいて行われる反復的なプロセスです。
重要
このガイダンスは、重要なアプリケーション、大メモリのワークロード、高 CPU のワークロードを除外します。このようなユースケースは、 カスタマイズされたガイダンスについては、 MongoDBサポート にお問い合わせください。
配置に必要なクラスター リソースは、組織のおおよそのデータ サイズとワークロードを使用して推定できます。
必要なストレージの合計:未加工データ全体の 50%
必要な RAM の合計: 未加工データ全体の 10%
必要な CPU コアの合計 :データベース操作 1 秒あたりの予想ピーク読み取り/書込み操作数 割かつ 4000
必要なストレージ IOPS の合計:データベースの読み取り/書き込み操作の数が 1 秒あたりに増加することが予想されます(最小 IOPS = 5%、最大 IOPS = 95%)
次のクラスター サイズガイドを使用して、オーバープロビジョニングせずにパフォーマンスを確保するクラスター層を選択します。この表には、各クラスター層のデフォルトのストレージとパフォーマンス機能、およびクラスター層がステージングおよび本番環境に適しているかどうかが表示されています。
クラスターサイズガイドには、クラスターの合計データサイズとデフォルトの IOPS の期待値も含まれており、追加の設定でこれを増強することができます。以下のストレージに関する推奨事項は、クラスター全体ではなく、シャードごとのものであることにご注意ください。詳細については、「Atlas のスケーラビリティに関するガイダンス」を参照してください。
T シャードのサイズ | クラスター階層 | ストレージ範囲: AWS/Google Cloud/Azure | CPUs (#) | デフォルトの RAM | デフォルトの IOPS | 予想される中央値データサイズ | 予想されるピーク読み取り /書込み | に適しています |
|---|---|---|---|---|---|---|---|---|
小 |
| 2 GB から 128 GB | 2 | 2 GB | 1000 | 1 GB から 10 GB | 200 | 開発/テストのみ |
Med |
| 8 GB から 512 GB | 2 | 8 GB | 3000 | 20 GB から 50 GB | 3000 | Prod |
大 |
| 8 GB から 4 TB | 16 | 32 GB | 3000 | 360 GB から 420 GB | 11000 | Prod |
X-Large |
| 8 GB から 4 TB | 32 | 128 GB | 3000 | 1200 GB から 1750 GB | 39000 | Prod |
| [1] | M10 は、共有 CPU 階層であり、高度に規制されたセカンダリまたは機密データの場合、最小かつ最小の開始階層は M30 である必要があります。 |
例として、架空のフィンテック会社 MongoFinance が、合計 400 GB の処理済みデータを保存する必要があるとします。アクティビティのピーク時、MongoFinance の従業員とカスタマーは、MongoFinance データベースに対して毎秒最大3000回の読み取りまたは書き込みを行います。MongoFinance のストレージおよびパフォーマンス要件は、大規模または M50 クラスター階層によって最もよく満たされます。
クラスター階層とそれをサポートするリージョンの詳細については、各クラウドプロバイダーに関する Atlas ドキュメントをご覧ください。
オートメーションの例: Atlas の組織、プロジェクト、クラスター
Tip
すべてのピリオドにわたって推奨事項を強制する Terraform の例については、 Githubの次のいずれかの例を参照してください。
次の例では、オートメーション用の Atlas ツール を使用して組織、プロジェクト、クラスターを作成します。
これらの例では、次のようなその他の推奨される構成も適用されます。
開発用またはテスト環境では、クラスター階層が
M10に設定されています。アプリケーションサイズに推奨されるクラスター層については、 クラスター サイズガイドを使用してください。単一リージョン、3 ノード レプリカ セットまたはシャード配置トポロジー。
当社の例では、AWS、Azure、および Google Cloud を互換的に使用します。これら 3 つのクラウドプロバイダーのいずれかを使用できますが、クラウドプロバイダーに一致するようにリージョン名を変更する必要があります。クラウドプロバイダーとそのリージョンに関する詳細は、「クラウドプロバイダー」を参照してください。
中規模アプリケーション用のクラスター階層が
M30に設定されました。クラスターサイズガイドを使用して、アプリケーションのサイズに応じた推奨クラスター階層を確認してください。単一リージョン、3 ノード レプリカ セットまたはシャード配置トポロジー。
当社の例では、AWS、Azure、および Google Cloud を互換的に使用します。これら 3 つのクラウドプロバイダーのいずれかを使用できますが、クラウドプロバイダーに一致するようにリージョン名を変更する必要があります。クラウドプロバイダーとそのリージョンに関する詳細は、「クラウドプロバイダー」を参照してください。
注意
Atlas CLI を使用してリソースを作成する前に、次の手順を実行する必要があります。
Programmatic Useの手順に従って Atlas CLI から接続します。
組織を作成
各 BU に対して次のコマンドを実行します。ID と名前を変更して、実際の 値を使用します。
atlas organizations create ConsumerProducts --ownerId 508bb8f5f11b8e3488a0e99e --apiKeyRole ORG_OWNER --apiKeyDescription consumer-products-key
この例に関する構成オプションと詳細については、atlas organizations create を参照してください。
Atlas Administration API を使用して、組織を作成し、支払い組織にプログラムでリンクすることができます。そのためには、POST リクエストを https://cloud.mongodb.com/api/atlas/v2/orgs エンドポイントに送信し、支払い組織 ID を federationSettingsId フィールドに指定します。リクエストするサービスアカウントまたは API キーは、「組織オーナー」ロールを持ち、リクエストする組織が支払い組織である必要があります。
次の例では、cURL を使用してリクエストを送信します。
curl --location '/api/atlas/v2/orgs?envelope=false&pretty=false' \ --header 'Content-Type: application/vnd.atlas.2023-01-01+json' \ --header 'Accept: application/vnd.atlas.2023-01-01+json' \ --data '{ "name": "<organization name>", "apiKey": { "desc": "<organization description>", "roles": [ "ORG_MEMBER" ] }, "federationSettingsId": "<ID of org to link to>", "orgOwnerId": "<organization owners ID>", "skipDefaultAlertsSettings": false }'
上記のAPI呼び出しの詳細については、「atlas 組織の作成」APIドキュメントを参照してください。
ユーザー ID と組織 ID を取得するには、次のコマンドをご覧ください。
プロジェクトを作成する
アプリケーションと環境のペアごとに次のコマンドを実行します。ID と名前を変更して、 値を使用します。
atlas projects create "Customer Portal - Prod" --tag environment=production --orgId 32b6e34b3d91647abb20e7b8
その他の構成オプションとこの例に関する情報については、「 Atlas プロジェクト作成 」を参照してください。
プロジェクト ID を取得するには、次のコマンドをご覧ください。
カスタマー キー管理による暗号化の設定
ステージング環境と本番環境では、クラスターをプロビジョニングする際に、カスタマー キー管理による暗号化を有効にすることを推奨します。規制の厳しい業界にいる場合や機密データを保存している場合を除き、開発およびテスト環境では、コストを削減するためにカスタマー キー管理による暗号化を省略することを検討してください。詳細については、「Atlas の組織、プロジェクト、およびクラスターに関する推奨事項」をご覧ください。
Atlas CLI を使用して、カスタマーキー管理で暗号化を管理することはできません。代わりに、次のメソッドを使用してください。
プロジェクトごとに 1 つのクラスターを作成する
開発およびテスト環境用の単一リージョンクラスターを作成するには、作成した各プロジェクトに対して次のコマンドを実行します。必要に応じて ID と名前を変更して使用します。
注意
クラスターの Atlas Admin API を使用してクラスターを作成することもできます。
この例では、開発およびテスト環境におけるコスト管理を支援するためのオートスケーリング機能は有効になっていません。ステージングおよび本番環境では、オートスケーリングを有効にする必要があります。
atlas clusters create CustomerPortalDev \ --projectId 56fd11f25f23b33ef4c2a331 \ --region EASTERN_US \ --members 3 \ --tier M10 \ --provider GCP \ --mdbVersion 8.0 \ --diskSizeGB 30 \ --tag bu=ConsumerProducts \ --tag teamName=TeamA \ --tag appName=ProductManagementApp \ --tag env=Production \ --tag version=8.0 \ --tag email=marissa@example.com \ --watch
マルチリージョンクラスターを構成するには、作成した各プロジェクトに対して次の cluster.json ファイルを作成します。必要に応じて ID と名前を変更して使用します。
{ "name": "CustomerPortalDev", "projectId": "56fd11f25f23b33ef4c2a331", "clusterType": "REPLICASET", "diskSizeGB": 30, "mongoDBMajorVersion": "8.0", "backupEnabled": true, "replicationSpecs": [ { "numShards": 1, "regionConfigs": [ { "providerName": "GCP", "regionName": "EASTERN_US", "members": 3, "priority": 7, "autoScaling": { "compute": { "enabled": true, "scaleDownEnabled": true }, "diskGB": { "enabled": true } } }, { "providerName": "GCP", "regionName": "CENTRAL_US", "members": 2, "priority": 5, "autoScaling": { "compute": { "enabled": true, "scaleDownEnabled": true }, "diskGB": { "enabled": true } } }, { "providerName": "GCP", "regionName": "WESTERN_US", "members": 2, "priority": 4, "autoScaling": { "compute": { "enabled": true, "scaleDownEnabled": true }, "diskGB": { "enabled": true } } } ] } ], "tags": [ { "key": "bu", "value": "ConsumerProducts" }, { "key": "teamName", "value": "TeamA" }, { "key": "appName", "value": "ProductManagementApp" }, { "key": "env", "value": "Production" }, { "key": "version", "value": "8.0" }, { "key": "email", "value": "marissa@example.com" } ] }
前述の構成ファイルを作成した後、次のコマンドを実行してクラスターを作成します。
atlas clusters create --file <path to your configuration file>
ステージング環境および本番環境用の単一リージョンクラスターを作成するには、作成した各プロジェクトに対して次の cluster.json ファイルを作成します。必要に応じて ID と名前を変更して使用します。
{ "clusterType": "REPLICASET", "links": [], "name": "CustomerPortalProd", "mongoDBMajorVersion": "8.0", "replicationSpecs": [ { "numShards": 1, "regionConfigs": [ { "electableSpecs": { "instanceSize": "M30", "nodeCount": 3 }, "priority": 7, "providerName": "GCP", "regionName": "EASTERN_US", "analyticsSpecs": { "nodeCount": 0, "instanceSize": "M30" }, "autoScaling": { "compute": { "enabled": true, "scaleDownEnabled": true }, "diskGB": { "enabled": true } }, "readOnlySpecs": { "nodeCount": 0, "instanceSize": "M30" } } ], "zoneName": "Zone 1" } ], "tag" : [{ "bu": "ConsumerProducts", "teamName": "TeamA", "appName": "ProductManagementApp", "env": "Production", "version": "8.0", "email": "marissa@example.com" }] }
cluster.json ファイルを作成した後、作成した各プロジェクトに対して次のコマンドを実行します。このコマンドは、cluster.json ファイルを使用してクラスターを作成します。
atlas cluster create --projectId 5e2211c17a3e5a48f5497de3 --file cluster.json
マルチリージョンクラスターを構成するには、次の例に示すように、前述の cluster.json ファイルのreplicationSpecs 配列を変更して複数のリージョンを指定します。
{ … "replicationSpecs": [ { "numShards": 1, "regionConfigs": [ { "electableSpecs": { "instanceSize": "M30", "nodeCount": 3 }, "priority": 7, "providerName": "GCP", "regionName": "EASTERN_US", "analyticsSpecs": { "nodeCount": 0, "instanceSize": "M30" }, "autoScaling": { "compute": { "enabled": true, "scaleDownEnabled": true }, "diskGB": { "enabled": true } }, "readOnlySpecs": { "nodeCount": 0, "instanceSize": "M30" } }, { "electableSpecs": { "instanceSize": "M30", "nodeCount": 3 }, "priority": 5, "providerName": "GCP", "regionName": "CENTRAL_US", "analyticsSpecs": { "nodeCount": 0, "instanceSize": "M30" }, "autoScaling": { "compute": { "enabled": true, "scaleDownEnabled": true }, "diskGB": { "enabled": true } }, "readOnlySpecs": { "nodeCount": 0, "instanceSize": "M30" } }, { "electableSpecs": { "instanceSize": "M30", "nodeCount": 3 }, "priority": 6, "providerName": "GCP", "regionName": "WESTERN_US", "analyticsSpecs": { "nodeCount": 0, "instanceSize": "M30" }, "autoScaling": { "compute": { "enabled": true, "scaleDownEnabled": true }, "diskGB": { "enabled": true } }, "readOnlySpecs": { "nodeCount": 0, "instanceSize": "M30" } } ], "zoneName": "Zone 1" } ], … }
前述の構成ファイルを作成した後、次のコマンドを実行してクラスターを作成します。
atlas clusters create --file <path to your configuration file>
その他の構成オプションと上記例の詳細については、「atlas clusters create」をご覧ください。
注意
重要
以下の例は、MongoDB Atlas Terraform プロバイダー バージョン 2.x(~> 2.2)を使用しています。プロバイダーのバージョン1.x からアップグレードする場合は、「2.0.0 アップグレードガイド」を参照してください。このガイドには、重大な変更点や移行手順が記載されています。例では、mongodbatlas_advanced_cluster リソースが v2.x 構文で使用されています。
プロジェクトとデプロイメントを作成する
開発環境およびテスト環境では、アプリケーションと環境のペアごとに次のファイルを作成します。各アプリケーションと環境ペアのファイルを 独自のディレクトリに配置します。ID と名前を変更して、 値を使用します。
main.tf
# Create a Project resource "mongodbatlas_project" "atlas-project" { org_id = var.atlas_org_id name = var.atlas_project_name } # Create an Atlas Advanced Cluster resource "mongodbatlas_advanced_cluster" "atlas-cluster" { project_id = mongodbatlas_project.atlas-project.id name = "ClusterPortalDev" cluster_type = "REPLICASET" mongo_db_major_version = var.mongodb_version replication_specs = [ { region_configs = [ { electable_specs = { instance_size = var.cluster_instance_size_name node_count = 3 } auto_scaling = { compute_enabled = true compute_scale_down_enabled = true compute_max_instance_size = "M60" compute_min_instance_size = "M10" } priority = 7 provider_name = var.cloud_provider region_name = var.atlas_region } ] } ] tags = { BU = "ConsumerProducts" TeamName = "TeamA" AppName = "ProductManagementApp" Env = "Test" Version = "8.0" Email = "marissa@example.com" } # MongoDB recommends enabling auto-scaling # When auto-scaling is enabled, Atlas may change the instance size, and this lifecycle # block prevents Terraform from reverting Atlas auto-scaling changes # that modify instance size back to the original configured value lifecycle { ignore_changes = [ replication_specs[0].region_configs[0].electable_specs.instance_size ] } } # Outputs to Display output "atlas_cluster_connection_string" { value = mongodbatlas_advanced_cluster.atlas-cluster.connection_strings.0.standard_srv } output "project_name" { value = mongodbatlas_project.atlas-project.name }
注意
マルチリージョンクラスターを作成するには、各リージョンをそれぞれの region_configs オブジェクトに指定し、それらを replication_specs オブジェクトにネストします。priority フィールドは降順で定義され、次の例に示すように 7 から 1 までの値で構成される必要があります。
replication_specs = [ { region_configs = [ { electable_specs = { instance_size = "M10" node_count = 2 } auto_scaling = { compute_enabled = true compute_scale_down_enabled = true compute_max_instance_size = "M60" compute_min_instance_size = "M10" } provider_name = "GCP" priority = 7 region_name = "NORTH_AMERICA_NORTHEAST_1" }, { electable_specs = { instance_size = "M10" node_count = 3 } auto_scaling = { compute_enabled = true compute_scale_down_enabled = true compute_max_instance_size = "M60" compute_min_instance_size = "M10" } provider_name = "GCP" priority = 6 region_name = "WESTERN_US" } ] } ] # MongoDB recommends enabling auto-scaling # When auto-scaling is enabled, Atlas may change the instance size, and this lifecycle # block prevents Terraform from reverting Atlas auto-scaling changes # that modify instance size back to the original configured value lifecycle { ignore_changes = [ replication_specs[0].region_configs[0].electable_specs.instance_size, replication_specs[0].region_configs[1].electable_specs.instance_size ] }
variables.tf
# MongoDB Atlas Provider Authentication Variables # Legacy API key authentication (backward compatibility) variable "mongodbatlas_public_key" { type = string description = "MongoDB Atlas API public key" sensitive = true } variable "mongodbatlas_private_key" { type = string description = "MongoDB Atlas API private key" sensitive = true } # Recommended: Service account authentication variable "mongodb_service_account_id" { type = string description = "MongoDB service account ID for authentication" sensitive = true default = null } variable "mongodb_service_account_key_file" { type = string description = "Path to MongoDB service account private key file" sensitive = true default = null } # Atlas Organization ID variable "atlas_org_id" { type = string description = "Atlas Organization ID" } # Atlas Project Name variable "atlas_project_name" { type = string description = "Atlas Project Name" } # Atlas Project Environment variable "environment" { type = string description = "The environment to be built" } # Cluster Instance Size Name variable "cluster_instance_size_name" { type = string description = "Cluster instance size name" } # Cloud Provider to Host Atlas Cluster variable "cloud_provider" { type = string description = "AWS or GCP or Azure" } # Atlas Region variable "atlas_region" { type = string description = "Atlas region where resources will be created" } # MongoDB Version variable "mongodb_version" { type = string description = "MongoDB Version" } # Atlas Group Name variable "atlas_group_name" { type = string description = "Atlas Group Name" }
terraform.tfvars
atlas_org_id = "32b6e34b3d91647abb20e7b8" atlas_project_name = "Customer Portal - Dev" environment = "dev" cluster_instance_size_name = "M10" cloud_provider = "AWS" atlas_region = "US_WEST_2" mongodb_version = "8.0"
provider.tf
# Define the MongoDB Atlas Provider terraform { required_providers { mongodbatlas = { source = "mongodb/mongodbatlas" version = "~> 2.2" } } required_version = ">= 1.0" } # Configure the MongoDB Atlas Provider provider "mongodbatlas" { # Legacy API key authentication (backward compatibility) public_key = var.mongodbatlas_public_key private_key = var.mongodbatlas_private_key # Recommended: Service account authentication # Uncomment and configure the following for service account auth: # service_account_id = var.mongodb_service_account_id # private_key_file = var.mongodb_service_account_key_file }
ステージング環境と本番環境において、各アプリケーションと環境のペアごとに以下のファイルを作成します。各アプリケーションと環境のペアごとに、それぞれのディレクトリ内でファイルを配置します。ID と名前を変更して、自分の値を使用します。
main.tf
# Create a Group to Assign to Project resource "mongodbatlas_team" "project_group" { org_id = var.atlas_org_id name = var.atlas_group_name usernames = [ "user1@example.com", "user2@example.com" ] } # Create a Project resource "mongodbatlas_project" "atlas-project" { org_id = var.atlas_org_id name = var.atlas_project_name } # Assign the team to project with specific roles resource "mongodbatlas_team_project_assignment" "project_team" { project_id = mongodbatlas_project.atlas-project.id team_id = mongodbatlas_team.project_group.team_id role_names = ["GROUP_READ_ONLY", "GROUP_CLUSTER_MANAGER"] } # Create an Atlas Advanced Cluster resource "mongodbatlas_advanced_cluster" "atlas-cluster" { project_id = mongodbatlas_project.atlas-project.id name = "ClusterPortalProd" cluster_type = "REPLICASET" mongo_db_major_version = var.mongodb_version replication_specs = [ { region_configs = [ { electable_specs = { instance_size = var.cluster_instance_size_name node_count = 3 disk_size_gb = var.disk_size_gb } auto_scaling = { disk_gb_enabled = var.auto_scaling_disk_gb_enabled compute_enabled = var.auto_scaling_compute_enabled compute_max_instance_size = var.compute_max_instance_size } priority = 7 provider_name = var.cloud_provider region_name = var.atlas_region } ] } ] # Prevent Terraform from reverting auto-scaling changes lifecycle { ignore_changes = [ replication_specs[0].region_configs[0].electable_specs.instance_size, replication_specs[0].region_configs[0].electable_specs.disk_size_gb ] } tags = { BU = "ConsumerProducts" TeamName = "TeamA" AppName = "ProductManagementApp" Env = "Production" Version = "8.0" Email = "marissa@example.com" } } # Outputs to Display output "atlas_cluster_connection_string" { value = mongodbatlas_advanced_cluster.atlas-cluster.connection_strings.standard_srv } output "project_name" { value = mongodbatlas_project.atlas-project.name }
注意
マルチリージョンクラスターを作成するには、各リージョンをそれぞれ独自のregion_configs で指定し、それらをreplication_specs オブジェクトにネストします。以下の例をご覧ください。
replication_specs = [ { region_configs = [ { electable_specs = { instance_size = "M10" node_count = 2 } provider_name = "GCP" priority = 7 region_name = "NORTH_AMERICA_NORTHEAST_1" }, { electable_specs = { instance_size = "M10" node_count = 3 } provider_name = "GCP" priority = 6 region_name = "WESTERN_US" } ] } ]
variables.tf
# MongoDB Atlas Provider Authentication Variables # Legacy API key authentication (backward compatibility) variable "mongodbatlas_public_key" { type = string description = "MongoDB Atlas API public key" sensitive = true } variable "mongodbatlas_private_key" { type = string description = "MongoDB Atlas API private key" sensitive = true } # Recommended: Service account authentication variable "mongodb_service_account_id" { type = string description = "MongoDB service account ID for authentication" sensitive = true default = null } variable "mongodb_service_account_key_file" { type = string description = "Path to MongoDB service account private key file" sensitive = true default = null } # Atlas Organization ID variable "atlas_org_id" { type = string description = "Atlas Organization ID" } # Atlas Project Name variable "atlas_project_name" { type = string description = "Atlas Project Name" } # Atlas Project Environment variable "environment" { type = string description = "The environment to be built" } # Cluster Instance Size Name variable "cluster_instance_size_name" { type = string description = "Cluster instance size name" } # Cloud Provider to Host Atlas Cluster variable "cloud_provider" { type = string description = "AWS or GCP or Azure" } # Atlas Region variable "atlas_region" { type = string description = "Atlas region where resources will be created" } # MongoDB Version variable "mongodb_version" { type = string description = "MongoDB Version" } # Atlas Group Name variable "atlas_group_name" { type = string description = "Atlas Group Name" }
terraform.tfvars
atlas_org_id = "32b6e34b3d91647abb20e7b8" atlas_project_name = "Customer Portal - Prod" environment = "prod" cluster_instance_size_name = "M30" cloud_provider = "AWS" atlas_region = "US_WEST_2" mongodb_version = "8.0" atlas_group_name = "Atlas Group"
provider.tf
# Define the MongoDB Atlas Provider terraform { required_providers { mongodbatlas = { source = "mongodb/mongodbatlas" version = "~> 2.2" } } required_version = ">= 1.0" } # Configure the MongoDB Atlas Provider provider "mongodbatlas" { # Legacy API key authentication (backward compatibility) public_key = var.mongodbatlas_public_key private_key = var.mongodbatlas_private_key # Recommended: Service account authentication # Uncomment and configure the following for service account auth: # service_account_id = var.mongodb_service_account_id # private_key_file = var.mongodb_service_account_key_file }
この例に関するその他の設定オプションや情報については、「MongoDB & HashiCorp Terraform」およびMongoDB Terraform のブログ記事をご覧ください。
ファイルを作成した後、各アプリケーションと環境ペアのディレクトリに移動し、次のコマンドを実行して Terraform を初期化します。
terraform init
Terraform プランを表示するには、次のコマンドを実行します。
terraform plan
次のコマンドを実行して、アプリケーションと環境のペアに対して 1 つのプロジェクトと 1 つのデプロイメントを作成します。コマンドは、ファイルと MongoDB & HashiCorp Terraform を使用して、プロジェクトとクラスターを作成します。
terraform apply
プロンプトが表示されたら、yes を入力し、Enter を押して設定を適用します。
次のステップ
組織、プロジェクト、クラスターの階層とサイズを計画した後、次の推奨リソースを参照するか、左側のナビゲーションを使用して、Well-Architected Framework の各柱の機能とベスト プラクティスを見つけます。