개요
Apple ID 인증 제공자 사용자가 Apple로 로그인 을 통해 Apple ID 자격 증명 으로 로그인 할 수 있도록 허용합니다. 이 인증 방법은 업계 표준 OAuth.2 0 권한 부여 프로토콜 사용합니다.
사용자가 Apple로 로그인을 통해 로그인하면 Apple은 Apple ID 제공자 사용자를 인증하는 데 사용하는 JSON web token 포함된 자격 증명 객체 반환합니다. 사용자가 앱 에 권한을 부여한 경우 자격 증명 객체 에 사용자 이름과 이메일 주소 도 포함될 수 있습니다.
Sign in with Apple(Apple로 로그인) 구현 방법에 대한 자세한 내용은 다음 섹션을 참조하세요.
Apple 개발자 포털의 공식 Apple로 로그인 문서
WWDC 2019의 Apple로 로그인 소개 세션
관련 참고 애플리케이션.
참고
Apple ID 인증을 사용하는 iOS 앱은 iOS 13 이상을 대상으로 해야 합니다.
다음 다이어그램은 OAuth 로직의 흐름을 보여줍니다.


준비물
Apple ID 인증을 구현하려면 먼저 다음 사항이 필요합니다.
Apple ID 인증 구성
Atlas App Services와 함께 Sign-in with Apple(Apple로 로그인)을 사용할 경우, 모바일 애플리케이션 또는 웹 애플리케이션 중 하나에 대해 Apple 인증 제공자를 구성할 수 있습니다.
양쪽에 Sign in with Apple(Apple로 로그인)을 사용하려면 웹 또는 모바일 앱 중 하나에 대한 수동 Sign in with Apple(Apple로 로그인) 흐름을 직접 설정하면 됩니다. 그런 다음 Custom JWT authentication provider(사용자 지정 JWT 인증 제공자)와 함께 반환되는 JWT를 사용하세요. 이후 Realm SDK에서 각 인증 제공자의 사용자 ID를 단일 사용자에 연결할 수 있습니다.
웹 또는 모바일 애플리케이션에서만 Apple로 로그인을 사용하려면 애플리케이션 유형을 선택하고 이 가이드를 따르세요.
앱에 Apple로 로그인 추가
이 기능을 사용하려면 앱에 Apple로 로그인 권한이 있어야 합니다.
Xcode에서 앱 대상을 선택합니다.
Signing & Capabilities 탭 으로 고 (Go) 하여 + Capability 을(를) 선택합니다.
Apple로 로그인 기능을 검색하여 선택합니다.
그런 다음 Apple 개발자 포털에서 허용 여부를 확인합니다.
Certificates, Identifiers and Profiles Apple 개발자 포털의 페이지로 이동합니다.
드롭다운에서 앱의 식별자를 선택합니다. 그러면 App ID Configuration 창으로 이동합니다.
Sign In with Apple에 대한 확인란이 보일 때까지 아래로 스크롤합니다. 해당 확인란이 선택되어 있지 않으면 선택합니다. 변경한 경우 Save 버튼을 누릅니다.
앱의 Bundle ID에 유의하십시오. 클라이언트 암호를 생성하고 App Services에서 Apple로 로그인을 구성할 때 번들 ID가 필요합니다.
비공개 키 만들기
Apple로 로그인을 위한 클라이언트 비밀 번호는 사용자가 생성하고 비공개 키로 서명하는 JSON Web Token입니다. Apple 개발자 포털을 통해 비공개 키를 생성해야 합니다.
왼쪽 탐색 패널에서 Keys 을 클릭합니다.
0} 옆의 파란색 더하기 아이콘을 클릭합니다.Keys
Register a New Key 페이지에서 설명이 포함된 Key Name을 입력한 다음 아래로 스크롤하여 Sign in with Apple 행을 찾습니다. 확인란을 선택하여 Apple 로그인을 활성화한 다음 Configure을 클릭합니다.
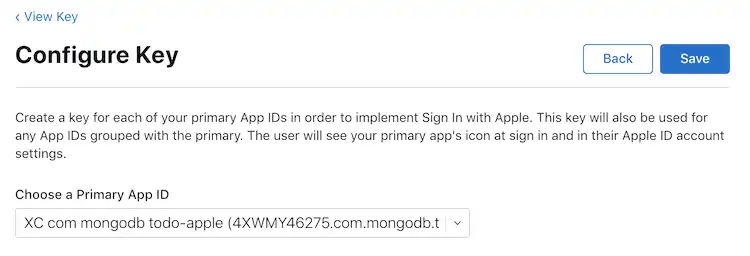
0} Configure Key 페이지에서 앱의 앱 ID를 로 선택한 다음 Primary App ID Save를 클릭합니다.
키 구성을 검토하려면 Continue을 클릭합니다. 키를 올바르게 구성했다는 확신이 들면 Register을 클릭합니다.
나중에 액세스 할 수 있는 위치에 Key ID 값을 복사한 다음 Download 를 클릭하여 키를
.p8텍스트 파일 로 다운로드 합니다. 이를 사용하여 클라이언트 시크릿을 생성합니다.중요
키 저장
키는 한 번만 다운로드할 수 있습니다. 다시 필요할 경우를 대비하여 키를 안전한 곳에 저장해야 합니다. 키를 분실한 경우 새 키를 생성해야 합니다.
클라이언트 비밀 JWT 만들기
이제 Apple ID 인증 제공자에 대한 클라이언트 비밀 JWT를 만들 수 있습니다. 다음 정보가 있는지 확인하십시오.
앱의 Bundle ID 입니다. 아래 스크립트에서 이것을
client_id로 사용합니다.만든 키의 Key ID 과 키가 포함된
.p8파일입니다.Apple 팀 ID. Apple 개발자 포털의 오른쪽 상단에서 찾을 수 있습니다.
필요한 정보가 모두 있음을 확인한 후에는 스크립트를 사용하여 JWT를 생성할 수 있습니다. 직접 스크립트를 정의하거나 이 단계의 스크립트를 사용할 수 있습니다.
JSON web token 생성하기 위해 JSON web token gem을 사용합니다. 설치하려면 다음을 실행 .
gem install jwt
generate_client_secret.rb 이라는 새 파일을 만들고 다음의 코드 블록을 파일에 복사합니다.
# Source: https://developer.okta.com/blog/2019/06/04/what-the-heck-is-sign-in-with-apple require 'jwt' # Update these values with your app's information team_id = '<Apple Team ID>' client_id = '<Bundle ID or Services ID>' key_id = '<Apple Key ID>' key_file = '<Key File Path>' # Define the JWT's headers and claims headers = { # The token must be signed with your key 'kid' => key_id } claims = { # The token is issued by your Apple team 'iss' => team_id, # The token applies to Apple ID authentication 'aud' => 'https://appleid.apple.com', # The token is scoped to your application 'sub' => client_id, # The token is valid immediately 'iat' => Time.now.to_i, # The token expires in 6 months (maximum allowed) 'exp' => Time.now.to_i + 86400*180, } # Read in the key and generate the JWT ecdsa_key = OpenSSL::PKey::EC.new IO.read key_file token = JWT.encode claims, ecdsa_key, 'ES256', headers # Print the JWT to stdout puts token
team_id, client_id, key_id, key_file 값을 애플리케이션 정보와 일치하도록 업데이트한 다음 파일을 저장합니다. JWT를 생성할 준비가 되면 셸에서 스크립트를 실행합니다.
ruby generate_client_secret.rb >> client_secret.txt
중요
JWT 저장
generate_client_secret.rb 스크립트는 stdout으로 출력됩니다. 이 함수를 호출하면 client_secret.txt이라는 파일에 stdout이 추가됩니다. App Services에서 Apple ID 제공자를 구성하려면 JWT가 필요합니다.
App Services에서 제공자 구성하기
이 지점에서 Apple 애플리케이션을 구성하고 필요한 OAuth 2.0 자격 증명을 생성했습니다. 이제 App Services 클라이언트 애플리케이션 사용자가 로그인할 수 있도록 자격 증명을 사용하여 Apple ID 인증 제공자를 구성할 수 있습니다.
왼쪽 탐색 메뉴에서 Authentication을 클릭한 다음 Apple ID을 클릭합니다.
Provider Enabled 토글을 켭니다.
App Services Client ID 의 경우 애플리케이션의 Bundle ID 을(를) 입력합니다.
Client Secret에 대해 설명이 포함된 이름의 새 비밀을 만들고 Client Secret Value을 생성한 JWT 문자열로 설정합니다. 또는 JWT가 포함된 기존 비밀 번호를 선택할 수도 있습니다.
제공자 구성을 완료하려면 Save을 클릭합니다. 클라이언트 애플리케이션에서 제공자를 사용할 수 있도록 하려면 변경 사항을 배포해야 합니다. Review & Deploy Changes을 클릭한 다음 Deploy을 클릭합니다.
appservices로 Apple 인증 제공자 를 활성화 하고 구성하려면 /auth/providers.json 에서 구성 객체 를 정의합니다.
Apple 제공자 구성의 형식은 다음과 같습니다.
{ "oauth2-apple": { "name": "oauth2-apple", "type": "oauth2-apple", "disabled": <boolean>, "config": { "clientId": "<Bundle ID>" }, "secret_config": { "clientSecret": "<Secret Name>" }, "redirect_uris": ["<string>", ...] } }
필드 | 설명 |
|---|---|
Client ID config.clientId | 필수입니다. 애플리케이션의 Bundle ID. |
Client Secret secret_config.clientSecret | 필수입니다. 생성한 을 저장하는 Secret 의 Client Secret JSON web token 이름입니다. |
Redirect URIs redirect_uris | 웹 애플리케이션에 필요합니다. 모바일 애플리케이션에는 필요하지 않습니다. |
구성 파일 을 생성한 후에는 애플리케이션을 배포하여 클라이언트 애플리케이션 에서 Apple ID 인증 제공자 를 사용할 수 있도록 설정할 수 있습니다.
App Services CLI 를 사용하여 초안 애플리케이션 을 배포 하려면 다음을 수행합니다.
appservices push
자동 Github 배포서버를 사용하여 초안 애플리케이션 을 배포 하려면 다음을 수행합니다.
git add ./auth/providers.json git commit -m "Configure and Enable Apple ID Authentication" git push origin <branch name>
앱 ID 만들기
Apple 앱 ID 는 애플리케이션 을 나타내며 이를 통해 Apple로 로그인과 같은 서비스에 액세스 할 수 있습니다. Apple ID 제공자 를 구성하려면 새 앱 ID 를 만들어야 합니다.
Certificates, Identifiers and Profiles Apple 개발자 포털의 페이지로 이동합니다.
왼쪽 탐색 패널에서 Identifiers 을 클릭합니다.
0} 옆의 파란색 더하기 아이콘을 클릭합니다.Identifiers
Register a New Identifier 페이지에서 App IDs 을 선택한 다음 Continue 를 클릭합니다.
Register an App ID 페이지에서 앱 실행되는 Platform 을 선택한 다음 간단한 Description 및 역방향 DNS 표기법 Bundle ID을 입력합니다.
Sign in with Apple 역량 이 표시될 때까지 Register an App ID 페이지를 아래로 스크롤합니다. 역량 을 활성화 하려면 확인란을 선택합니다.
페이지 상단의 Continue 버튼을 누릅니다. 앱 에 적용 되는 다른 설정 단계를 완료한 다음 Register 버튼을 누릅니다.
서비스 ID 만들기
Apple 서비스 ID 는 단일 애플리케이션 을 나타내며, 이를 통해 권한 부여 콜백 URL 을 구성하고 애플리케이션 의 비공개 키를 정의할 수 있습니다.
왼쪽 탐색 패널에서 Identifiers 을 클릭합니다.
0} 옆의 파란색 더하기 아이콘을 클릭합니다.Identifiers
Register a New Identifier 페이지에서 Services IDs 을 선택한 다음 Continue 를 클릭합니다.
Register a Services ID 페이지에서 간단한 Description 및 역방향 DNS 표기법 Identifier을 입력합니다.
중요
식별자 저장
서비스 ID 의 Identifier 값은 애플리케이션의 Client ID 입니다. 나중에 이 값은 Atlas App Services 에서 Apple ID 제공자 를 구성할 때 필요합니다.
Continue 버튼을 누릅니다. 세부 정보를 확인한 다음 Register 를 누릅니다.
방금 생성한 서비스를 클릭합니다. 확인란을 선택하여 Sign in with Apple 을(를) 활성화 한 다음 Configure 을(를) 클릭합니다. Primary App ID 로 생성한 앱 ID 를 선택합니다.
서비스 ID 에 대한 도메인, 하위 도메인 및 반환 URL을 입력합니다. Next 버튼을 누릅니다.
Continue 을 클릭한 다음 Save 을 클릭합니다. 서비스 ID 를 올바르게 구성했는지 확인한 다음 Register 를 클릭합니다.
비공개 키 만들기
Apple로 로그인을 위한 클라이언트 비밀 번호는 사용자가 생성하고 비공개 키로 서명하는 JSON Web Token입니다. Apple 개발자 포털을 통해 비공개 키를 생성해야 합니다.
왼쪽 탐색 패널에서 Keys 을 클릭합니다.
0} 옆의 파란색 더하기 아이콘을 클릭합니다.Keys
Register a New Key 페이지에서 설명이 포함된 Key Name을 입력한 다음 아래로 스크롤하여 Sign in with Apple 행을 찾습니다. 확인란을 선택하여 Apple 로그인을 활성화한 다음 Configure을 클릭합니다.
Configure Key 페이지에서 생성한 앱 ID 를 Primary App ID 로 선택한 다음 Save 를 클릭합니다.
![Apple 개발자 포털의 키 구성 페이지]()
키 구성을 검토하려면 Continue을 클릭합니다. 키를 올바르게 구성했다는 확신이 들면 Register을 클릭합니다.
나중에 액세스할 수 있는 위치에 Key ID 값을 복사한 다음 Download 클릭하여 키를
.p8텍스트 파일로 다운로드합니다. 이를 사용하여 클라이언트 비밀을 생성합니다.중요
키 저장
키는 한 번만 다운로드할 수 있습니다. 다시 필요할 경우를 대비하여 키를 안전한 곳에 저장해야 합니다. 키를 분실한 경우 새 키를 생성해야 합니다.

클라이언트 비밀 JWT 만들기
이제 Apple ID 인증 제공자에 대한 클라이언트 비밀 JWT를 만들 수 있습니다. 다음 정보가 있는지 확인하십시오.
사용자가 만든 Services ID 입니다. 아래 스크립트 에서 이를
client_id로 사용합니다.- 생성한 키의 Key ID 와(과)
.p8 - 키가 포함된 파일 입니다.
- 생성한 키의 Key ID 와(과)
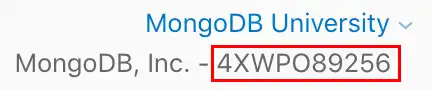
- Apple 팀 ID. Apple의 오른쪽 상단에서 찾을 수 있습니다.
- 개발자 포털.

필요한 정보가 모두 있음을 확인한 후에는 스크립트를 사용하여 JWT를 생성할 수 있습니다. 직접 스크립트를 정의하거나 이 단계의 스크립트를 사용할 수 있습니다.
JSON web token 생성하기 위해 JSON web token gem을 사용합니다. 설치하려면 다음을 실행 .
gem install jwt
generate_client_secret.rb 이라는 새 파일을 만들고 다음의 코드 블록을 파일에 복사합니다.
# Source: https://developer.okta.com/blog/2019/06/04/what-the-heck-is-sign-in-with-apple require 'jwt' # Update these values with your app's information team_id = '<Apple Team ID>' client_id = '<Bundle ID or Services ID>' key_id = '<Apple Key ID>' key_file = '<Key File Path>' # Define the JWT's headers and claims headers = { # The token must be signed with your key 'kid' => key_id } claims = { # The token is issued by your Apple team 'iss' => team_id, # The token applies to Apple ID authentication 'aud' => 'https://appleid.apple.com', # The token is scoped to your application 'sub' => client_id, # The token is valid immediately 'iat' => Time.now.to_i, # The token expires in 6 months (maximum allowed) 'exp' => Time.now.to_i + 86400*180, } # Read in the key and generate the JWT ecdsa_key = OpenSSL::PKey::EC.new IO.read key_file token = JWT.encode claims, ecdsa_key, 'ES256', headers # Print the JWT to stdout puts token
team_id, client_id, key_id, key_file 값을 애플리케이션 정보와 일치하도록 업데이트한 다음 파일을 저장합니다. JWT를 생성할 준비가 되면 셸에서 스크립트를 실행합니다.
ruby generate_client_secret.rb >> client_secret.txt
중요
JWT 저장
generate_client_secret.rb 스크립트는 stdout으로 출력됩니다. 이 함수를 호출하면 client_secret.txt이라는 파일에 stdout이 추가됩니다. App Services에서 Apple ID 제공자를 구성하려면 JWT가 필요합니다.
App Services에서 제공자 구성하기
이 지점에서 Apple 애플리케이션을 구성하고 필요한 OAuth 2.0 자격 증명을 생성했습니다. 이제 App Services 클라이언트 애플리케이션 사용자가 로그인할 수 있도록 자격 증명을 사용하여 Apple ID 인증 제공자를 구성할 수 있습니다.
왼쪽 탐색 메뉴에서 Authentication을 클릭한 다음 Apple ID을 클릭합니다.
Provider Enabled 토글을 켭니다.
App Services Client ID 의 경우, 위의 2 단계에서 Services ID 를 생성할 때 얻은 Apple Services ID 을 입력합니다.
Client Secret에 대해 설명이 포함된 이름의 새 비밀을 만들고 Client Secret Value을 생성한 JWT 문자열로 설정합니다. 또는 JWT가 포함된 기존 비밀 번호를 선택할 수도 있습니다.
Redirect URIs의 경우 Add Redirect URI 을 클릭하고 OAuth 프로세스 완료되면 App Services 에서 리디렉션해야 하는 URL 을 입력합니다. 제어하는 도메인의 URL 제공한 다음 범용 링크 를 사용하여 사용자를 앱으로 다시 리디렉션합니다.
제공자 구성을 완료하려면 Save을 클릭합니다. 클라이언트 애플리케이션에서 제공자를 사용할 수 있도록 하려면 변경 사항을 배포해야 합니다. Review & Deploy Changes을 클릭한 다음 Deploy을 클릭합니다.
appservices 으로 Apple 인증 제공자 를 활성화 하고 구성하려면 /auth/providers.json 에서 구성 객체 를 정의합니다.
Apple 제공자 구성의 형식은 다음과 같습니다.
{ "oauth2-apple": { "name": "oauth2-apple", "type": "oauth2-apple", "disabled": <boolean>, "config": { "clientId": "<Apple Services ID>" }, "secret_config": { "clientSecret": "<Secret Name>" }, "redirect_uris": ["<string>", ...] } }
필드 | 설명 |
|---|---|
Client ID config.clientId | 필수입니다. 위의 2 단계를 완료했을 때 생성한 Apple Services ID 입니다. |
Client Secret secret_config.clientSecret | 필수입니다. 생성한 을 저장하는 Secret 의 Client Secret JSON web token 이름입니다. |
Redirect URIs redirect_uris | 웹 애플리케이션에 필요합니다. 허용된 리다이렉션 URI 목록입니다. 사용자가 인증 프로세스 를 완료하면 App Services 는 사용자를 지정된 리디렉션 URI로 리디렉션하거나, 리디렉션 URI가 지정되지 않은 경우 인증 요청 을 시작한 URL 로 리디렉션합니다. App Services 는 프로토콜 및 모든 트레일링 슬래시를 포함하여 이 목록의 항목과 정확히 일치하는 URI로만 사용자를 리디렉션합니다. 제어하는 도메인의 URL 제공한 다음 범용 링크 를 사용하여 사용자를 앱으로 다시 리디렉션합니다. |
구성 파일 을 생성한 후에는 애플리케이션을 배포하여 클라이언트 애플리케이션 에서 Apple ID 인증 제공자 를 사용할 수 있도록 설정할 수 있습니다.
App Services CLI 를 사용하여 초안 애플리케이션 을 배포 하려면 다음을 수행합니다.
appservices push
자동 Github 배포서버를 사용하여 초안 애플리케이션 을 배포 하려면 다음을 수행합니다.
git add ./auth/providers.json git commit -m "Configure and Enable Apple ID Authentication" git push origin <branch name>
예시
Apple 인증을 이용한 등록 및 로그인 방법에 대한 코드 예시는 Realm SDK 설명서를 참조하세요.