JavaScript is the top web development language today, running in millions of applications and websites. Modern JavaScript applications use REST APIs built with Node.js and a user interface built with a JavaScript framework such as React or Angular.
The most popular framework for building restful APIs is Express. It provides support for http requests out of the box and has an intuitive syntax for the standard http methods used in the REST principles.
For all your data storage concerns, you can easily integrate MongoDB with the native driver available to you. Using this stack, you can leverage MongoDB's document model with the REST API standard payload, which uses the JSON format.
This article will provide a step-by-step tutorial on how to use Express with MongoDB Atlas, our database-as-a-service platform, to expose restful API endpoints for our client-side application.
stub branch - starting point for following this tutorial
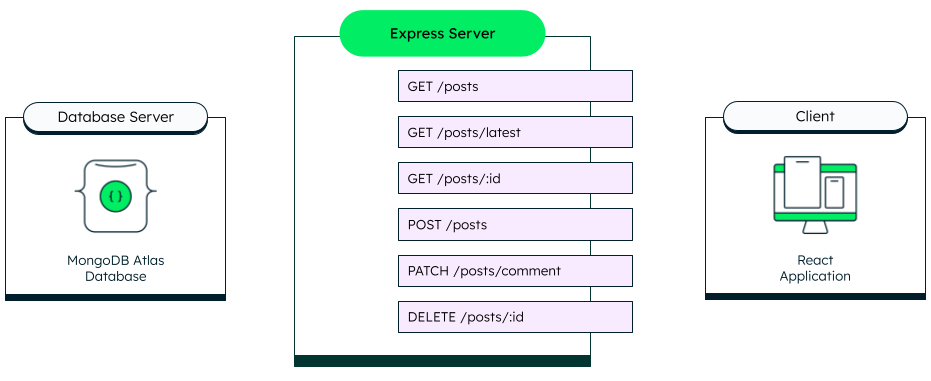
Our application will follow the standard REST architectural style. You will have client and server components. The application will send client requests to our server. The server will then fetch the data from the MongoDB Atlas database and return it to the client.
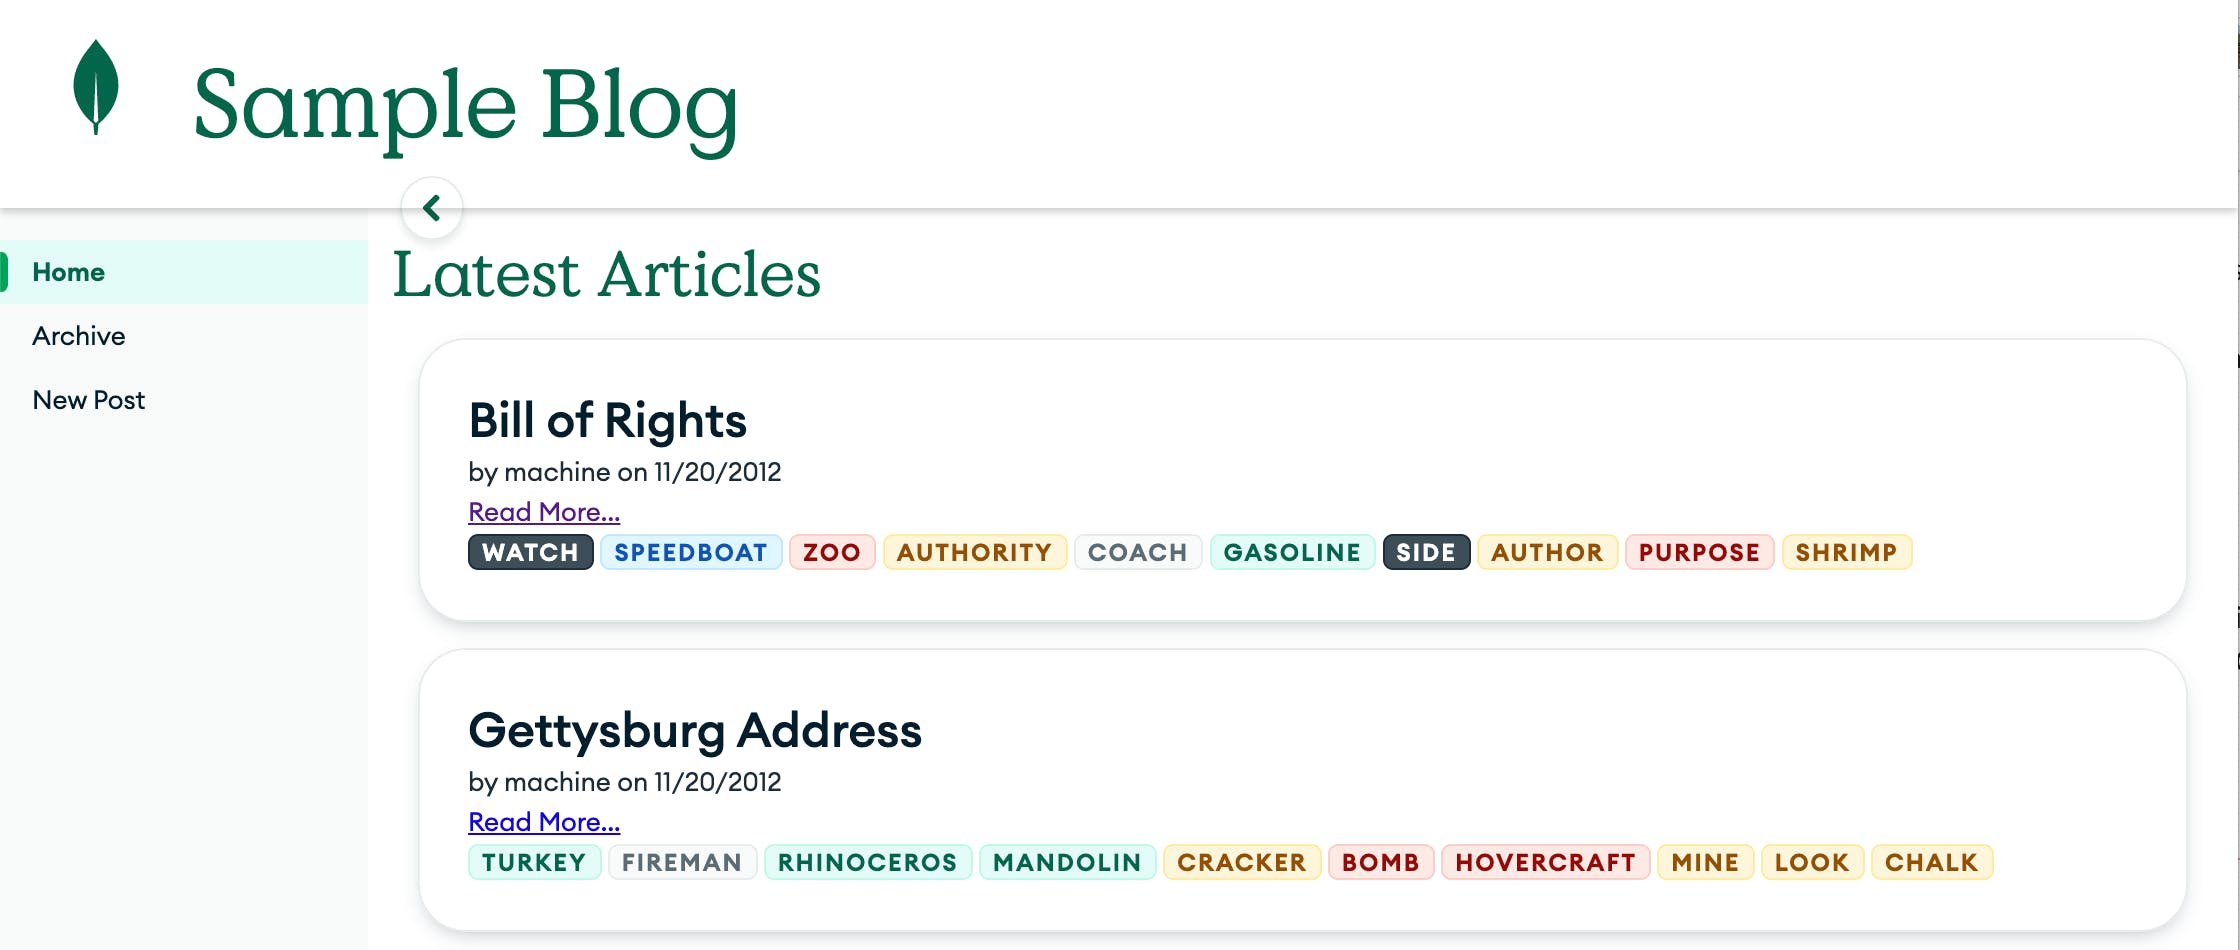
Finally, our front-end application will be written in React to use the REST API endpoints hosted on the Express.js server. The application is a blogging platform that uses the sample_training database, containing a posts collection.
Our back-end application will use the more modern Ecmascript module (ES Modules) syntax.
The application used for this tutorial will be a blogging platform.
Project tree
Here are the main files in the project:
xxxxxxxxxx
19
1
.
2
├── app
3
│ └── src
4
│ ├── App.tsx
5
│ ├── components
6
│ │ └── PostSummary.js
7
│ └── pages
8
│ ├── Archive.js
9
│ ├── Create.js
10
│ ├── Home.js
11
│ └── Post.js
12
└── server
13
├── .env
14
├── db
15
│ └── conn.mjs
16
├── index.mjs
17
├── loadEnvironment.mjs
18
└── routes
19
└── posts.mjs
The “server” directory hosts the Express.js server application and its dependencies. The main files here are:
Let's go to the “server” directory of the project and install the needed packages:
xxxxxxxxxx
2
1
cd mongodb-express-rest-api-example/server
2
npm install
You can start the server right away. It will automatically reload every time you save one of the files in the project.
xxxxxxxxxx
1
1
npm run dev
Now, we are ready to connect our Express server to the MongoDB Atlas Cluster.
Set up the environment variables
Edit the .env file to assign the ATLAS_URI variable the value of your connection string. Replace the credentials with your database username and password.
Our application uses the dotenv package to load this .env file to add these values to the environment variables usable by the code.
You will need the following code in the loadEnvironment.mjs file to load these environment variables.
xxxxxxxxxx
2
1
import dotenv from "dotenv";
2
dotenv.config();
The entry point script can then import this file, which will be executed immediately. In index.mjs, add the following line at the top.
xxxxxxxxxx
2
1
// Load environment variables
2
import "./loadEnvironment.mjs";
The Atlas connection string will now be available to our other modules.
Create the database module
Next, open server/db/conn.mjs and replace the content with the following code. This code will create a global database object that the other server components can reuse.
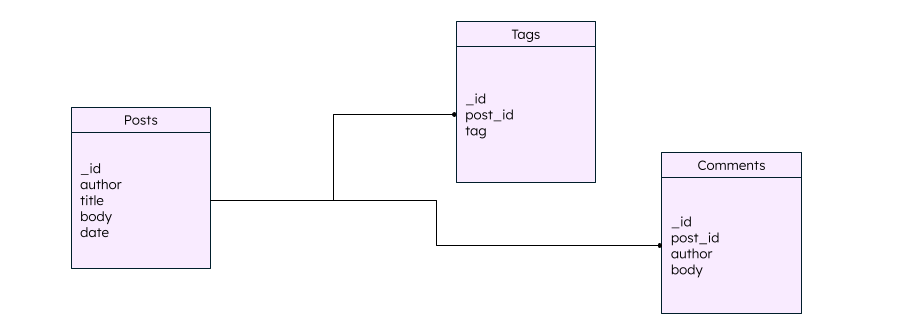
This code uses the connection string provided in the .env file and creates a new client. Once the client is defined, it tries to create a new connection to the database. The sample_training database is then exported if the connection is successful. This gives us a uniform interface that can be reused in all modules.
Handling the HTTP requests
The core of this tutorial is to expose REST API routes to perform Create, Read, Update, and Delete (CRUD) operations for our restful web service.
In this sample application, all the routes for our server are located in the file server/routes/posts.mjs. We then tell our server to use this module for all the incoming requests to routes that start with /posts. This is done in the index.mjs file in the following line.
xxxxxxxxxx
2
1
// Load the /posts routes
2
app.use("/posts", posts);
The code is already there, so you don't need to add that. We will now focus on the logic for all of the API requests.
There will be six routes, each performing one of the CRUD operations.
Read route
The Read route will be returning 50 of the articles when there is a get request on the /posts route. In server/routes/posts.mjs; find the GET route and replace the code with the following.
xxxxxxxxxx
8
1
// Get a list of 50 posts
2
router.get("/", async (req, res) => {
3
let collection = await db.collection("posts");
4
let results = await collection.find({})
5
.limit(50)
6
.toArray();
7
res.send(results).status(200);
8
});
Here, we start by defining our collection object, then do a .find operation. We limit the results and convert the response data to an array. We can then send data to the client using res.send. We can also specify the status code with the status method. Code 200 stands for "OK, " meaning that the operation was successful.
Read route (advanced)
You can also create a more complex route using aggregation pipelines to return a result. For example, we can add a route that will return the three most recent articles in the collection.
As you can see here, the code is similar. This endpoint will catch all the get requests to /post/latest. We then use an aggregation pipeline to sort the collection in descending order of date and limit the results to three. This leverages the database to do the heavy lifting with our data.
Read single result
You can also use parametrized routes to return filtered results or, in this case, a single object. Notice in the following code snippet that the route takes an :id parameter. You can then access the value of that parameter with req.params.id.
xxxxxxxxxx
8
1
// Get a single post
2
router.get("/:id", async (req, res) => {
3
let collection = await db.collection("posts");
4
let query = {_id: ObjectId(req.params.id)};
5
let result = await collection.findOne(query);
6
if (!result) res.send("Not found").status(404);
7
else res.send(result).status(200);
8
});
In this get request, the id is converted into an ObjectId using the method provided by the MongoDB native driver. It is a query filter to retrieve a single document with this unique id.
If no results are found, we can send a different response — a 404 error message, in this case.
Create route
The Create route will add a new post to our collection. To catch a post request, you will use the router.post method from Express to define this route. Based on the REST conventions, adding new items should be done with a POST method.
xxxxxxxxxx
8
1
// Add a new document to the collection
2
router.post("/", async (req, res) => {
3
let collection = await db.collection("posts");
4
let newDocument = req.body;
5
newDocument.date = new Date();
6
let result = await collection.insertOne(newDocument);
7
res.send(result).status(204);
8
});
In this sample, we take the request body, append the current date and time, and save it in the collection direction with the collection.insertOne() method.
You can also use InsertMany to insert multiple documents at once.
Update route
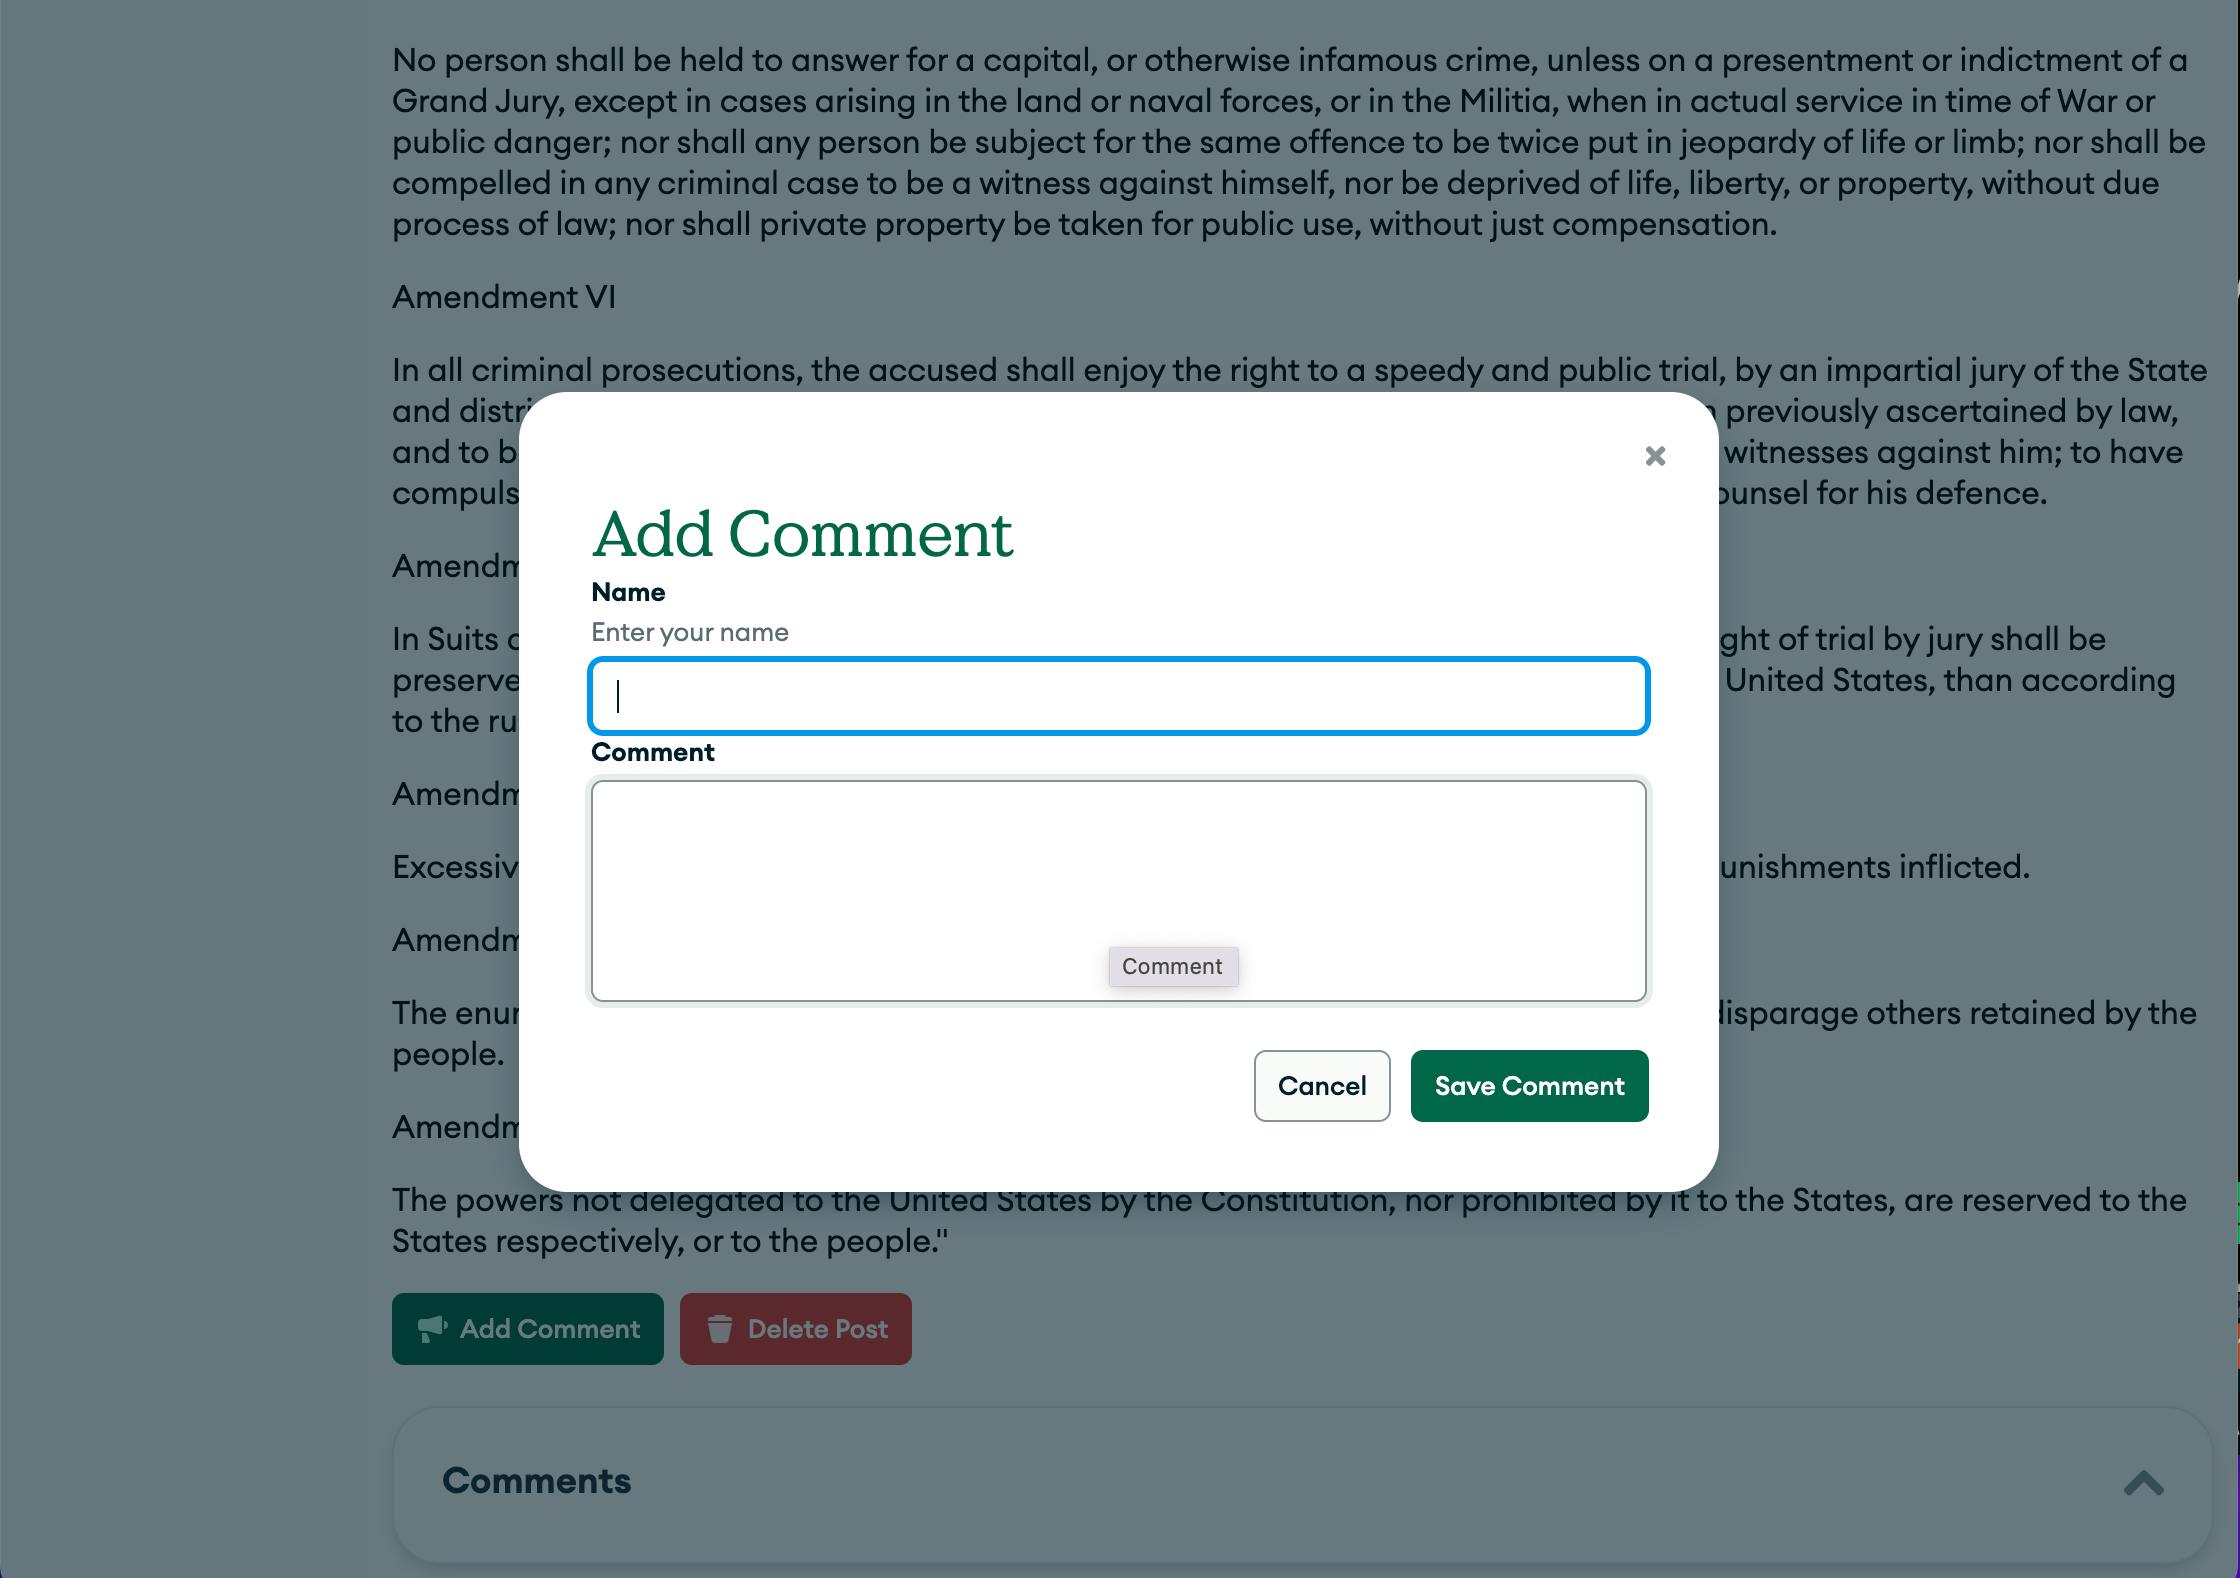
The Update route adds a new comment to our blog post. Best practices in REST API design state that we should use a PATCH request for updates. Sometimes, a PUT request might also be used.
You might wonder why this is considered an update and not a create. This is because we are leveraging the MongoDB document model. Since we are not restricted to a flat structure like a relational database, we store all the comments as an array inside the post object.
To add a comment, we will update this array with a push operator with the request body as the new comment.
let result = await collection.updateOne(query, updates);
9
res.send(result).status(200);
10
});
The route uses the collection.updateOne() method with the unique id specified as an ObjectId, and the operator as the second argument.
Delete route
And last but not least, we need to handle the delete request. The users will have the ability to delete an article from our blog.
xxxxxxxxxx
7
1
// Delete an entry
2
router.delete("/:id", async (req, res) => {
3
const query = { _id: ObjectId(req.params.id) };
4
const collection = db.collection("posts");
5
let result = await collection.deleteOne(query);
6
res.send(result).status(200);
7
});
Here, we are using a parametrized route to get the id of the object to delete. The post is then deleted with the collection.deleteOne() method.
Your server is now ready to be used. You can already test it with tools such as Postman or curl. For example, you could run the following command to get the latest articles.
xxxxxxxxxx
1
1
curl localhost:5050/posts/latest
Now, any third-party applications can connect to this server, but let's see how we can get our React application to connect.
Setting up the front end
Plenty of tutorials provide a lot more detail on how to query a public API and manage responses from a client request. Understanding the basics of React applications is out of the scope of this article, but you can see examples of how to access the API you just created in the /app/src folder.
In the /app/src/pages/Home.js file, we retrieve the latest three entries from the blog. This is done through a request to the /posts/latest route of the server. In this application, we are using the browser's native fetch object.
xxxxxxxxxx
4
1
const loadPosts = async () => {
2
let results = await fetch(`${baseUrl}/posts/latest`).then(resp => resp.json());
3
setPosts(results);
4
}
This loadPosts function uses fetch and passes the URL to the API. We could use the response in several data formats, but we are explicitly converting it to JSON, as it's the easiest way to manipulate data in JavaScript. The setPosts function updates the application's state and forces the user interface to re-render.
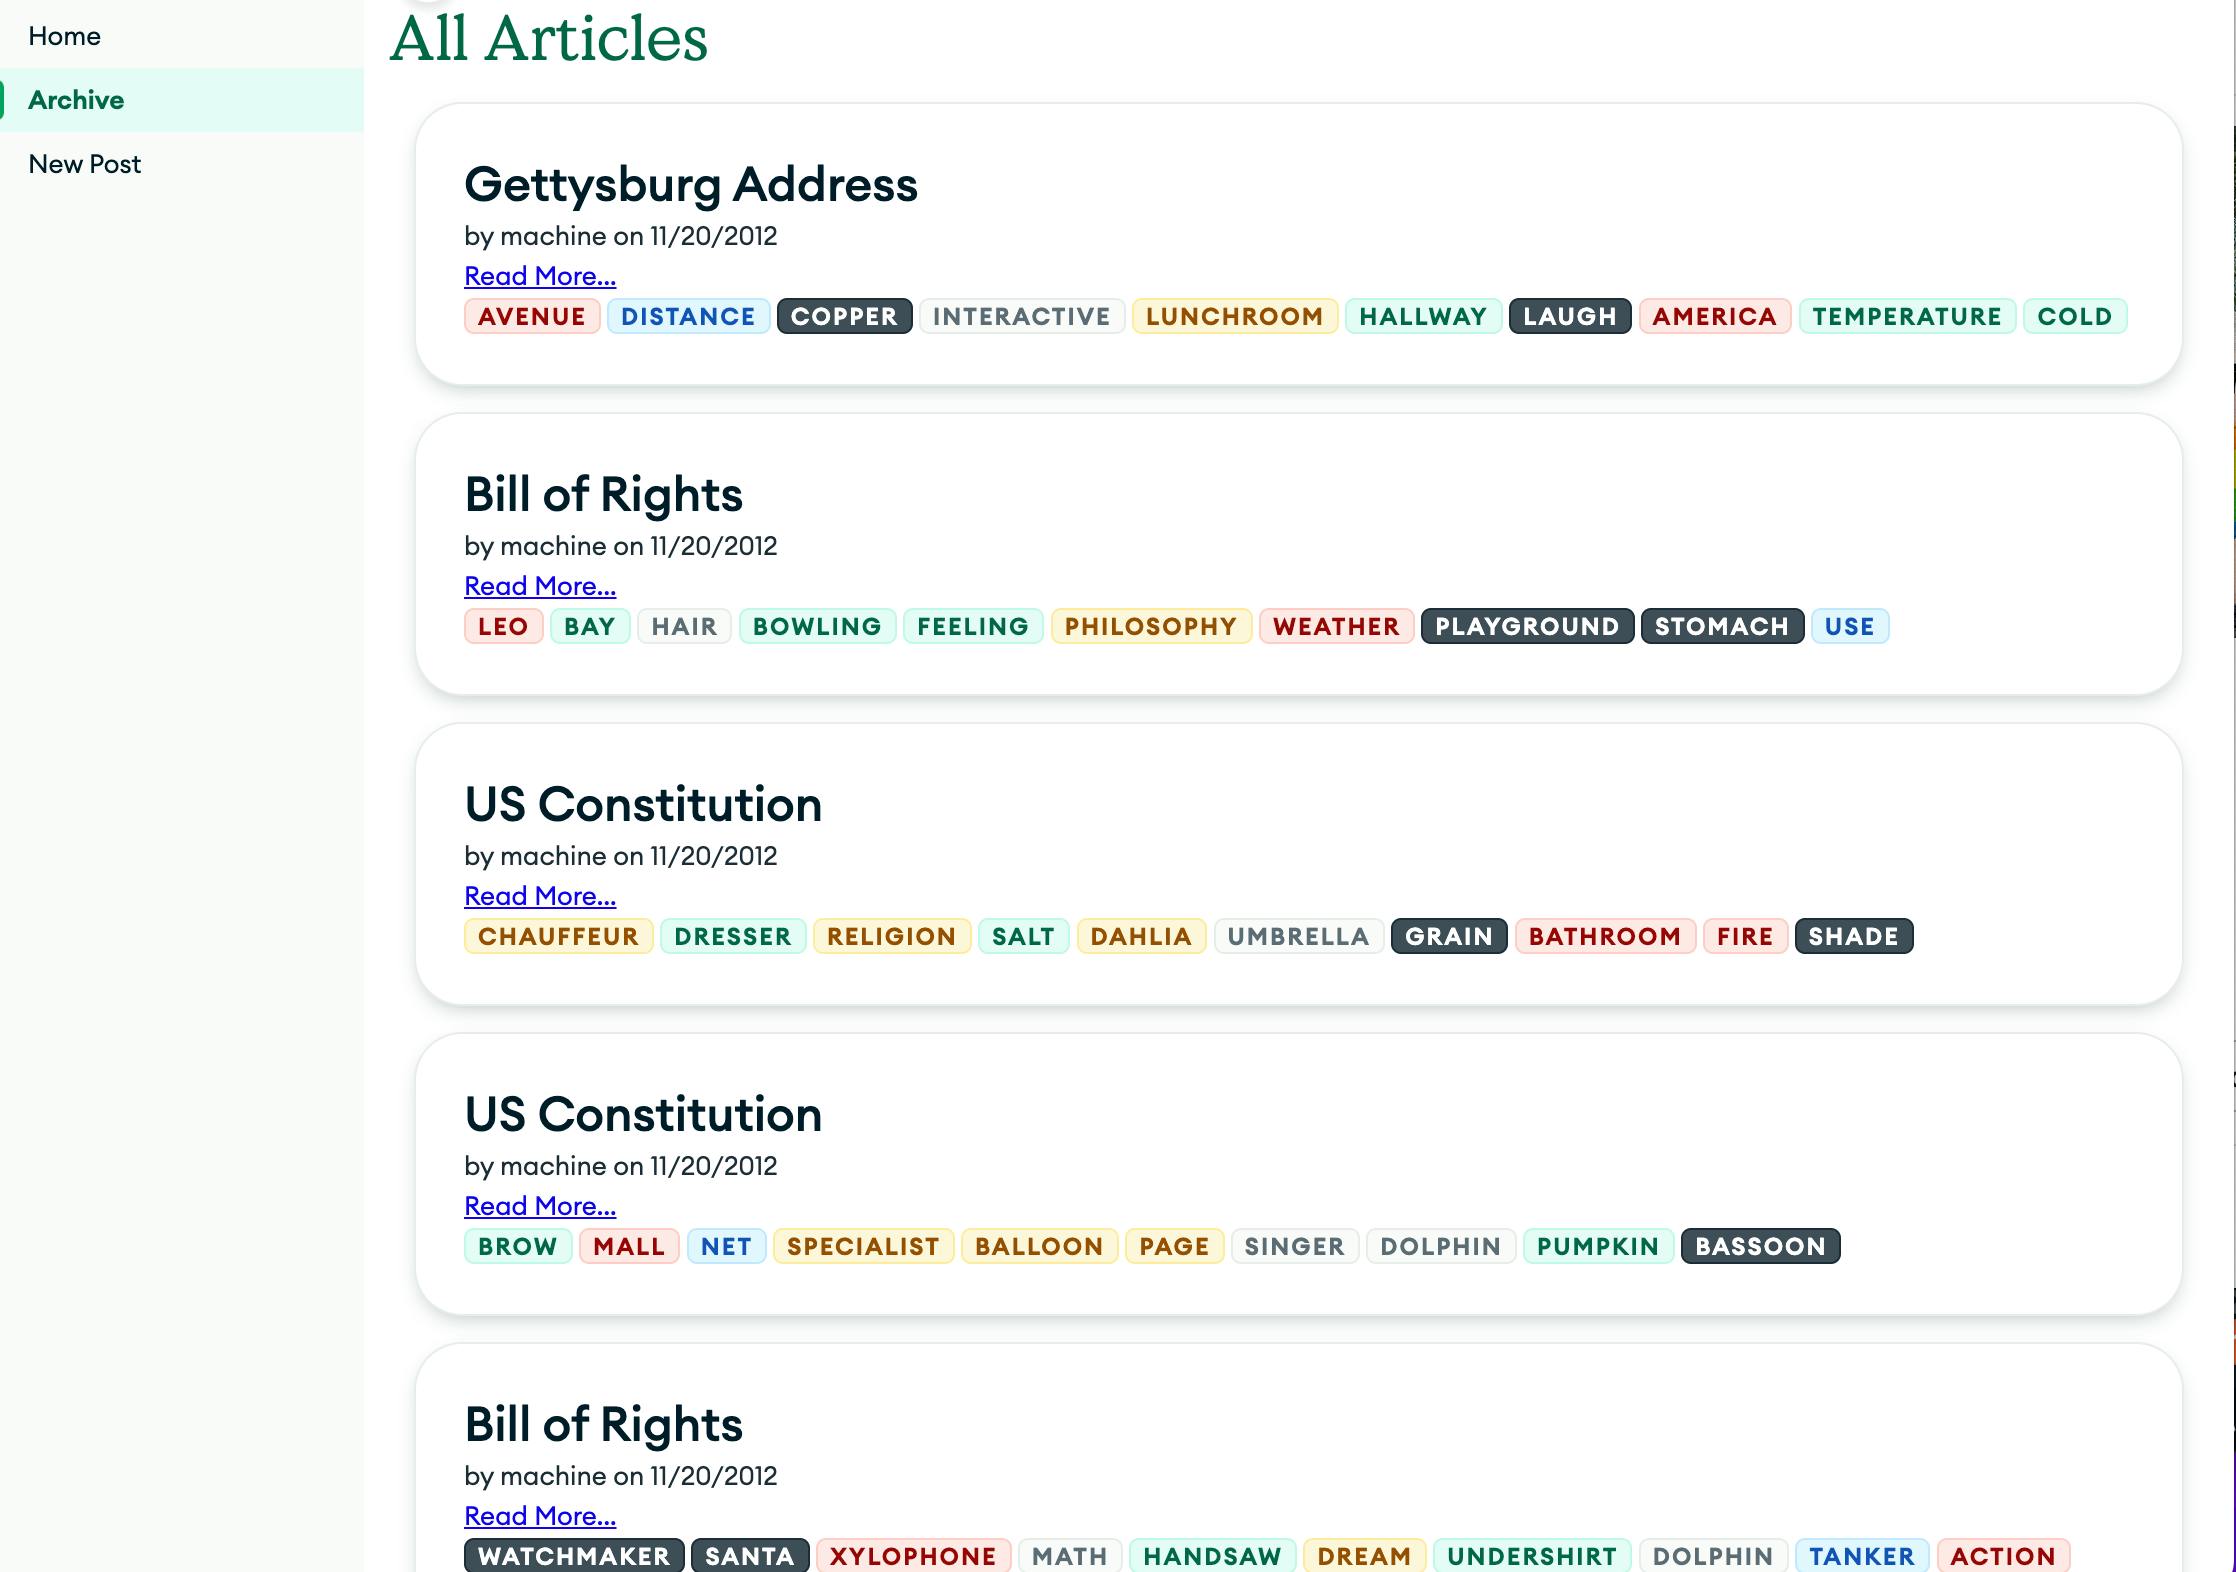
All requests to read from the API follow the same pattern. We use the following to fetch all the articles in the app/src/pages/Archive.js page.
xxxxxxxxxx
1
1
let results = await fetch(`${baseUrl}/posts/`).then(resp => resp.json());
The only difference here is the route. The same goes for fetching a single document in app/src/pages/Post.js.
xxxxxxxxxx
1
1
let results = await fetch(`${baseUrl}/posts/${params.id}`).then(resp => resp.json());
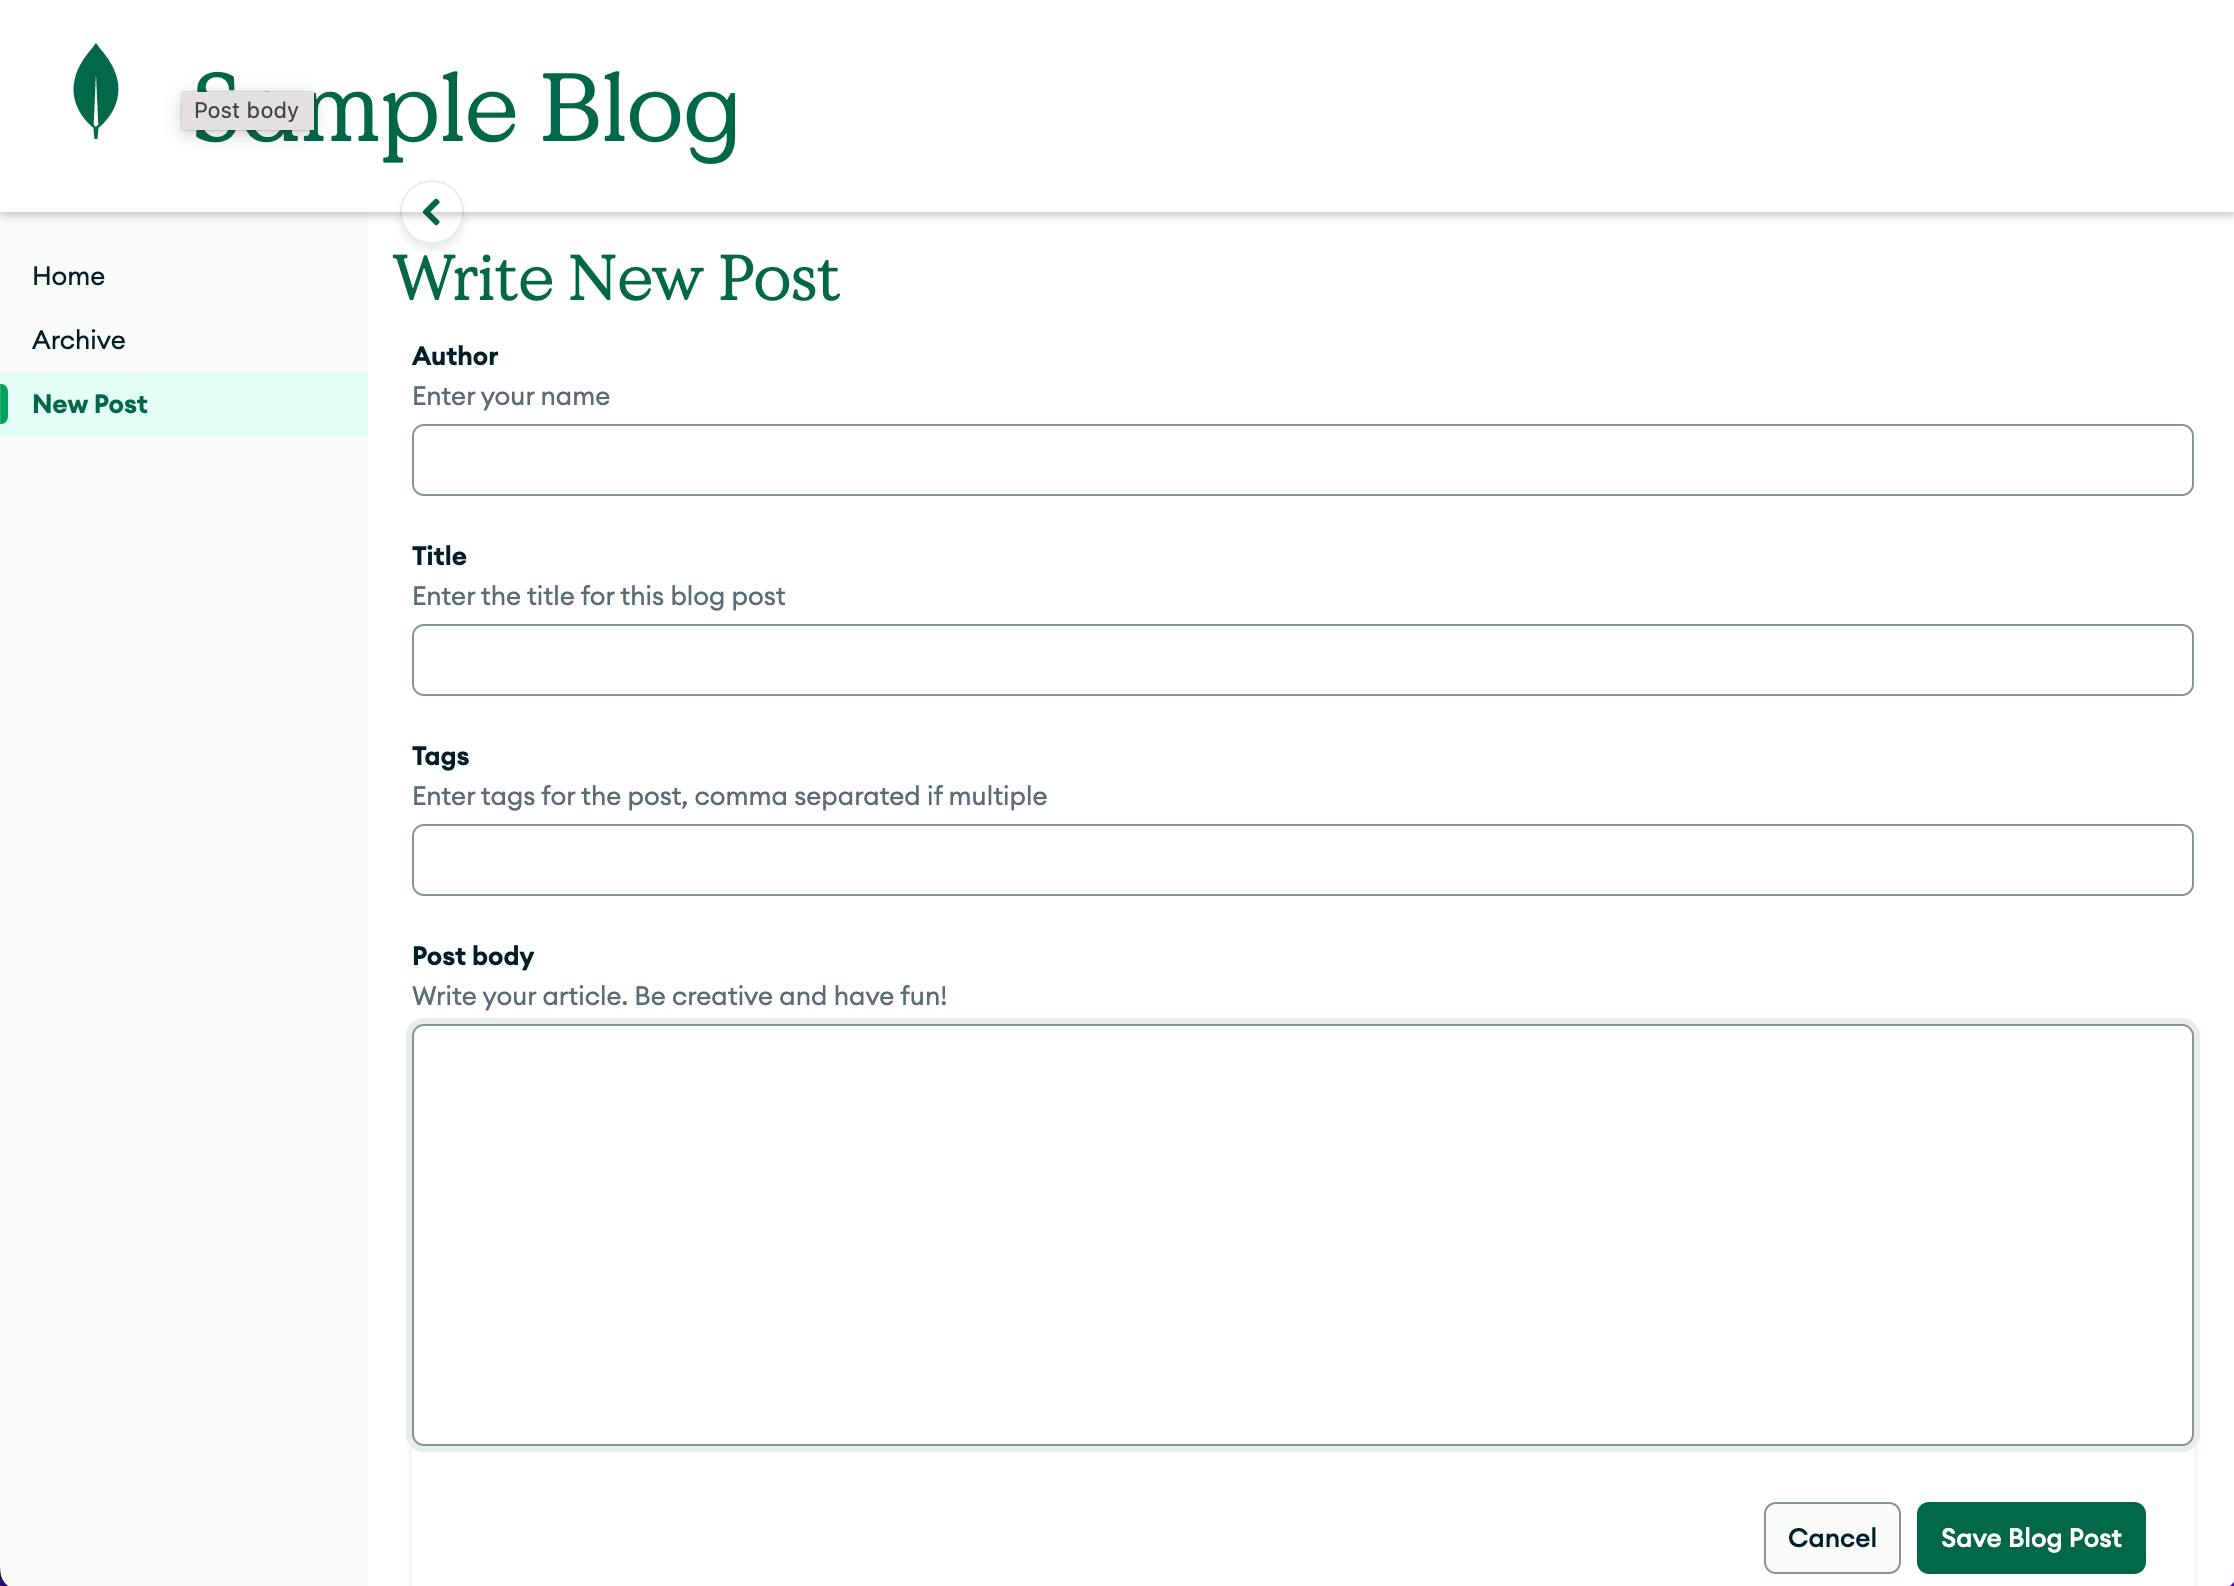
We still use the fetch object to create a new entry, but you will need to specify the HTTP method, an additional http header, and the request body. The code to create, update, or delete entries can be found in /app/src/pages/Create.js.
xxxxxxxxxx
9
1
await fetch(`${baseUrl}/posts`, {
2
method: "POST",
3
headers: {
4
"content-type": "application/json"
5
},
6
body: JSON.stringify({
7
author, title, tags: tags.split(","), body
8
})
9
}).then(resp => resp.json());
Doing an update follows the same patterns but with a different method.
If you want to test the application, open a new terminal and run the following.
xxxxxxxxxx
3
1
cd ../app
2
npm install
3
npm start
Testing the application
Once all components are up and running, we can open the http://localhost:3000 URL, and you should see the sample blog. From there, you can create new blog posts, read an existing entry, add a comment, or delete that entry.
You now have a fully functional application that uses the REST principles. It has a back end that answers the necessary requests, and the client can request data from those endpoints.
Summary
Using Express as a back-end framework is a popular MongoDB stack design. Express is lightweight and approachable for JSON and REST API operations. MongoDB Atlas is a scalable and flexible document database as a service and makes a perfect companion to Express in many stacks like MERN, MEAN, and MEVN.
FAQ
How do I use MongoDB with Express JS?
The MongoDB Driver is the native driver for Node JS applications. Therefore, the Express JS server can use it to access MongoDB.
How do I create a REST API using node Express and Mongo?
In this article, we covered the essential parts of setting up an Express server with connection to MongoDB Atlas as well as exposing REST API endpoints to the client applications.