Crie uma API RESTful com .NET Core e MongoDB


Avaliar este tutorial


If you've been keeping up with my development content, you'll remember that I recently wrote Crie seu primeiro aplicativo .NET Core com o MongoDB Atlas, which focused on building a console application that integrated with MongoDB. While there is a fit for MongoDB in console applications, many developers are going to find it more valuable in web applications.
Neste tutorial, vamos expandir o anterior e criar uma API RESTful com endpoints que executam operações básicas de criação, leitura, atualização e exclusão (CRUD) no MongoDB Atlas.
Para que este tutorial cumpra sua finalidade, você precisa resolver alguns detalhes primeiro:
- Um cluster do MongoDB Atlas implantado e configurado, M0 ou superior
- .NET Core 6+
We won't go through the steps of deploying a MongoDB Atlas cluster or configuring it with user and network rules. If this is something you need help with, check out a previous tutorial that was published on the topic.
Usaremos o .NET Core 6.0 neste tutorial, mas outras versões ainda podem funcionar. Apenas leve a versão em consideração antes de continuar.
Para começar, vamos criar um novo projeto do .NET Core usando o modelo de aplicativo web que a Microsoft oferece. Para fazer isso, execute os seguintes comandos da CLI:
1 dotnet new webapi -o MongoExample 2 cd MongoExample 3 dotnet add package MongoDB.Driver
Os comandos acima criam um novo projeto de aplicativo da web para o .NET Core e instalam o driver do MongoDB mais recente. Ficaremos com alguns arquivos boilerplate como parte do modelo, mas podemos removê-los.
Inside the project, delete any file related to
WeatherForecast and similar.Antes de começarmos a projetar cada um dos endpoints da API RESTful com o .NET Core, precisamos criar e configurar nosso serviço MongoDB e definir o modelo de dados para nossa API.
Começaremos trabalhando em nosso serviço MongoDB, que será responsável por estabelecer nossa conexão e trabalhar diretamente com documentos dentro do MongoDB. Dentro do projeto, crie "Models/MongoDBSettings.cs" e adicione o seguinte código C#:
1 namespace MongoExample.Models; 2 3 public class MongoDBSettings { 4 5 public string ConnectionURI { get; set; } = null!; 6 public string DatabaseName { get; set; } = null!; 7 public string CollectionName { get; set; } = null!; 8 9 }
The above
MongoDBSettings class will hold information about our connection, the database name, and the collection name. The data we plan to store in these class fields will be found in the project's "appsettings.json" file. Open it and add the following:1 { 2 "Logging": { 3 "LogLevel": { 4 "Default": "Information", 5 "Microsoft.AspNetCore": "Warning" 6 } 7 }, 8 "AllowedHosts": "*", 9 "MongoDB": { 10 "ConnectionURI": "ATLAS_URI_HERE", 11 "DatabaseName": "sample_mflix", 12 "CollectionName": "playlist" 13 } 14 }
Specifically take note of the
MongoDB field. Just like with the previous example project, we'll be using the "sample_mflix" database and the "playlist" collection. You'll need to grab the ConnectionURI string from your MongoDB Atlas Dashboard.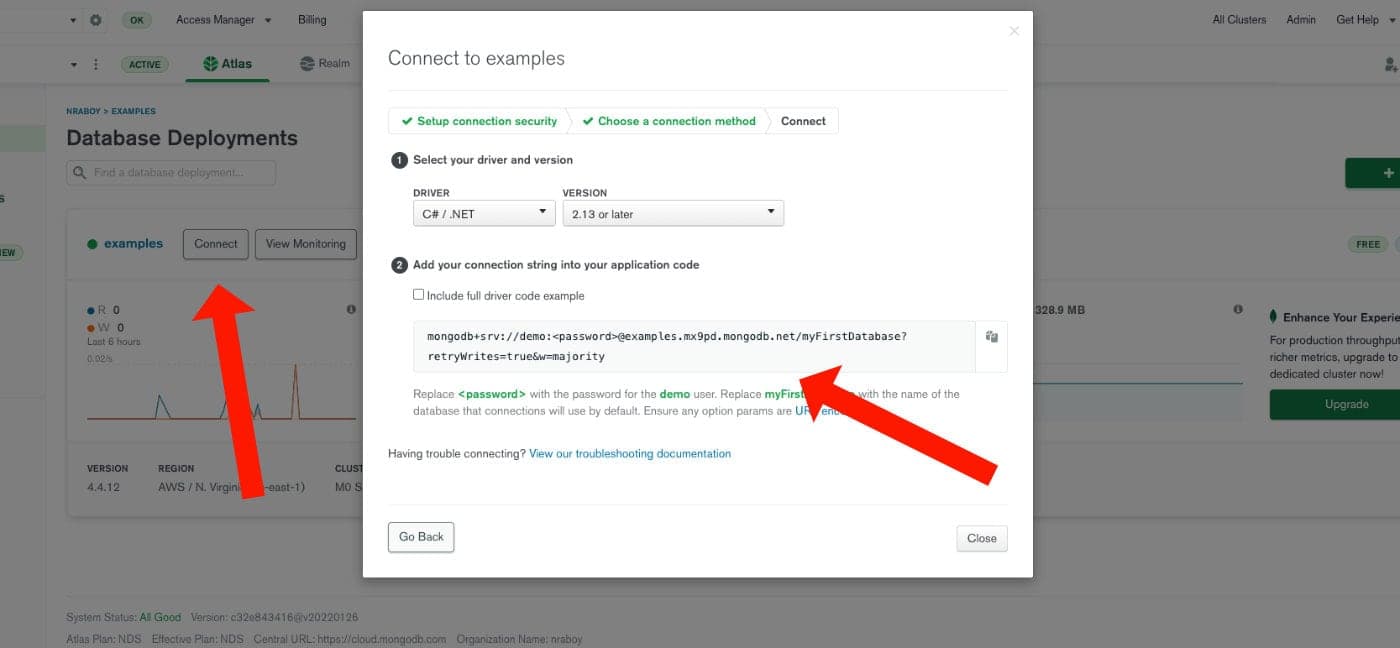
Com as configurações definidas, podemos passar para a criação do serviço.
Crie "Services/MongoDBService.cs" dentro do seu projeto e adicione o seguinte:
1 using MongoExample.Models; 2 using Microsoft.Extensions.Options; 3 using MongoDB.Driver; 4 using MongoDB.Bson; 5 6 namespace MongoExample.Services; 7 8 public class MongoDBService { 9 10 private readonly IMongoCollection<Playlist> _playlistCollection; 11 12 public MongoDBService(IOptions<MongoDBSettings> mongoDBSettings) { 13 MongoClient client = new MongoClient(mongoDBSettings.Value.ConnectionURI); 14 IMongoDatabase database = client.GetDatabase(mongoDBSettings.Value.DatabaseName); 15 _playlistCollection = database.GetCollection<Playlist>(mongoDBSettings.Value.CollectionName); 16 } 17 18 public async Task<List<Playlist>> GetAsync() { } 19 public async Task CreateAsync(Playlist playlist) { } 20 public async Task AddToPlaylistAsync(string id, string movieId) {} 21 public async Task DeleteAsync(string id) { } 22 23 }
In the above code, each of the asynchronous functions were left blank on purpose. We'll be populating those functions as we create our endpoints. Instead, make note of the constructor method and how we're taking the passed settings that we saw in our "appsettings.json" file and setting them to variables. In the end, the only variable we'll ever interact with for this example is the
_playlistCollection variable.Com o serviço disponível, precisamos conectá-lo ao aplicativo. Abra o "Program.cs" do arquivo do projeto e adicione o seguinte no topo:
1 using MongoExample.Models; 2 using MongoExample.Services; 3 4 var builder = WebApplication.CreateBuilder(args); 5 6 builder.Services.Configure<MongoDBSettings>(builder.Configuration.GetSection("MongoDB")); 7 builder.Services.AddSingleton<MongoDBService>();
You'll likely already have the
builder variable in your code because it was part of the boilerplate project, so don't add it twice. What you'll need to add near the top is an import to your custom models and services as well as configuring the service.Remember the
MongoDB field in the "appsettings.json" file? That is the section that the GetSection function is pulling from. That information is passed into the singleton service that we created.Com o serviço criado e funcionando, com exceção das funções assíncronas incompletas, podemos nos concentrar na criação de um modelo de dados para a nossa coleção.
Crie "Models/playlist.cs" e adicione o seguinte código C#:
1 using MongoDB.Bson; 2 using MongoDB.Bson.Serialization.Attributes; 3 using System.Text.Json.Serialization; 4 5 namespace MongoExample.Models; 6 7 public class Playlist { 8 9 [] 10 [] 11 public string? Id { get; set; } 12 13 public string username { get; set; } = null!; 14 15 [] 16 [] 17 public List<string> movieIds { get; set; } = null!; 18 19 }
Há algumas coisas acontecendo na classe acima que a transformam de uma classe C# padrão em algo que pode se integrar perfeitamente a um documento MongoDB.
Primeiro, você pode observar o seguinte:
1 [] 2 [] 3 public string? Id { get; set; }
We're saying that the
Id field is to be represented as an ObjectId in BSON and the _id field within MongoDB. However, when we work with it locally in our application, it will be a string.A próxima coisa que você notará é o seguinte:
1 [] 2 [] 3 public List<string> movieIds { get; set; } = null!;
Even though we plan to work with
movieIds within our C# application, in MongoDB, the field will be known as items and when sending or receiving JSON, the field will also be known as items instead of movieIds.You don't need to define custom mappings if you plan to have your local class field match the document field directly. Take the
username field in our example. It has no custom mappings, so it will be username in C#, username in JSON, and username in MongoDB.Assim, temos um serviço do MongoDB e um document model para nossa coleção para trabalhar com o .NET Core.
Ao criar pontos de extremidade CRUD para este projeto, precisaremos alternar entre dois locais diferentes dentro do nosso projeto. Precisaremos definir o ponto de extremidade em um controlador e fazer o trabalho em nosso serviço.
Crie "Controllers/PlaylistController.cs" e adicione o seguinte código:
1 using System; 2 using Microsoft.AspNetCore.Mvc; 3 using MongoExample.Services; 4 using MongoExample.Models; 5 6 namespace MongoExample.Controllers; 7 8 [] 9 [] 10 public class PlaylistController: Controller { 11 12 private readonly MongoDBService _mongoDBService; 13 14 public PlaylistController(MongoDBService mongoDBService) { 15 _mongoDBService = mongoDBService; 16 } 17 18 [] 19 public async Task<List<Playlist>> Get() {} 20 21 [] 22 public async Task<IActionResult> Post([FromBody] Playlist playlist) {} 23 24 [] 25 public async Task<IActionResult> AddToPlaylist(string id, [FromBody] string movieId) {} 26 27 [] 28 public async Task<IActionResult> Delete(string id) {} 29 30 }
In the above
PlaylistController class, we have a constructor method that gains access to our singleton service class. Then we have a series of endpoints for this particular controller. We could add far more endpoints than this to our controller, but it's not necessary for this example.Vamos começar criando dados por meio do ponto de extremidade POST. Para fazer isso, é melhor começar no arquivo "Services/MongoDBService.cs" :
1 public async Task CreateAsync(Playlist playlist) { 2 await _playlistCollection.InsertOneAsync(playlist); 3 return; 4 }
We had set the
_playlistCollection in the constructor method of the service, so we can now use the InsertOneAsync method, taking a passed Playlist variable and inserting it. Jumping back into the "Controllers/PlaylistController.cs," we can add the following:1 [] 2 public async Task<IActionResult> Post([FromBody] Playlist playlist) { 3 await _mongoDBService.CreateAsync(playlist); 4 return CreatedAtAction(nameof(Get), new { id = playlist.Id }, playlist); 5 }
What we're saying is that when the endpoint is executed, we take the
Playlist object from the request, something that .NET Core parses for us, and pass it to the CreateAsync function that we saw in the service. After the insert, we return some information about the interaction.É importante observar que, neste projeto de exemplo, não validaremos nenhum dado que flua de solicitações HTTP.
Vamos passar às operações de leitura.
Volte para o arquivo "Services/MongoDBService.cs" e adicione a seguinte função:
1 public async Task<List<Playlist>> GetAsync() { 2 return await _playlistCollection.Find(new BsonDocument()).ToListAsync(); 3 }
The above
Find operation will return all documents that exist in the collection. If you wanted to, you could make use of the FindOne or provide filter criteria to return only the data that you want. We'll explore filters shortly.Com a função de serviço pronta, adicione o seguinte endpoint ao "Controllers/PlaylistController.cs" arquivo:
1 [] 2 public async Task<List<Playlist>> Get() { 3 return await _mongoDBService.GetAsync(); 4 }
Nada mal, né? Faremos o mais ou menos o mesmo com os outros endpoints.
O próximo estágio do CRUD é a atualização dos dados. No arquivo "Services/MongoDBService.cs" , adicione a seguinte função:
1 public async Task AddToPlaylistAsync(string id, string movieId) { 2 FilterDefinition<Playlist> filter = Builders<Playlist>.Filter.Eq("Id", id); 3 UpdateDefinition<Playlist> update = Builders<Playlist>.Update.AddToSet<string>("movieIds", movieId); 4 await _playlistCollection.UpdateOneAsync(filter, update); 5 return; 6 }
Rather than making changes to the entire document, we're planning on adding an item to our playlist and nothing more. To do this, we set up a match filter to determine which document or documents should receive the update. In this case, we're matching on the id which is going to be unique. Next, we're defining the update criteria, which is an
AddToSet operation that will only add an item to the array if it doesn't already exist in the array.The
UpdateOneAsync method will only update one document even if the match filter returned more than one match.In the "Controllers/PlaylistController.cs" file, add the following endpoint to pair with the
AddToPlayListAsync function:1 [] 2 public async Task<IActionResult> AddToPlaylist(string id, [FromBody] string movieId) { 3 await _mongoDBService.AddToPlaylistAsync(id, movieId); 4 return NoContent(); 5 }
In the above PUT endpoint, we are taking the
id from the route parameters and the movieId from the request body and using them with the AddToPlaylistAsync function.Isso nos leva à nossa parte final do espectro CRUD. Nós vamos cuidar da exclusão de dados.
No arquivo "Services/MongoDBService.cs" , adicione a seguinte função:
1 public async Task DeleteAsync(string id) { 2 FilterDefinition<Playlist> filter = Builders<Playlist>.Filter.Eq("Id", id); 3 await _playlistCollection.DeleteOneAsync(filter); 4 return; 5 }
A função acima excluirá um único documento com base nos critérios do filtro. Os critérios do filtro, neste caso, são uma correspondência no ID que sempre será exclusivo. Seus filtros podem ser mais extravagantes, se você quiser.
Para finalizar, o endpoint dessa função teria a seguinte aparência no arquivo "Controllers/PlaylistController.cs"
1 [] 2 public async Task<IActionResult> Delete(string id) { 3 await _mongoDBService.DeleteAsync(id); 4 return NoContent(); 5 }
Criamos apenas quatro pontos de extremidade, mas você poderia pegar tudo o que fizemos e criar mais 100 se quisesse. Todos eles usariam uma estratégia semelhante e podem aproveitar tudo o que o MongoDB tem a oferecer.
Agora que você implementou o código, pode usar os quatro pontos de extremidade da API RESTful.
Ao executar o aplicativo, você deverá ver uma UI do Swagger, conforme abaixo:
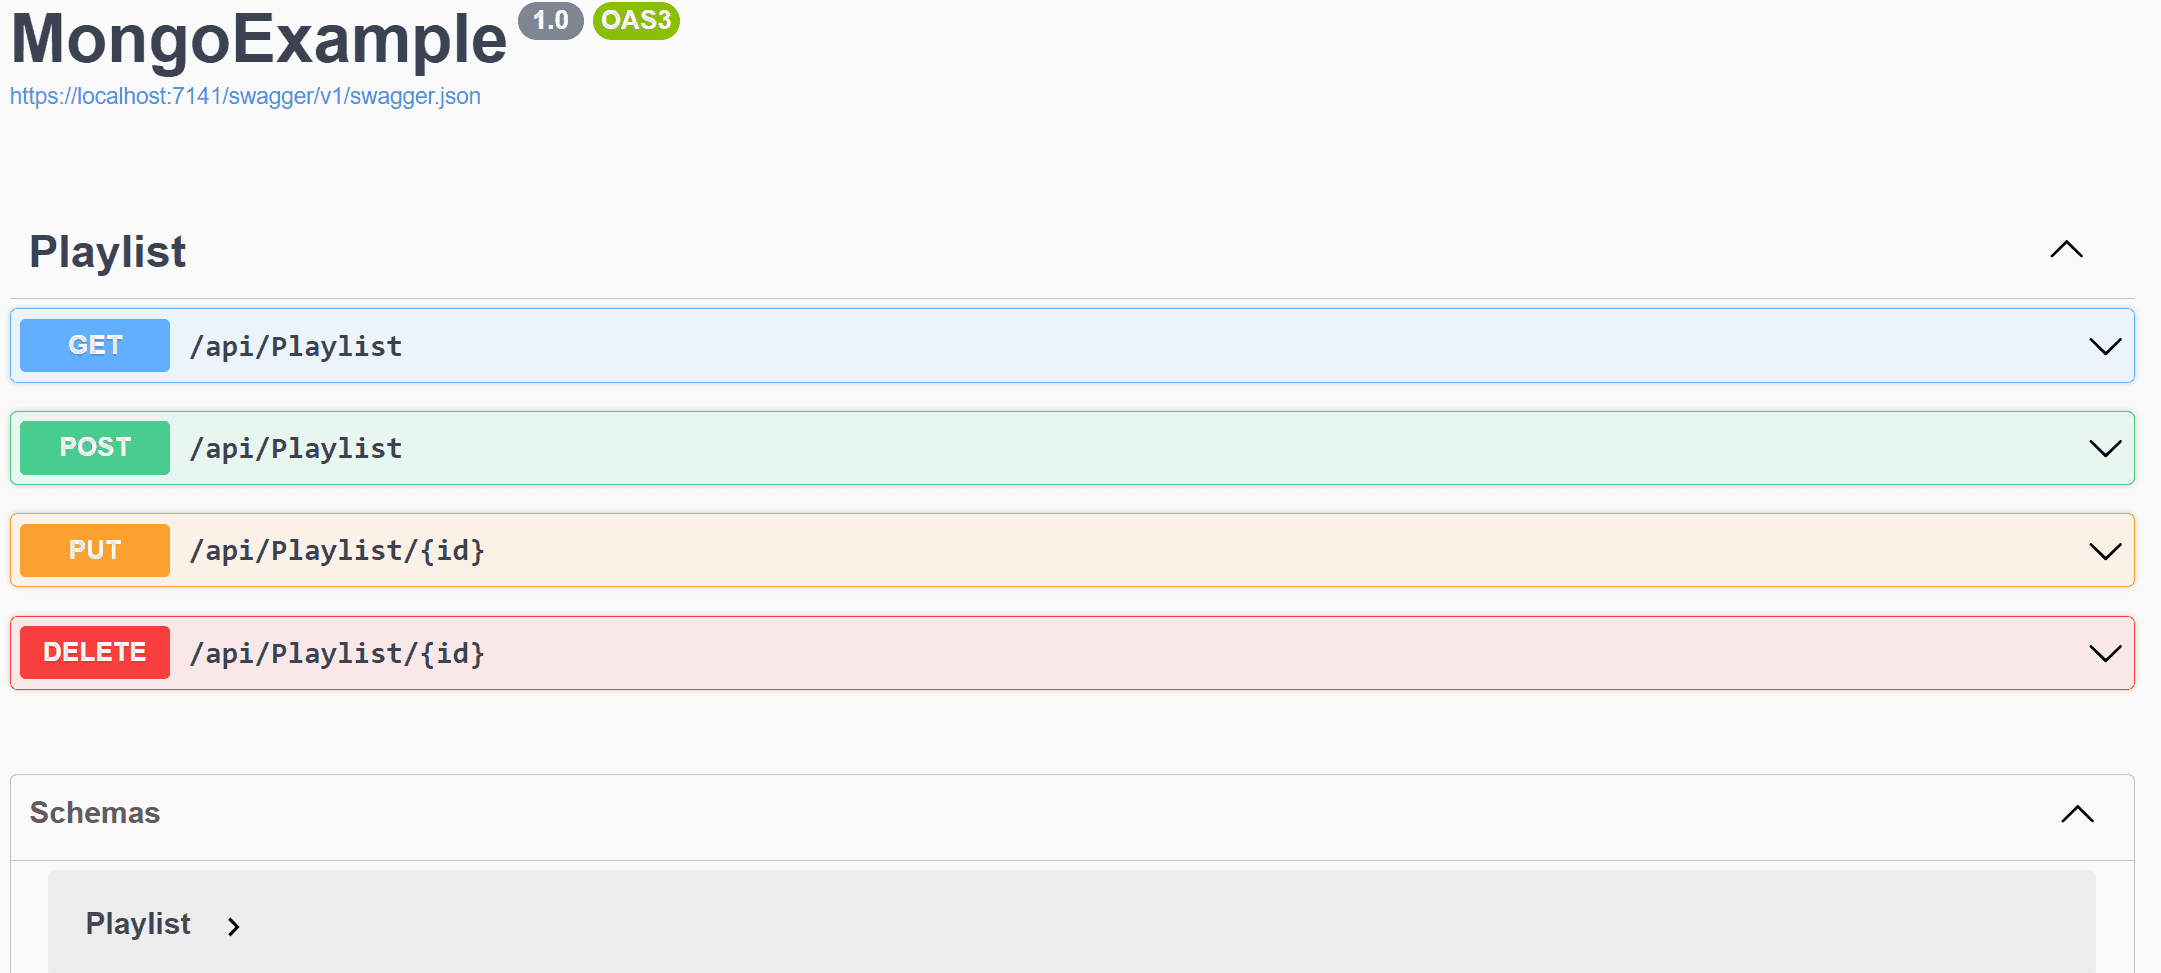
You can test this by clicking the "Try it out" button on each endpoint. It is easier to start with the
/api/Playlist/ POST endpoint, to add some data to the database. The following can be used as dummy data:1 { 2 "username": "nraboy", 3 "items": [ 4 "1234", 5 "5678" 6 ] 7 }
A execução desse procedimento insere esses dados e permite buscá-los no GET e usar o valor de ID gerado para testar os outros pontos de extremidade.
You just saw how to create a simple four endpoint RESTful API using .NET Core and MongoDB. This was an expansion to the previous tutorial, which went over the same usage of MongoDB, but in a console application format rather than web application.
Como mencionei, você pode aplicar essa mesma estratégia em mais pontos de extremidade, cada um fazendo algo crítico para seu aplicativo da web.