Implantando o MongoDB Atlas com o Terraform com o Azure


Classifique este artigo


MongoDB Atlas is a fully managed cloud database. It handles the tricky parts of setting up, managing, and fixing your MongoDB databases on any major cloud platform (like AWS, Azure, or GCP). It's the easiest way to get started, run, and grow your MongoDB databases in the cloud.
Terraform is an open-source infrastructure as code (IaC) tool used to manage and provision infrastructure across various platforms, including cloud providers and on-premise data centers. Terraform automates your infrastructure's creation, modification, and destruction, ensuring consistency and repeatability. Terraform has a MongoDB Atlas provider that interacts with the resources supported by MongoDB Atlas.
In this tutorial, we’ll guide you through setting up MongoDB Atlas on the Azure platform and utilizing Terraform for deployment. The source code used in this article can be found in the Repositório do GitHub.
Antes de começarmos, você precisará configurar as seguintes contas/ferramentas:
Para configurar o ambiente, primeiro geraremos a chave de acesso da API do MongoDB Atlas e, em seguida, configuraremos um método de cobrança.
After establishing an account on MongoDB Atlas and logging in, the next step is to generate an API key to verify the Terraform MongoDB Atlas Provider. To do this, select the access manager for the organization and create the access key. Follow the documentation to learn more about creating an API key.
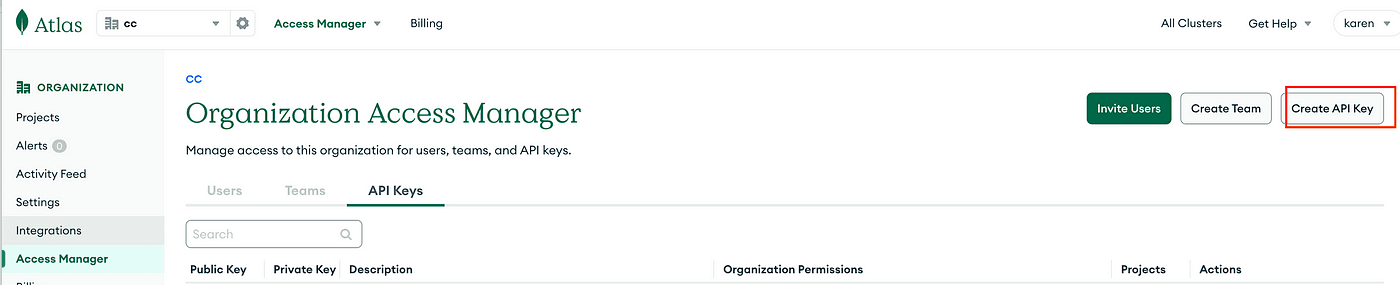
Capture where to create an API key (screenshot from the Atlas UI representing the Organization Access Manager section)
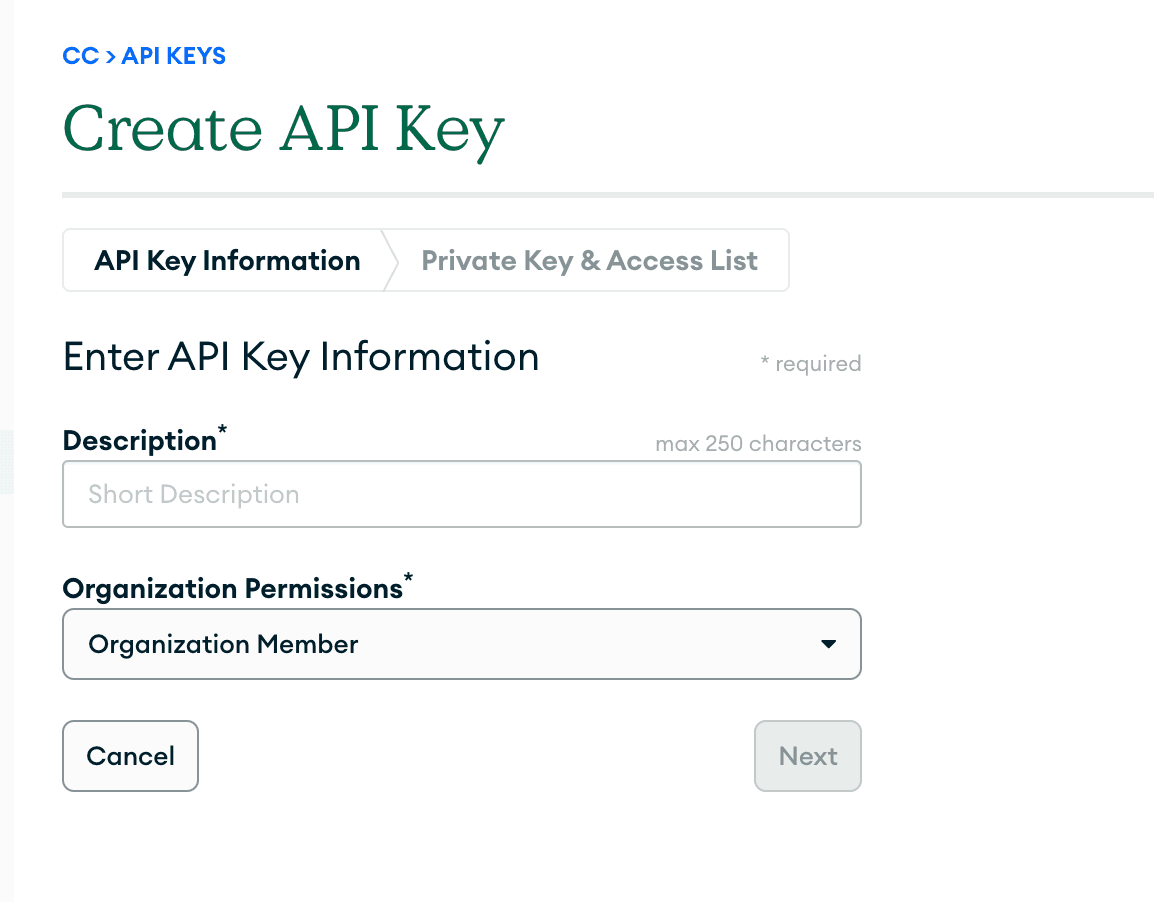
Give your API key a clear name that reflects its purpose, like “Terraform Deployment API Key.” Next, we’ll choose the permissions needed for your Terraform tasks. Both Organization Owner and Organization Project Creator roles allow for enough access to complete this, but the Organization Project Creator role should be chosen following the principle of least privilege. To learn more about the user roles, follow the Organization Roles and Project Roles.
Copie sua chave privada e sua chave pública e, em seguida, configure as variáveis de ambiente:
1 export MONGODB_ATLAS_PUBLIC_KEY="<insert your public key here>" 2 export MONGODB_ATLAS_PRIVATE_KEY="<insert your private key here>"
Capture for adding current IP to Access List Entry (screenshot from the Atlas UI representing adding access list entry section)
Em seguida, adicionaremos uma entrada de lista de acesso de chave de API para garantir que as chamadas de API originadas de IPs ou intervalos CIDR possam dar acesso. Usamos nosso endereço IP atual e salvamos.
MongoDB allows a free M0 cluster tier that you do not have to pay for. However, if you want to deploy any other clusters, we will have to set up a billing method. Follow the documentation about setting up a billing method.
We are now going to create a
variables.tf file for declaring Terraform variables, a terraform.tfvars file for defining variable values and secrets, and a main.tf for the main Terraform configuration. In Terraform, these configuration files (variables.tf, terraform.tfvars, and main.tf) are typically created within the root directory of your Terraform project. You can find the source code in the Repositório do GitHub.Primeiro, definimos os provedores MongoDB Atlas e Azure em
main.tf:1 # Define the MongoDB Atlas and Azure Providers 2 terraform { 3 required_providers { 4 mongodbatlas = { 5 source = "mongodb/mongodbatlas" 6 version = "=1.16.0" 7 } 8 azurerm = { 9 source = "hashicorp/azurerm" 10 version = "=3.0.0" 11 } 12 } 13 } 14 Then, we start defining all the variables our configuration will use in the variables.tf file.
O bloco de código abaixo define as variáveis utilizadas. As variáveis incluem identificadores para o projeto e o ambiente, o tamanho dos recursos de computação alocados, a plataforma de nuvem a ser usada (AWS, GCP, Azure), a região específica dentro dessa plataforma, a versão desejada do MongoDB e o(s) endereço(s) IP permissão para acessar o cluster de banco de dados.
1 # Atlas Organization ID 2 variable "atlas_org_id" { 3 type = string 4 description = "Atlas Organization ID" 5 } 6 # Atlas Project Name 7 variable "atlas_project_name" { 8 type = string 9 description = "Atlas Project Name" 10 } 11 # Atlas Project Environment 12 variable "environment" { 13 type = string 14 description = "The environment to be built" 15 } 16 # Cluster Instance Size Name 17 variable "cluster_instance_size_name" { 18 type = string 19 description = "Cluster instance size name" 20 } 21 # Cloud Provider to Host Atlas Cluster 22 variable "cloud_provider" { 23 type = string 24 description = "AWS or GCP or Azure" 25 } 26 # Atlas Region 27 variable "atlas_region" { 28 type = string 29 description = "Atlas region where resources will be created" 30 } 31 # MongoDB Version 32 variable "mongodb_version" { 33 type = string 34 description = "MongoDB Version" 35 } 36 # IP Address Access 37 variable "ip_address" { 38 type = string 39 description = "IP address used to access Atlas cluster" 40 }
In the
terraform.tfvars file, we specify the use of MongoDB version 7.0, a M10-sized cluster in the US_EAST_2 region on Azure. If you are outside North America, you can refer to the regions supported following the documentation for Microsoft Azure.Observe que o Atlas oferece suporte a regiões e zonas de disponibilidade específicas do Azure, e algumas regiões não oferecem suporte a clusters gratuitos (M0) e clusters compartilhados (M2/M5).
1 atlas_org_id = "<UPDATE WITH YOUR ORG ID>" 2 atlas_project_name = "yourProjectName" 3 environment = "dev" 4 cluster_instance_size_name = "M10" 5 cloud_provider = "Azure" 6 atlas_region = "US_EAST_2" 7 mongodb_version = "7.0" 8 ip_address = "<UPDATE WITH YOUR IP>"
To create a project using Terraform, we will need the MongoDB Atlas Organization ID with at least the Organization Project Creator role. To get this information, we can go to Settings on the left-hand side menu bar in the UI, and we can find Organization Settings with the Organization ID. Please refer to the documentation on Organizations for further reference.
So next, in our
main.tffile, we will use the mongodbatlas_project resource from Terraform MongoDB Atlas Provider to create our project. We add this to main.tf:1 # Create a Project 2 resource "mongodbatlas_project" "atlas-project" { 3 org_id = var.atlas_org_id 4 name = var.atlas_project_name 5 }
We must add a corresponding database user to our MongoDB Atlas project. Refer to the documentation for available user roles in case you want to customize the user’s Role-Based Access Control.
The code block below creates a database user with a random password, and to review the password, you will need to put the
terraform output -json user_password command in your terminal.1 # Create a Database User 2 resource "mongodbatlas_database_user" "db-user" { 3 username = "user-1" 4 password = random_password.db-user-password.result 5 project_id = mongodbatlas_project.atlas-project.id 6 auth_database_name = "admin" 7 roles { 8 role_name = "readWrite" 9 database_name = "${var.atlas_project_name}-db" 10 } 11 } 12 # Create a Database Password 13 resource "random_password" "db-user-password" { 14 length = 16 15 special = true 16 override_special = "_%@" 17 } 18 Next, we need to create the IP access list. 19 20 # Create Database IP Access List 21 resource "mongodbatlas_project_ip_access_list" "ip" { 22 project_id = mongodbatlas_project.atlas-project.id 23 ip_address = var.ip_address 24 } 25 We will need to put the IP address that we are connecting to the MongoDB Atlas cluster into the terraform.tfvars file.
We will now use the
mongodbatlas_cluster resource to create a MongoDB Atlas cluster. The resource lets you create, edit, and delete clusters.1 resource "mongodbatlas_cluster" "test" { 2 project_id = mongodbatlas_project.atlas-project.id 3 name = "${var.atlas_project_name}-${var.environment}-cluster" 4 cluster_type = "REPLICASET" 5 replication_specs { 6 num_shards = 1 7 regions_config { 8 region_name = var.atlas_region 9 electable_nodes = 3 10 priority = 7 11 read_only_nodes = 0 12 } 13 } 14 cloud_backup = true 15 auto_scaling_disk_gb_enabled = true 16 mongo_db_major_version = "7.0" 17 # Provider Settings "block" 18 provider_name = var.cloud_provider 19 provider_disk_type_name = "P6" 20 provider_instance_size_name = var.cluster_instance_size_name 21 }
O bloco de código mostrado acima especifica um cluster chamado “test” com um tipo de implantação de conjunto de réplicas, ideal para aplicativos que exigem alta disponibilidade e redundância de dados.
O cluster é configurado com um único fragmento e está configurado para escalar automaticamente seu armazenamento em disco conforme necessário. A convenção de nomenclatura para o cluster incorpora variáveis que permitem a personalização específica do ambiente, como
${var.atlas_project_name}-${var.environment}-cluster.A configuração também especifica um conjunto de réplicas com três nós eletivos em uma região configurável, garantindo que o nó primário possa ser efetivamente eleito. A versão principal do MongoDB está definida como "7.0," alinhando o cluster com a versão estável mais recente.
You can display information from your Terraform setup directly onto the terminal when running Terraform commands. This feature is particularly handy for obtaining values that are only determined after the resources have been created, such as a randomly generated database user password or the connection string needed for your Atlas cluster. The following code is in your
main.tf file and will ensure that these values are shown on the terminal once Terraform has finished executing.1 output "cluster_name" { 2 value = mongodbatlas_cluster.test.name 3 description = "Name of the MongoDB Atlas cluster" 4 } 5 output "cluster_uri" { 6 value = "mongodb://user-1:${random_password.db-user-password.result}@${mongodbatlas_cluster.test.name}.mongodb.net:27017/?authSource=admin&replicaSet=test-replicaSet" 7 description = "Connection URI for the MongoDB Atlas cluster" 8 sensitive = true 9 } 10 output "project_id" { 11 value = mongodbatlas_cluster.test.project_id 12 description = "ID of the MongoDB Atlas project where the cluster resides" 13 } 14 Initializing Terraform
We are now ready to run
terraform init. This command will initialize Terraform and download Terraform Azure and MongoDB Atlas providers.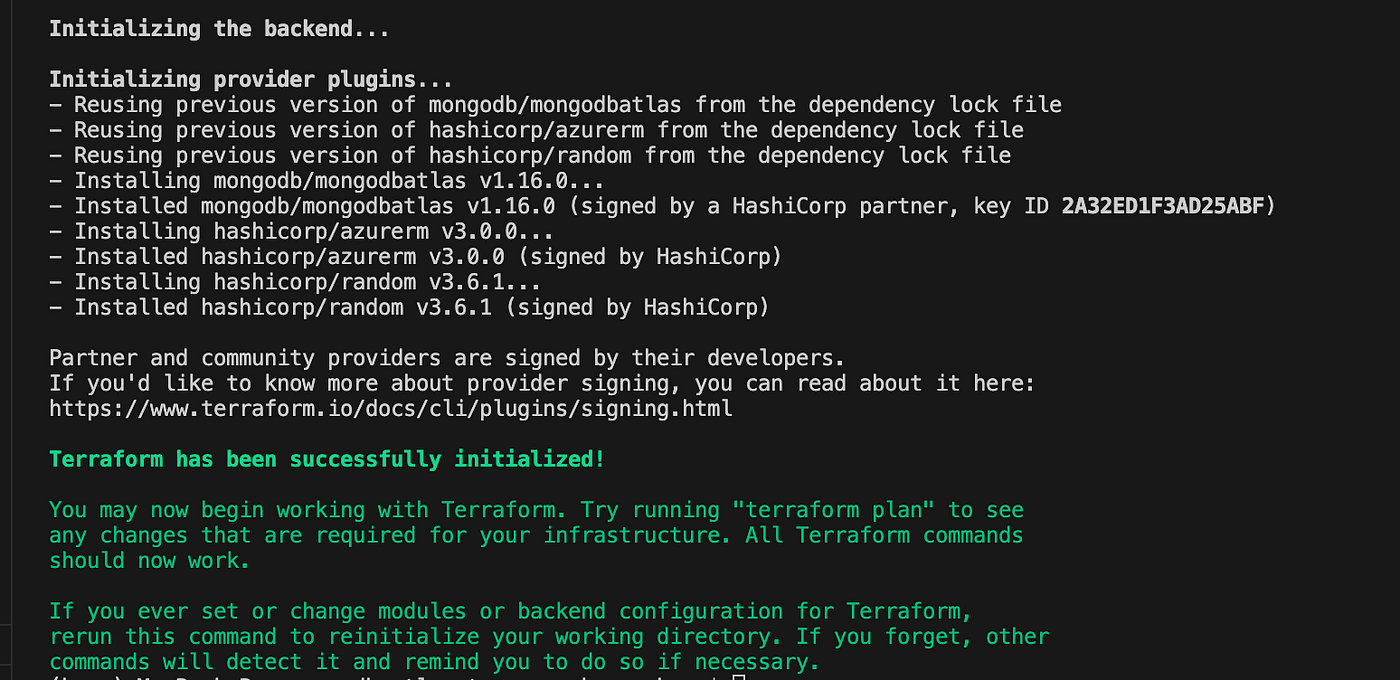
A captura de tela acima mostra que o Terraform foi inicializado com sucesso.
Next, we will be using
terraform plan to review the proposed changes.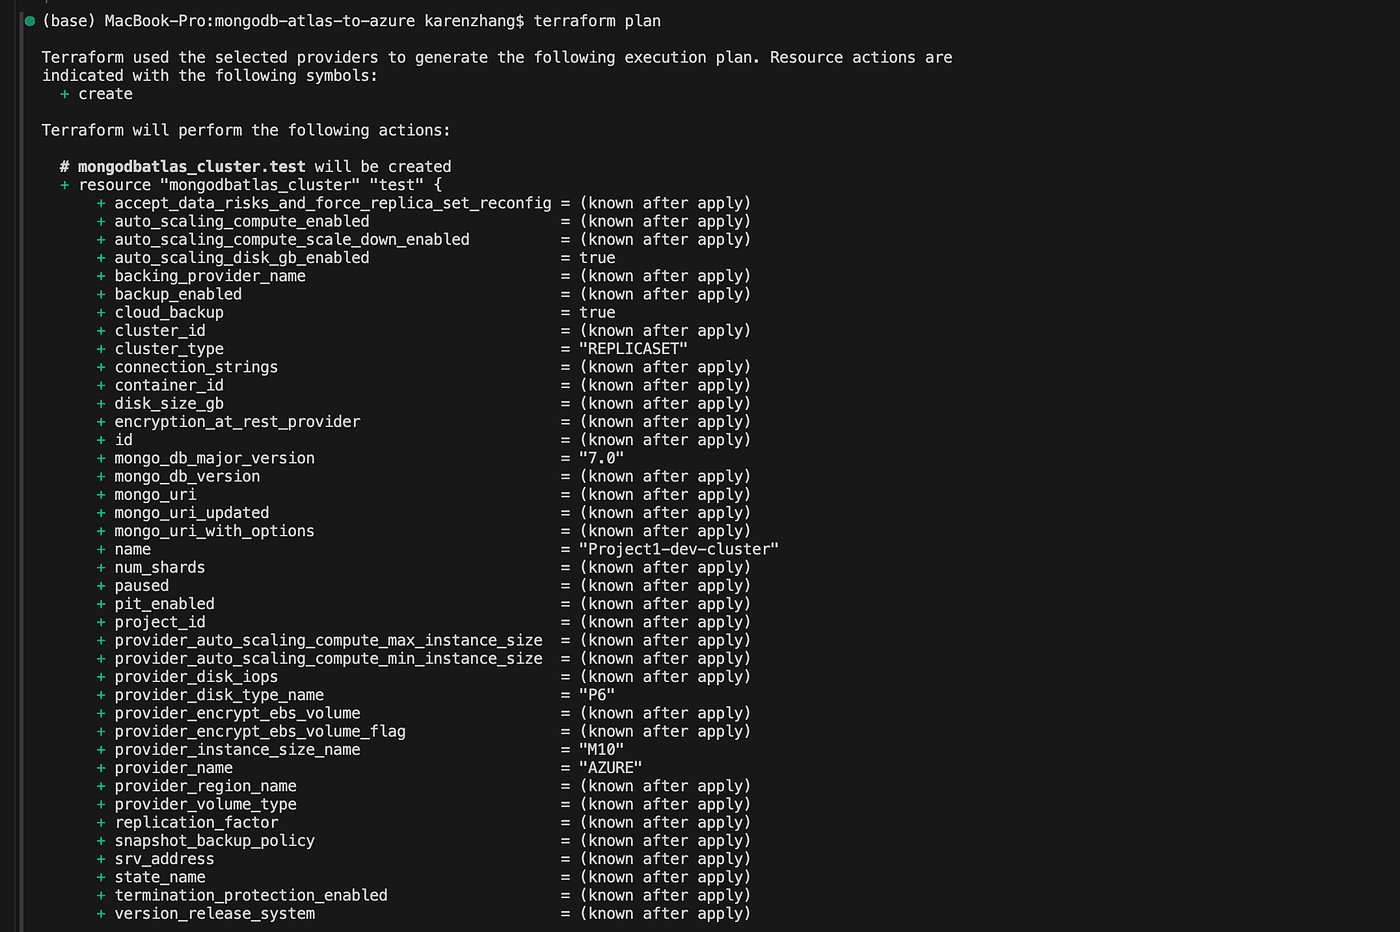
A captura de tela acima mostra que o Terraform executará as seguintes atualizações.
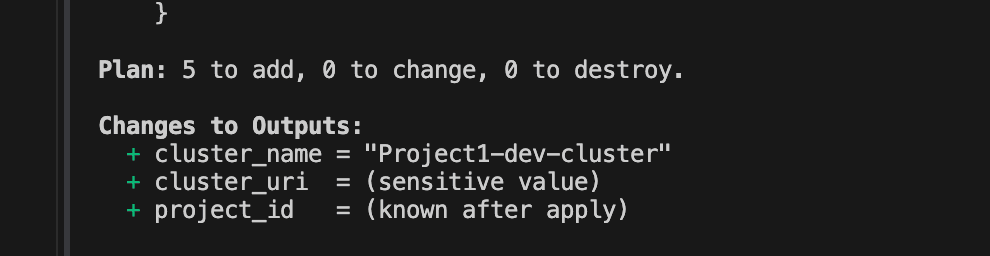
Ele mostra que o Terraform criará os seguintes cinco recursos: incluindo mongodbotlas_cluster.test, mongodmatlas_database_user.db-user, mongodbotlas_project.atlas-project, mongodbotlas_project_ip_access_list.ip e random_password.db-user-password.
Now, we will execute the
terraform apply command to initiate the deployment of the infrastructure. Upon reviewing and confirming that everything appears correct, respond with “yes” to give Terraform the go-ahead to proceed with the build.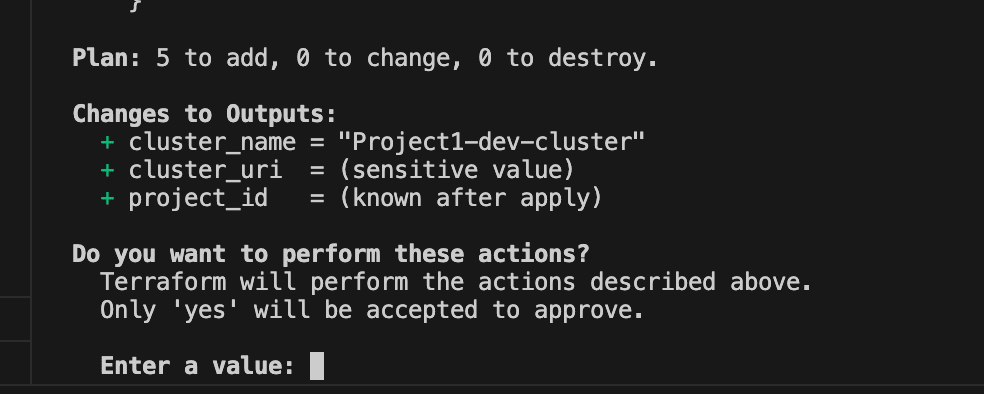
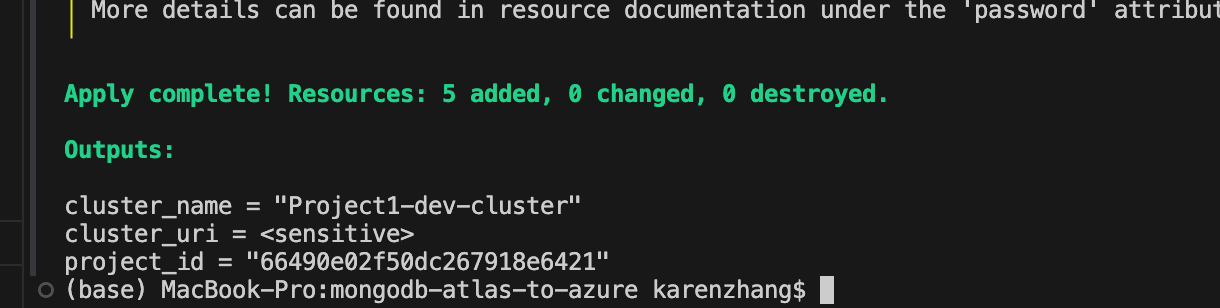
Pode levar cerca de 10 minutos para o cluster ser implementado. Depois que ele for implementado com sucesso, você poderá visualizá-lo na UI do Atlas. Abaixo, podemos ver que um cluster do10 M foi implantado no Azure na região 2 Leste dos EUA.
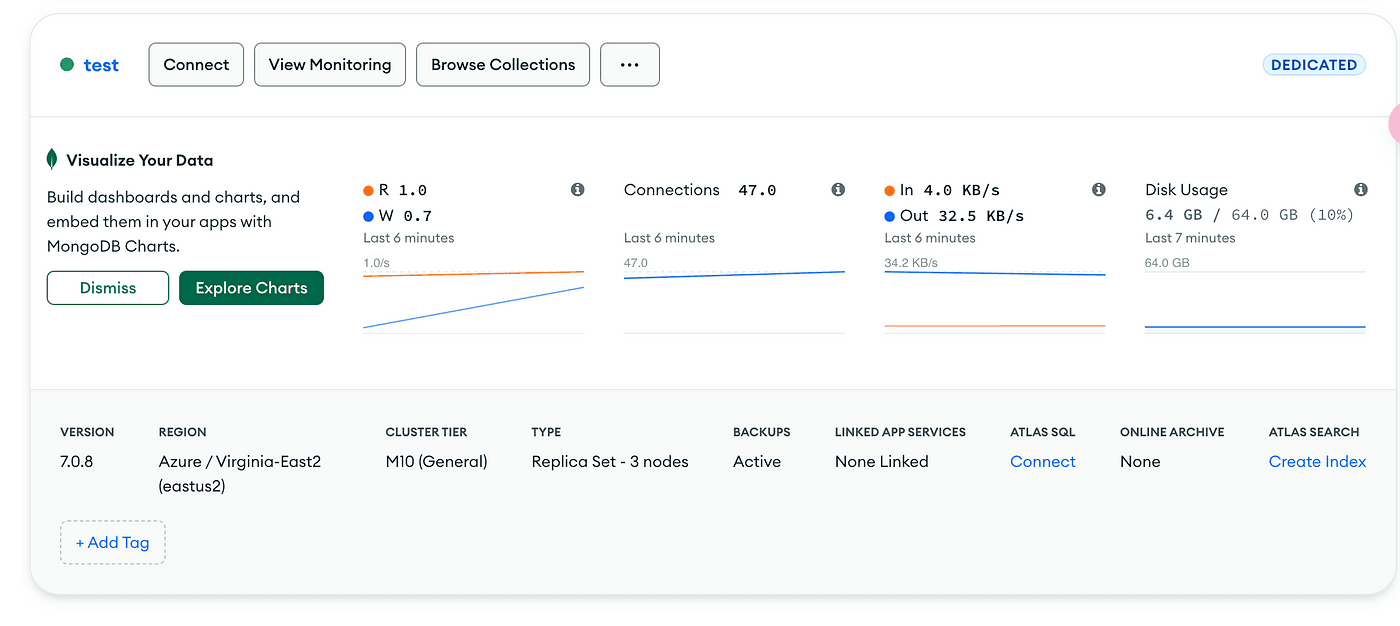
Parabéns! Você agora distribuiu com êxito um cluster M10 no Azure.
When ready to destroy the infrastructure created, we can use
terraform destroy to safely tear down the infrastructure. Type “yes” to destroy all the resources deployed. Be extra careful, though, if you are trying to destroy resources in the production environment.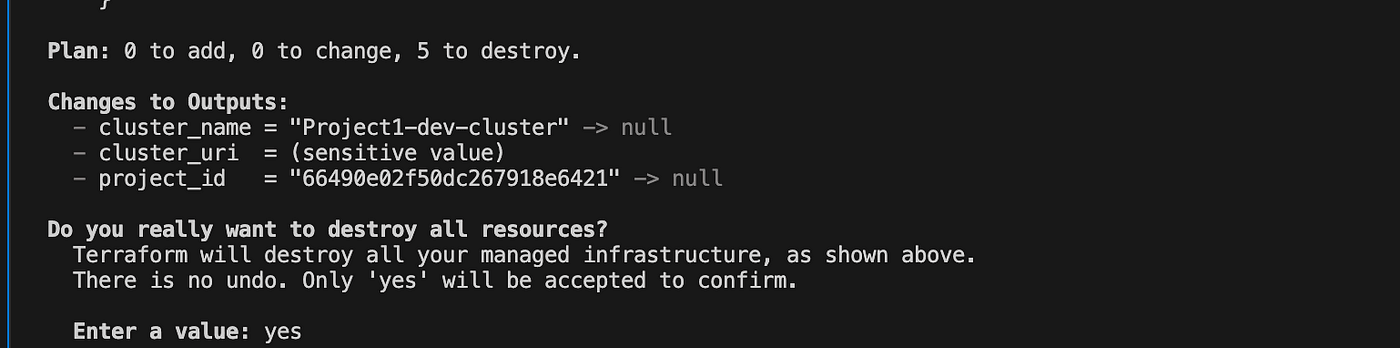
Neste tutorial, aprenderam como implantar um cluster do MongoDB Atlas no Azure. A integração do MongoDB Atlas com Terraform no Azure oferece uma abordagem poderosa e flexível para o gerenciamento de banco de dados na nuvem. Ao aproveitar a infraestrutura do Terraform como recursos de código, simplificamos o processo de implantação do MongoDB Atlas, garantindo que nossa infraestrutura seja reproduzível e facilmente gerenciável.
Classifique este artigo