Overview
Apple ID身份验证提供者允许用户通过 Sign in with Apple (通过 Apple 登录)使用其 Apple ID凭证登录。此身份验证方法使用行业标准 OAuth.2 0授权协议。
当用户通过“Sign in with Apple”成功登录时,Apple 会返回一个凭证对象,其中包含 Apple ID 提供程序用来对用户进行身份验证的 JSON 网络令牌。如果用户已向您的应用程序授予权限,则凭证对象还可能包括用户的姓名和电子邮件地址。
有关如何实现“通过 Apple 登录”的更多信息,请查看:
注意
通过 Apple ID 身份验证的 iOS 应用程序必须兼容 iOS 13 或更新版本。
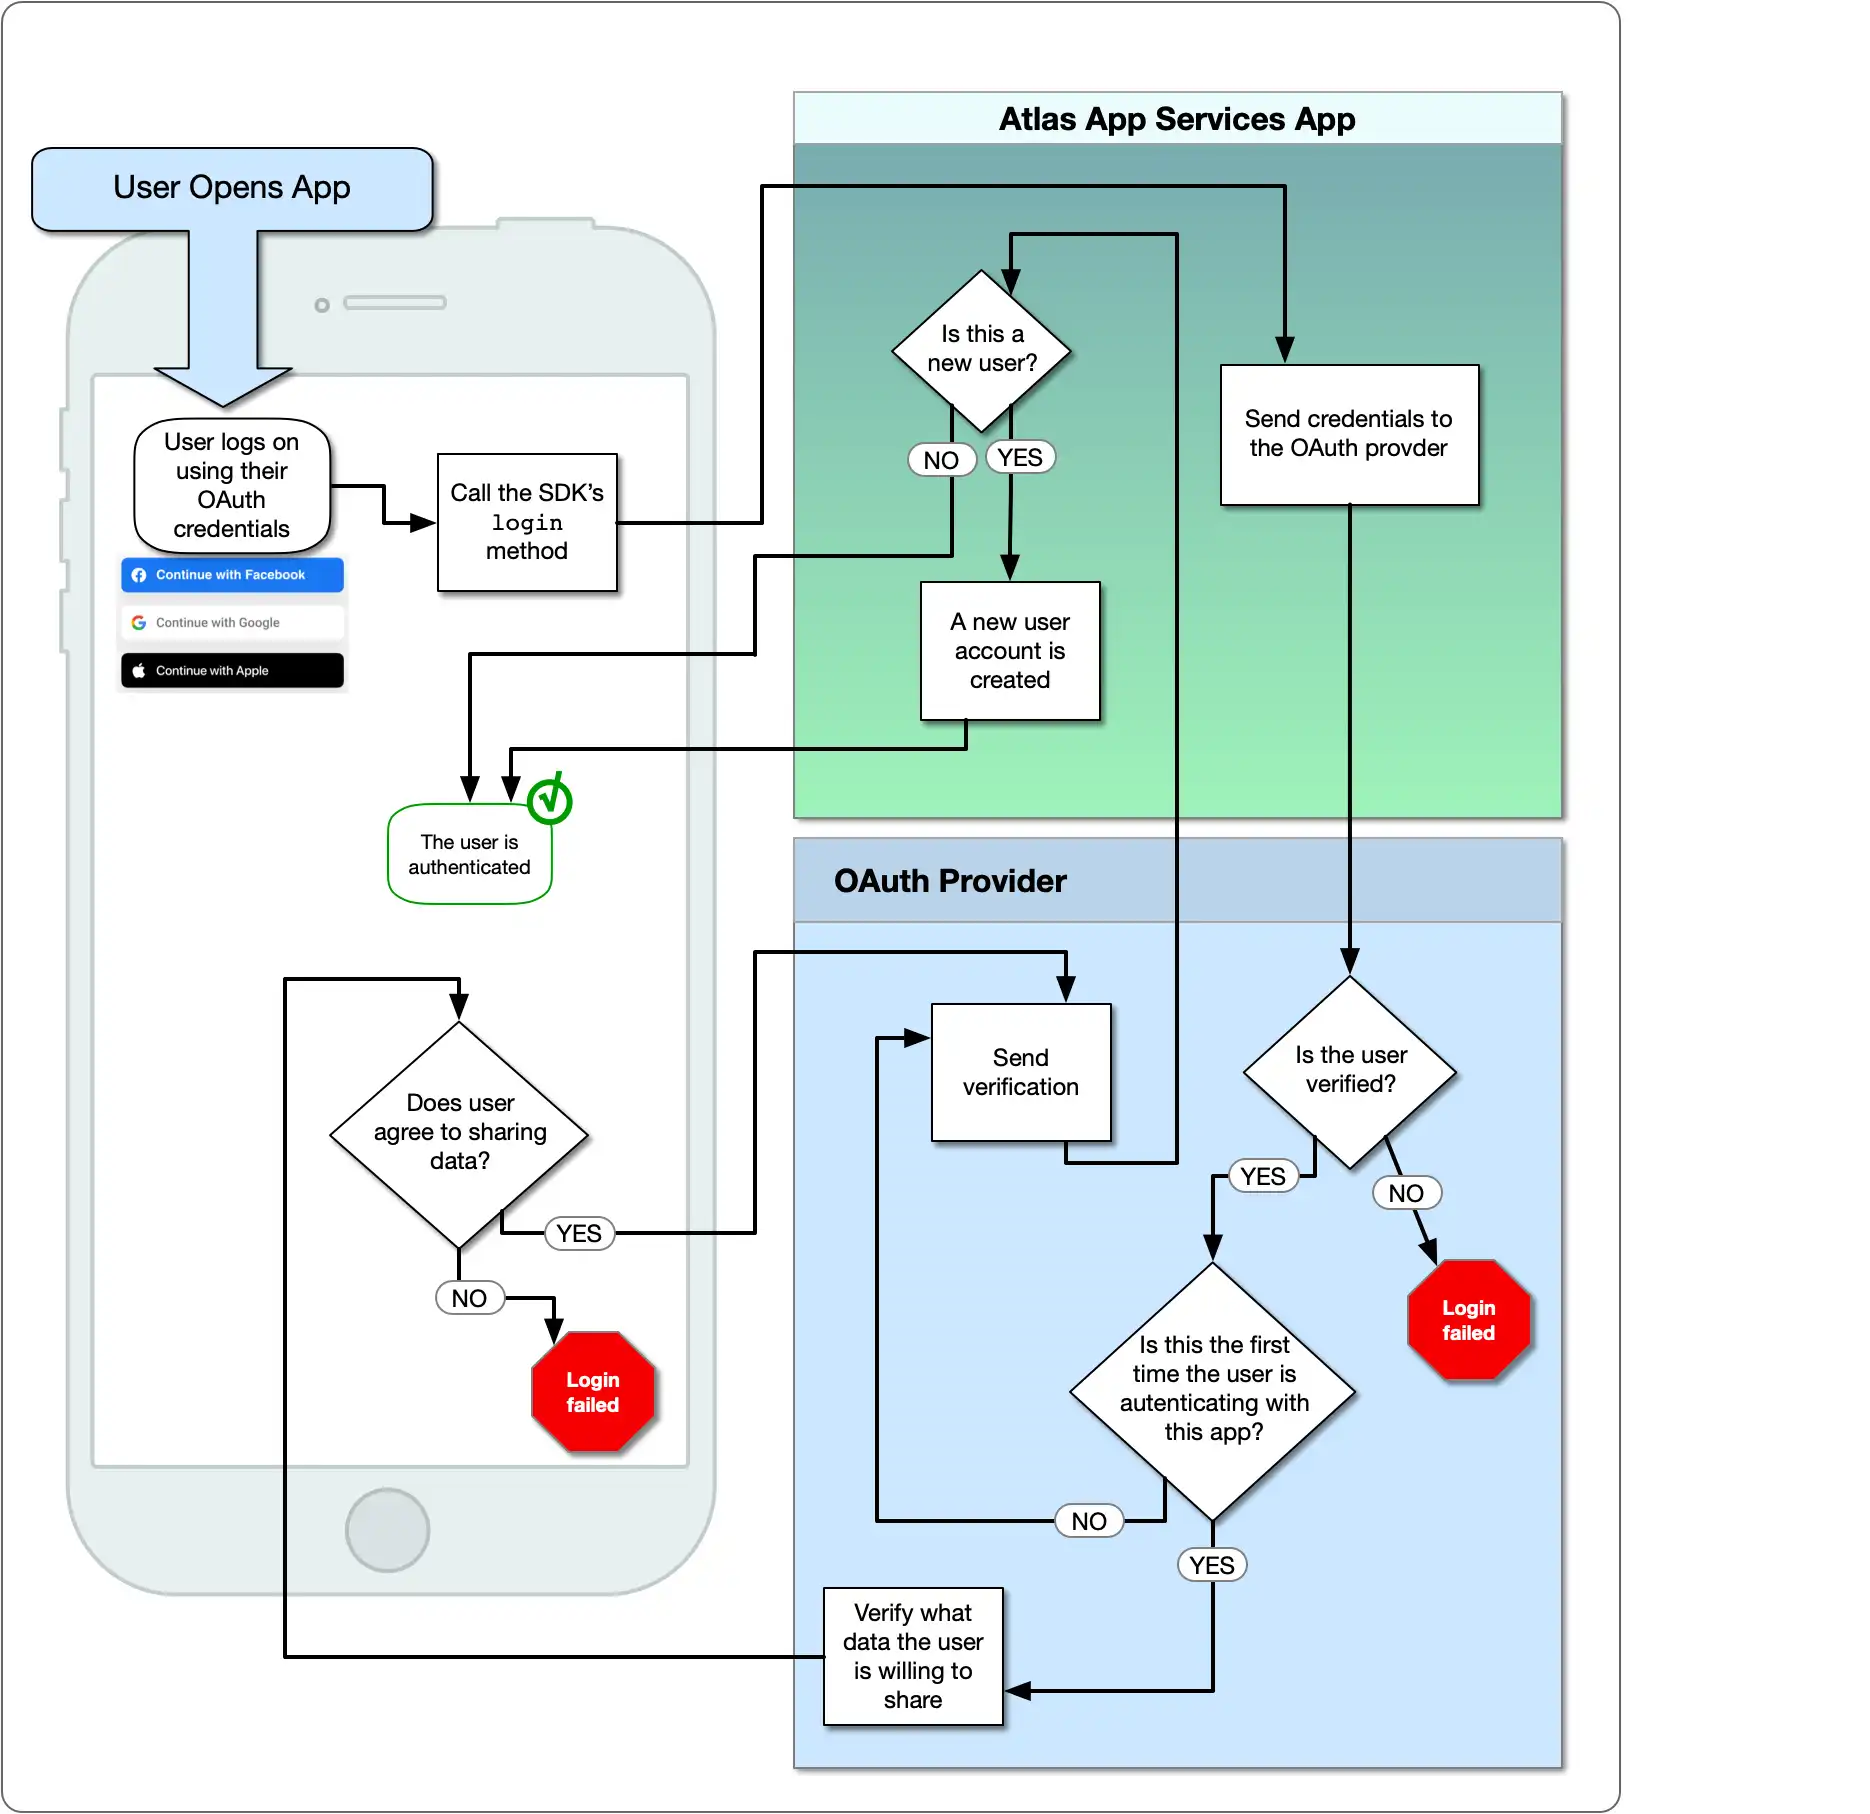
下图展示了 OAuth 逻辑流程:

您需要的工具
在实施 Apple ID 身份验证之前,您需要满足以下条件:
活跃的 Apple Developer Program 帐号。
Xcode 11 或更高版本。
配置 Apple ID 身份验证
将 Sign-in with Apple 与 Atlas App Services 结合使用时,可以为移动应用程序或 Web 应用程序配置 Apple 身份验证提供者。
如果您想为二者使用 Sign in with Apple,您可以为 Web 或移动应用程序设置自己的 Sign in with Apple 流程。然后,使用随自定义 JWT 身份验证提供程序一起返回的 JWT。然后,您可以在 Realm 软件开发工具包中,针对每个身份验证提供商,将用户身份关联到单个用户。
要仅通过网络或移动应用程序使用“通过 Apple 登录”,请选择您的应用程序类型并遵循本指南。
将 Sign-in With Apple 添加到您的应用程序中
您的应用程序必须具有通过 Apple 登录权限才能使用此功能。
在 Xcode 中选择您的应用程序目标。
Go Signing & Capabilities标签页,然后选择+ Capability 。
搜索通过 Apple 登录功能,然后选择该功能。
然后,确认在 Apple Developer 门户中已启用。
导航到 Apple Developer 门户的 Certificates, Identifiers and Profiles 页面。
从下拉列表中选择应用的标识符。这会打开 App ID Configuration 窗格。
向下滚动,直到看到 Sign In with Apple 的复选框。如果未选中该复选框,请将其选中。如果进行了更改,请按 Save 按钮。
注意您的应用的 Bundle ID。创建客户端密钥以及在 App Services 中配置“通过 Apple 登录”时,需要 Bundle ID。
创建私钥
通过 Apple 登录的客户端密钥是您创建并使用私钥签名的 JSON Web 令牌。您需要通过 Apple Developer 门户生成私钥。
单击左侧导航菜单中的 Keys(函数)。
单击 Keys 旁边的蓝色加号图标。
在 Register a New Key 页面,输入描述性 Key Name,然后向下滚动,找到 Sign in with Apple 行。选中复选框,启用“通过 Apple 登录”,然后单击 Configure。
在 Configure Key 页面上,选择您的应用的 App ID 作为 Primary App ID,然后单击 Save。
单击 Continue 以查看您的密钥配置。当您确定已正确配置密钥后,请单击 Register。
将Key ID值复制到以后可以访问权限的地方,然后单击Download将密钥下载为
.p8文本文件。 您将使用它们来生成客户端密钥。重要
保存密钥
密钥只能下载一次。确保将密钥保存在安全的位置,以备不时之需。如果丢失了密钥,则需要生成一个新密钥。
创建客户端密钥 JWT
现在,您可以为 Apple ID 身份验证提供者创建客户端密钥 JWT。确保您拥有以下信息:
您的应用的 Bundle ID。您将在下面的脚本中使用它作为
client_id。您创建的密钥的 Key ID 以及包含该密钥的
.p8文件。您的 Apple Team ID。您可以在 Apple Developer 门户的右上角找到它。
确认您拥有所有必需的信息后,您可以使用脚本生成 JWT。您可以定义自己的脚本或使用此步骤中的脚本。
为了生成 JWT,我们将使用 jwt gem。要安装它,请运行以下程序:
gem install jwt
创建一个名为 generate_client_secret.rb 的新文件,并将以下代码区块复制到该文件中。
# Source: https://developer.okta.com/blog/2019/06/04/what-the-heck-is-sign-in-with-apple require 'jwt' # Update these values with your app's information team_id = '<Apple Team ID>' client_id = '<Bundle ID or Services ID>' key_id = '<Apple Key ID>' key_file = '<Key File Path>' # Define the JWT's headers and claims headers = { # The token must be signed with your key 'kid' => key_id } claims = { # The token is issued by your Apple team 'iss' => team_id, # The token applies to Apple ID authentication 'aud' => 'https://appleid.apple.com', # The token is scoped to your application 'sub' => client_id, # The token is valid immediately 'iat' => Time.now.to_i, # The token expires in 6 months (maximum allowed) 'exp' => Time.now.to_i + 86400*180, } # Read in the key and generate the JWT ecdsa_key = OpenSSL::PKey::EC.new IO.read key_file token = JWT.encode claims, ecdsa_key, 'ES256', headers # Print the JWT to stdout puts token
更新 team_id、client_id、key_id 和 key_file 的值,使其与应用程序的信息相匹配,然后保存文件。准备好生成 JWT 后,请在 Shell 中运行脚本:
ruby generate_client_secret.rb >> client_secret.txt
重要
保存 JWT
generate_client_secret.rb 脚本输出到 stdout。调用时,我们会将 stdout 追加到名为 client_secret.txt 的文件中。您将需要 JWT 以便在 App Services 中配置 Apple ID 提供者。
在 App Services 中配置提供者
此时,您已配置 Apple 应用程序并生成所需的 OAuth 2.0 凭证。您现在可以使用凭证配置 Apple ID 身份验证提供者,以允许 App Services 客户端应用程序用户登录。
单击左侧导航菜单中的 Authentication,然后单击 Apple ID。
打开 Provider Enabled 开关。
对于 App Services Client ID,输入您的应用程序的 Bundle ID。
对于 Client Secret,使用描述性名称创建一个新密钥,并将 Client Secret Value 设置为您生成的 JWT 字符串。或者,您可以选择包含 JWT 的预先存在的密钥。
单击 Save 以完成提供者配置。如要使提供者可供客户端应用程序使用,您需要部署更改。单击 Review & Deploy Changes,然后单击 Deploy。
要使用 AppServices启用和配置 Apple身份验证提供者,请在/auth/providers.json中为其定义配置对象。
Apple提供商配置具有以下形式:
{ "oauth2-apple": { "name": "oauth2-apple", "type": "oauth2-apple", "disabled": <boolean>, "config": { "clientId": "<Bundle ID>" }, "secret_config": { "clientSecret": "<Secret Name>" }, "redirect_uris": ["<string>", ...] } }
字段 | 说明 |
|---|---|
Client ID config.clientId | 必需。 您的应用程序的Bundle ID 。 |
Client Secret secret_config.clientSecret | 必需。 存储您生成的 的 密钥 的名称。Client SecretJSON web token |
Redirect URIs redirect_uris | 对于 Web 应用程序是必需的。 移动应用程序不是必需的。 |
创建配置文件后,您可以通过部署应用程序程序,使 Apple ID身份验证提供者可供客户端应用程序使用。
要使用App Services CLI部署草稿应用程序程序:
appservices push
要使用自动Github部署来部署草稿应用程序:
git add ./auth/providers.json git commit -m "Configure and Enable Apple ID Authentication" git push origin <branch name>
创建 App ID
Apple App ID代表您的应用程序,并允许您访问权限“通过 Apple 登录”等服务。 要配置 Apple ID提供商,您必须创建新的 App ID。
导航到 Apple Developer 门户的 Certificates, Identifiers and Profiles 页面。
单击左侧导航菜单中的 Identifiers(函数)。
单击 Identifiers 旁边的蓝色加号图标。
在Register a New Identifier页面上,选择App IDs ,然后单击Continue 。
在 Register an App ID 页面上,选择运行应用的 Platform,然后输入简短的 Description 和反向 DNS 表示法 Bundle ID。
向下滚动Register an App ID页面,直到看到Sign in with Apple功能。 选中复选框以启用该功能。
按页面顶部的Continue按钮。 完成应用于您的应用的所有其他设置步骤,然后按Register按钮。
创建服务ID
Apple Services ID代表单个应用程序,允许您配置授权回调URL并为应用程序定义私钥。
单击左侧导航菜单中的 Identifiers(函数)。
单击 Identifiers 旁边的蓝色加号图标。
在Register a New Identifier页面上,选择Services IDs ,然后单击Continue 。
在 Register a Services ID 页面上,输入简短的 Description 和反向 DNS 表示法 Identifier。
重要
保存标识符
服务ID的Identifier值是应用程序的Client ID 。 稍后您将需要此值在Atlas App Services中配置 Apple ID提供商。
按Continue按钮。 确认详细信息,然后按Register 。
单击进入刚刚创建的服务。 选中复选框以启用Sign in with Apple ,然后单击Configure 。 选择您创建的应用程序ID作为Primary App ID 。
输入您的域、子域,并返回 Services ID的 URL。 按Next按钮。
单击Continue ,然后单击Save 。 确认您已正确配置服务ID ,然后单击Register 。
创建私钥
通过 Apple 登录的客户端密钥是您创建并使用私钥签名的 JSON Web 令牌。您需要通过 Apple Developer 门户生成私钥。
单击左侧导航菜单中的 Keys(函数)。
单击 Keys 旁边的蓝色加号图标。
在 Register a New Key 页面,输入描述性 Key Name,然后向下滚动,找到 Sign in with Apple 行。选中复选框,启用“通过 Apple 登录”,然后单击 Configure。
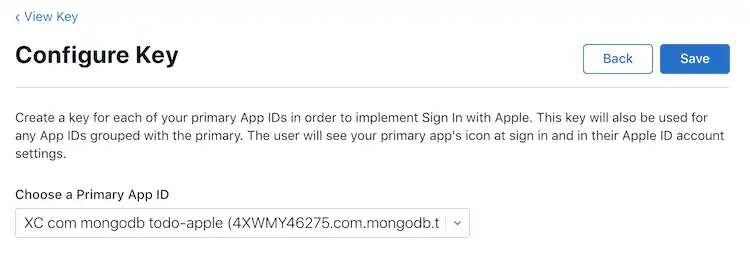
在Configure Key页面上,选择您创建的应用程序ID作为Primary App ID ,然后单击Save 。
![Apple Developer 门户中的“配置密钥”页面]()
单击 Continue 以查看您的密钥配置。当您确定已正确配置密钥后,请单击 Register。
将 Key ID 值复制到以后可以访问的地方,然后单击 Download 将密钥下载为
.p8文本文件。您将使用这些文件来生成客户端密钥。重要
保存密钥
密钥只能下载一次。确保将密钥保存在安全的位置,以备不时之需。如果丢失了密钥,则需要生成一个新密钥。

创建客户端密钥 JWT
现在,您可以为 Apple ID 身份验证提供者创建客户端密钥 JWT。确保您拥有以下信息:
您创建的Services ID 。 您将在以下脚本中将其用作
client_id。- 您创建的密钥的Key ID和
.p8 - 包含密钥的文件。
- 您创建的密钥的Key ID和
- 您的 Apple Team ID。 您可以在 Apple
- 开发者门户。


确认您拥有所有必需的信息后,您可以使用脚本生成 JWT。您可以定义自己的脚本或使用此步骤中的脚本。
为了生成 JWT,我们将使用 jwt gem。要安装它,请运行以下程序:
gem install jwt
创建一个名为 generate_client_secret.rb 的新文件,并将以下代码区块复制到该文件中。
# Source: https://developer.okta.com/blog/2019/06/04/what-the-heck-is-sign-in-with-apple require 'jwt' # Update these values with your app's information team_id = '<Apple Team ID>' client_id = '<Bundle ID or Services ID>' key_id = '<Apple Key ID>' key_file = '<Key File Path>' # Define the JWT's headers and claims headers = { # The token must be signed with your key 'kid' => key_id } claims = { # The token is issued by your Apple team 'iss' => team_id, # The token applies to Apple ID authentication 'aud' => 'https://appleid.apple.com', # The token is scoped to your application 'sub' => client_id, # The token is valid immediately 'iat' => Time.now.to_i, # The token expires in 6 months (maximum allowed) 'exp' => Time.now.to_i + 86400*180, } # Read in the key and generate the JWT ecdsa_key = OpenSSL::PKey::EC.new IO.read key_file token = JWT.encode claims, ecdsa_key, 'ES256', headers # Print the JWT to stdout puts token
更新 team_id、client_id、key_id 和 key_file 的值,使其与应用程序的信息相匹配,然后保存文件。准备好生成 JWT 后,请在 Shell 中运行脚本:
ruby generate_client_secret.rb >> client_secret.txt
重要
保存 JWT
generate_client_secret.rb 脚本输出到 stdout。调用时,我们会将 stdout 追加到名为 client_secret.txt 的文件中。您将需要 JWT 以便在 App Services 中配置 Apple ID 提供者。
在 App Services 中配置提供者
此时,您已配置 Apple 应用程序并生成所需的 OAuth 2.0 凭证。您现在可以使用凭证配置 Apple ID 身份验证提供者,以允许 App Services 客户端应用程序用户登录。
单击左侧导航菜单中的 Authentication,然后单击 Apple ID。
打开 Provider Enabled 开关。
对于App Services Client ID ,输入您在上面的步骤2中创建Services ID时获得的 Apple Services ID 。
对于 Client Secret,使用描述性名称创建一个新密钥,并将 Client Secret Value 设置为您生成的 JWT 字符串。或者,您可以选择包含 JWT 的预先存在的密钥。
对于 Redirect URIs,单击 Add Redirect URI 并输入 OAuth进程完成后App Services应重定向到的URL 。提供您控制的域的URL ,然后使用通用链接将用户重定向回您的应用。
单击 Save 以完成提供者配置。如要使提供者可供客户端应用程序使用,您需要部署更改。单击 Review & Deploy Changes,然后单击 Deploy。
要使用appservices启用和配置 Apple身份验证提供者,请在/auth/providers.json中为其定义一个配置对象。
Apple提供商配置具有以下形式:
{ "oauth2-apple": { "name": "oauth2-apple", "type": "oauth2-apple", "disabled": <boolean>, "config": { "clientId": "<Apple Services ID>" }, "secret_config": { "clientSecret": "<Secret Name>" }, "redirect_uris": ["<string>", ...] } }
字段 | 说明 |
|---|---|
Client ID config.clientId | 必需。 您在完成上述步骤2时创建的 Apple Services ID 。 |
Client Secret secret_config.clientSecret | 必需。 存储您生成的 的 密钥 的名称。Client SecretJSON web token |
Redirect URIs redirect_uris | 对于 Web 应用程序是必需的。允许的重定向 URI 列表。 用户完成身份验证进程后, App Services会将其重定向回指定的重定向 URI;或者,如果未指定重定向 URI,则重定向回他们发起身份验证请求的URL 。 App Services仅将用户重定向到与此列表中的条目完全匹配的 URI,包括协议和所有结尾斜杠。 提供您控制的域的URL ,然后使用通用链接将用户重定向回您的应用。 |
创建配置文件后,您可以通过部署应用程序程序,使 Apple ID身份验证提供者可供客户端应用程序使用。
要使用App Services CLI部署草稿应用程序程序:
appservices push
要使用自动Github部署来部署草稿应用程序:
git add ./auth/providers.json git commit -m "Configure and Enable Apple ID Authentication" git push origin <branch name>
示例
有关演示如何使用 Apple 身份验证进行注册和登录的代码示例,请参阅 Realm SDK 的文档: