入门 (Rails 7)
在此页面上
注意
本教程适用于 Ruby on Rails 7。如果您使用的不是这个版本,请从导航菜单选择适合 Rails 版本的教程。
新应用程序
本部分将演示如何使用 Mongoid ODM 创建新的 Ruby on Rails 应用程序。通过将 Rails 的默认 ActiveRecord 适配器替换为 MongoDB 用于数据访问的库(类似于 ORM 库),我们将创建一个应用程序,其与 Ruby on Rails 入门指南中所述的博客应用程序相似。
此应用程序的完整源代码可以在 mongoid-demoGithub 存储库 中找到 。
注意
本指南假定您对 Ruby on Rails 有基本的了解。 要了解有关 Ruby on Rails 的更多信息,请参阅 入门指南 或其他 Rails 指南。
安装 rails
我们将使用 Rails 生成器创建应用程序框架。为此,第一步是安装 rails gem:
gem install rails -v 7.1
创建新的应用程序
使用 rails 命令创建应用程序框架,如下所示:
rails new blog --skip-active-record cd blog
我们传递 --skip-active-record,请求不要将 ActiveRecord 添加为依赖项,因为我们将使用 Mongoid。
可选择跳过测试
如果您打算用 RSpec 测试您的应用程序,您可以通过传递 --skip-test 和 --skip-system-test 选项指示生成器省略默认的 Rails 测试设置:
rails new blog --skip-active-record --skip-test --skip-system-test cd blog
设置 Mongoid
1 。 修改Gemfile 以添加对 mongoid gem:
gem 'mongoid'
安装 gem 依赖项:
bundle install
生成默认 Mongoid 配置:
bin/rails g mongoid:config
此生成器将创建 config/mongoid.yml 配置文件(用于配置与 MongoDB 部署的连接)和 config/initializers/mongoid.rb 初始值设定项文件(可用于其他与 Mongoid 相关的配置)。请注意,由于不使用 ActiveRecord,因此不会有 database.yml 文件。
配置自管理 MongoDB
在上一步中创建的配置适用于在本地运行 MongoDB 服务器的情况。如果还没有本地 MongoDB 服务器,请下载并安装 MongoDB。
虽然生成的 mongoid.yml 无需修改即可运行,但我们建议减少开发时的服务器选择超时。进行此更改后,mongoid.yml 的未注释行应如下所示:
development: clients: default: database: blog_development hosts: - localhost:27017 options: server_selection_timeout: 1
配置 MongoDB Atlas
您可以创建一个免费的 MongoDB Atlas 帐户并在 Atlas 中创建免费的 MongoDB 集群,而无需在本地下载、安装和运行 MongoDB。 创建集群后,请按照连接到集群页面中的说明获取 URI。 使用Ruby 驱动程序2.5或更高版本。
将 URI 粘贴到 config/mongoid.yml 文件中,并注释掉定义的主机。在使用 Atlas 时,我们建议将开发环境的服务器选择超时设置为 5 秒。
config/mongoid.yml 的未注释内容应如下所示:
development: clients: default: uri: mongodb+srv://user:pass@yourcluster.mongodb.net/blog_development?retryWrites=true&w=majority options: server_selection_timeout: 5
运行应用程序
现在,您可以通过运行以下命令启动应用程序服务器:
bin/rails s
通过导航到 本地主机来访问应用程序:3000 。
添加帖子
通过使用标准 Rails 搭建,Mongoid 可以为我们的博客生成所需的模型、控制器和视图文件,以使我们可以快速开始创建博文:
bin/rails g scaffold Post title:string body:text
导航到 本地主机:3000 /posts 创建帖子并查看已创建的帖子。

添加评论
为了使应用程序更具交互性,增加用户对帖子添加评论的能力。
创建 Comment 模型:
bin/rails g scaffold Comment name:string message:string post:belongs_to
打开 Post 模型文件 app/models/post.rb,然后为注释添加 has_many 关联:
class Post include Mongoid::Document include Mongoid::Timestamps field :title, type: String field :body, type: String has_many :comments, dependent: :destroy end
打开 app/views/posts/show.html.erb 并添加一个部分,以呈现现有评论并提示留下新评论:
<section class="section comments"> <div class="container"> <h2 class="subtitle is-5"> <strong><%= @post.comments.count %></strong> Comments </h2> <%= render @post.comments %> <div class="comment-form"> <hr /> <h3 class="subtitle is-3">Leave a reply</h3> <%= render partial: 'comments/form', locals: { comment: @post.comments.build } %> </div> </div> </section>
打开 app/views/comments/_form.html.erb,将 :message 的字段类型从 text_field 更改为 text_area,并将 :post_id 的字段类型从 text_field 更改为 hidden_field。结果应如下所示:
<%= form_with(model: comment, local: true) do |form| %> <% if comment.errors.any? %> <div id="error_explanation"> <h2><%= pluralize(comment.errors.count, "error") %> prohibited this comment from being saved:</h2> <ul> <% comment.errors.full_messages.each do |message| %> <li><%= message %></li> <% end %> </ul> </div> <% end %> <div class="field"> <%= form.label :name %> <%= form.text_field :name %> </div> <div class="field"> <%= form.label :message %> <%= form.text_area :message %> </div> <div class="field"> <%= form.hidden_field :post_id %> </div> <div class="actions"> <%= form.submit %> </div> <% end %>
接着将 app/view/comments/_comment.html.erb 替换为以下内容:
<p> <strong><%= comment.name %>:</strong> <%= comment.message %> <%= link_to 'Delete', [comment], data: { "turbo-method": :delete, "turbo-confirm": 'Are you sure?' } %> </p>
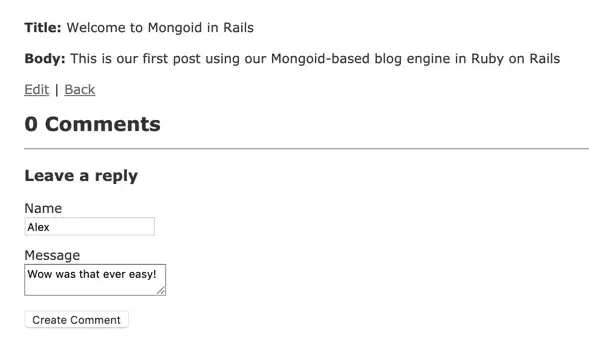
现在您应该能够给帖子留下评论:

现有应用程序
Mongoid 可轻松添加到现有 Rails 应用程序中,并与其他 ActiveRecord 适配器一起运行。如果这是您的使用案例,更新依赖项并填充配置文件即可开始在应用程序中使用 MongoDB。
要将现有的 Ruby on Rails 应用程序切换为使用 Mongoid 而不是 ActiveRecord,需要进行额外的配置更改,如下所述。
Dependencies
首先,需要将 mongoid gem 添加到 Gemfile 中。
gem 'mongoid'
如果 Mongoid 是唯一的数据库适配器,请删除或注释掉任何 RDBMS 库,例如 Gemfile 中提到的 sqlite 或 pg。
安装 gem 依赖项:
bundle install
Mongoid 配置
生成默认 Mongoid 配置:
bin/rails g mongoid:config
此生成器将创建 config/mongoid.yml 配置文件(用于配置与 MongoDB 部署的连接)和 config/initializers/mongoid.rb 初始值设定项文件(可用于其他与 Mongoid 相关的配置)。通常,建议对所有 Mongoid 配置使用 mongoid.yml。
查看配置自管理 MongoDB 和配置 MongoDB Atlas 部分,以确定要如何部署 MongoDB,并调整 Mongoid 配置 (config/mongoid.yml) 以使其匹配。
加载的框架
检查 config/application.rb。如果它通过 require 'rails/all' 要求使用 Rails 的所有组件,请将其更改为要求使用单独的框架。要验证 rails/all 内容是否适用于您的版本,请参阅 Github 存储库:
# Remove or comment out #require "rails/all" # Add the following instead of "rails/all": require "rails" # require "active_record/railtie" rescue LoadError # require "active_storage/engine" rescue LoadError require "action_controller/railtie" rescue LoadError require "action_view/railtie" rescue LoadError require "action_mailer/railtie" rescue LoadError require "active_job/railtie" rescue LoadError require "action_cable/engine" rescue LoadError # require "action_mailbox/engine" rescue LoadError # require "action_text/engine" rescue LoadError require "rails/test_unit/railtie" rescue LoadError
警告
由于对 ActiveRecord 的依赖,ActionText、ActiveStorage 和 ActionMailbox 不能与 Mongoid 一起使用。
ActiveRecord 配置
审核所有配置文件 (config/application.rb, config/environments/{development,production.test}.rb),并删除或注释掉对 config.active_record 和 config.active_storage 的任何引用。
调整模型
如果您的应用程序已有模型,从 ActiveRecord 迁移到 Mongoid 时则需要更改这些模型。
ActiveRecord 模型派生自 ApplicationRecord,没有列定义。Mongoid 模型一般没有超类,但必须包含 Mongoid::Document,并且通常会显式定义字段(但 动态字段 也可用于代替显式字段定义)。
例如,最基本的帖子模型在 ActiveRecord 中可能如下所示:
class Post < ApplicationRecord has_many :comments, dependent: :destroy end
相同的模型在 Mongoid 中可能如下所示:
class Post include Mongoid::Document field :title, type: String field :body, type: String has_many :comments, dependent: :destroy end
或者,如果使用动态字段,则如下所示:
class Post include Mongoid::Document include Mongoid::Attributes::Dynamic has_many :comments, dependent: :destroy end
Mongoid 不使用 ActiveRecord 迁移,因为 MongoDB 不要求在存储数据之前定义模式。
数据迁移
如果您希望将关系数据库中的已有数据转移到 MongoDB,则需要执行数据迁移。如上所述,不需要迁移架构,因为 MongoDB 不需要使用预定义的架构存储数据。
迁移工具通常特定于要迁移的数据,因为尽管 Mongoid 支持 ActiveRecord 关联超集,但对于 Mongoid 和 ActiveRecord 来说,在集合中存储模型引用的方式有所不同。话虽如此,MongoDB 提供了一些有关从 RDBMS 迁移到 MongoDB 的资源,例如 RDBMS 到 MongoDB 迁移指南和现代化指南。
Rails API
使用 Mongoid 创建 Rails API 应用程序的过程与创建常规应用程序的过程相同,唯一的变化是将 --api 参数更改为 rails new。将 Rails API 应用程序迁移到 Mongoid 的过程与上述常规 Rails 应用程序的过程相同。
可以在 mongoid-demo GitHub 存储库中找到与本教程中描述的 Rails API 应用程序类似的完整应用程序。