Kubernetes, popularly known as k8s, is a container orchestration tool designed for cloud native applications. Kubernetes automates the deployment, scaling and overall management of the containerized applications across all Kubernetes clusters. Kubernetes Deployments are self healing, utilize declarative configuration, support rolling updates and rollbacks, and can scale automatically.
Table of contents
- Kubernetes deployment Overview
- Kubernetes architecture
- Kubernetes deployment strategies
- Kubernetes deployment
- MongoDB and Kubernetes
- Common deployment issues and best practices
- FAQs
Kubernetes deployment Overview
With the rise of loosely coupled, distributed microservices, applications are now packaged into containers. A containerized application consists of all of its code and libraries packaged together in what is called a container. Kubernetes is the open source tool that facilitates the deployment and management of these cloud-native applications in any isolated environment.
Before delving into Kubernetes deployment, let us understand a few important terms about the deployment process on a kubernetes cluster.
Container image
Once the development team writes the application source code, they package the code, dependencies, and libraries into an immutable snapshot called as the container image. This image serves as a blueprint for running containerized applications.
Container registry
Container images are stored in a container registry like Docker Hub, which is a centralized repository to access and manage container images.
kubectl
kubectl is the command line tool used to interact with the Kubernetes cluster. In later sections of this article, we will demonstrate how to use kubectl commands to deploy, manage, monitor, and debug cluster resources.
YAML deployment file
Kubernetes uses YAML files for deployment of container images into its clusters. These files consist of all the application configuration details required to deploy applications into the Kubernetes cluster and manage them within the cluster.
Kubernetes cluster
A Kubernetes cluster is a set of nodes that run containerized cloud-native applications, managed by Kubernetes. It consists of at least one control plane node and one or more compute (worker) nodes.
Container runtime
Container runtime is the engine that runs the containerized applications inside a node. Some popular container runtimes are Docker and CRI-O.
Pod
The cloud applications are deployed inside pods, present in the worker nodes. Containers within the same pod share the same IP address and network namespace so that they can communicate with each other and share resources.
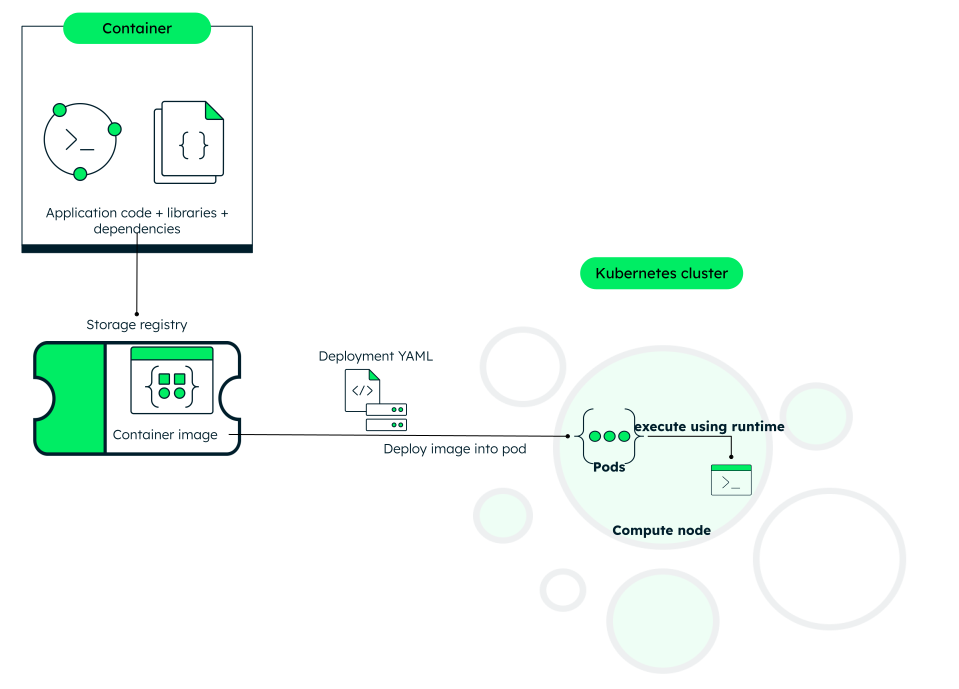
A quick overview of the deployment steps is as follows:
- Application containerization (container image)—the source code, libraries, and dependencies are stored as a container image in a registry.
- The details of the container image are written in a YAML file that Kubernetes can read and process. You can specify details like replica sets, container images to be used, and so on.
- The Kubernetes controller will perform actions using details from the YAML file. For example, creating pods and deploying cloud applications.
- Once the application is deployed, it can be run using the runtime present in the compute node.
Kubernetes architecture
The smallest unit in the Kubernetes architecture is the pod, which represents a single instance of a running process in a Kubernetes cluster. Pods consist of one or more containers.
At the outset, we would think that whenever a new pod creation request comes in, the kube-apiserver writes it to etcd and then etcd sends a response saying that it's done. However, a lot goes on between the various components to create, modify, or delete a pod once kubectl is issued.
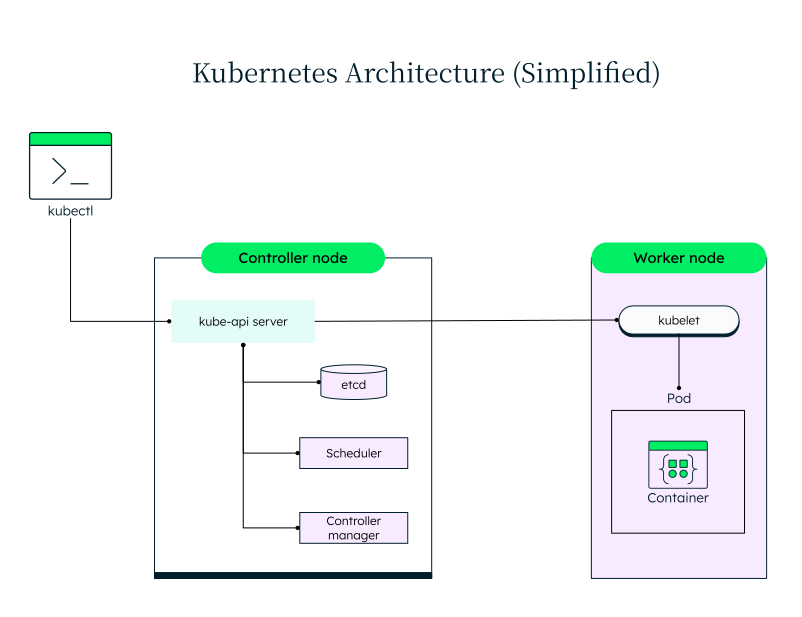
The diagram below shows some of the important components that make up the Kubernetes architecture. The control node consists of components like kube-apiserver, etcd, and the scheduler. The kube-apiserver receives and processes the incoming request and sends it to the compute node for execution. The key-value datastore, etcd, is distributed across the cluster.
Upon receiving a request, the kube-apiserver writes the desired state to etcd. The scheduler then checks for the available nodes where the Pod can be placed based on resource availability and constraints. Note that each node has a number of pods, and each pod can have one or more containers grouped together. The scheduler informs the kube-apiserver of its decision, and the kube-apiserver then instructs the kubelet on the chosen worker node to create the pod. The kubelet is an agent present on each worker node and is responsible for managing the state of pods on its node. For example, the kubelet is responsible for taking actions to ensure that the desired state of the pod matches the actual state.
Kubernetes deployment strategies
There are several Kubernetes deployment strategies, which are discussed in brief below.
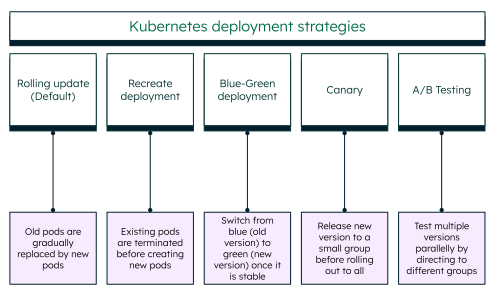
Rolling update: This is the default deployment strategy in Kubernetes. Old pods are gradually replaced with new ones. You can configure the update behavior using parameters like maxUnavailable (the maximum number of pods that can be unavailable during the update) and maxSurge (the maximum number of extra pods that can be created during the update) to balance availability and minimize disruption during updates.
Recreate deployment: In this approach all the existing pods are terminated before creating a new set of pods. It is faster than the default strategy (rolling update), however, it causes downtime and is suitable for stateless applications since they do not retain persistent state between restarts.
Blue-green deployment: In Kubernetes, you can use two separate deployments, with blue representing the current version and green representing the new version, and a service to switch traffic from the old version to the new version once it's ready and stable. This can be managed manually or automated using tools like ArgoCD. This type of deployment has zero downtime and is ideal for applications that require high availability.
Canary deployment: In a canary deployment, the new version of an application is released to a small group of users first (the canary), before rolling it out to everyone. If the new version works well for the small group, it is then gradually rolled out to all users. This strategy reduces the risk of any issues impacting all users, ensuring a smoother and safer deployment process.
A/B testing deployment: This strategy involves directing different users to different versions of your application, allowing you to test multiple versions simultaneously. By splitting users into groups, you can compare how each version performs and choose the best one. This approach helps in fine-tuning features and improving user experience.
Resource utilization
Kubernetes also offers tools to optimize resource usage within a deployment, such as the maximum resources a pod can utilize, minimum resources required to perform a stable operation, horizontal and vertical automatic pod scaling, and automatic scaling of cluster nodes, thereby optimizing cloud resource usage.
Kubernetes deployment
Kubernetes deployment is simple and can be performed in just a few steps, with the right configurations.
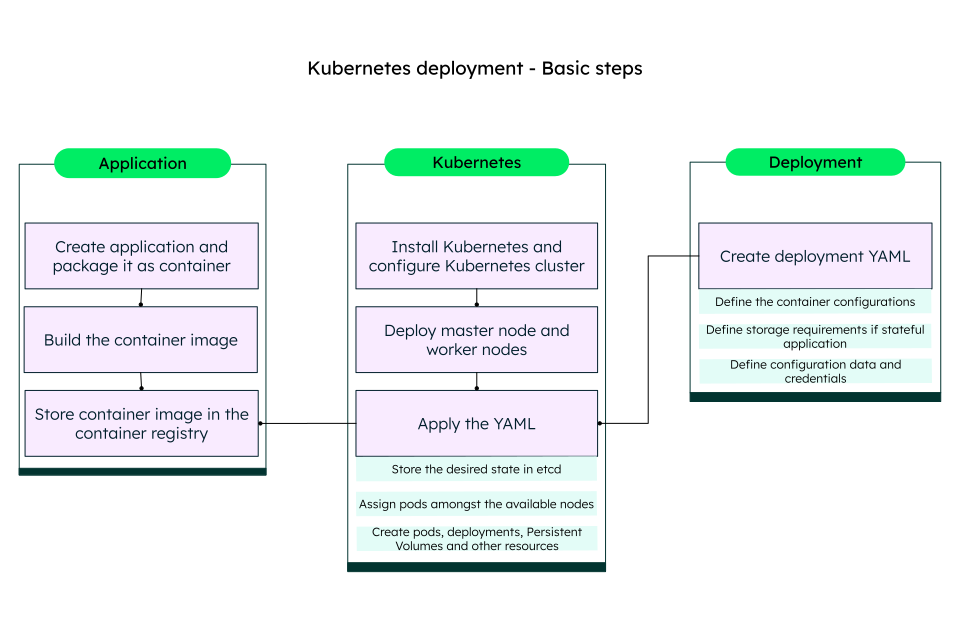
Setting up
All you need is a Kubernetes cluster that you can set up using any private or public cloud infrastructure, on-premises development environment, or managed Kubernetes service.
To run a local cluster, you can install minikube, a tool that provides minimal setup, which is ideal for testing purposes.
To set up a production cluster on a cloud environment without a managed service, you can download and install kubeadm (sets up the clusters) and kubectl (command line tool to interact with the cluster).
If you want to use a managed service, you can use the Google Kubernetes Engine (GKE), Azure Kubernetes Service (AKS), and many others depending on the cloud provider you choose. Managed services provide automatic provisioning and setup of clusters.
Once you have configured kubectl to connect to your Kubernetes cluster, you need to define the deployment spec that describes the desired state of your application.
Deployment spec
Defining the deployment spec involves creating a YAML or JSON file with the necessary configuration parameters. Here is an example YAML deployment file for a database service:
The above YAML, when executed, creates a new pod, as per the deployment strategy specified. You can use:
or
to create a new pod.
Let us briefly understand the different fields of the YAML. The “kind” indicates the type of Kubernetes resource. In the above YAML, the kind is StatefulSet, which is used to manage stateful applications, like a database. A StatefulSet is used for applications that require stable, unique network identities and persistent storage across pod restarts. The other kind is “deployment”, which manages stateless applications.
The metadata identifies and describes the resource, such as its name and additional information about the pod.
The next part is the specification, which describes the service to be deployed, the number of replicas to be created, and other important information about the desired state of the application.
Replica set
Replica set ensures that the specified number of replicas of the pod are up and running at all times.
Selector
A selector is a filter that chooses the pods corresponding to the given label. By using matchLabels, you can directly select the object based on the label and match with the Kubernetes resource. This ensures that any traffic is redirected only to the pods that match the label. We can have different labels for frontend, backend, db, production, testing, master, worker, and so on. Selector will select only those pods that match the criteria, like in the above case, app: db, selects only those resources that have app value as db. In the same way, you can define environment: production, or nodes: master to select only those pods.
Pod template
The template tag contains the pod template. The template tags define the desired pod configuration used by Kubernetes to create and manage pods. You define the containers the pod contains, the container image, and the port. Since this example is of a StatefulSet, we also mention the volumeMounts. This tag is used to mount volumes (making storage space available) for persistent data storage so that containers can access the data. The volumeClaimTemplates ensures that each pod has its own persistent storage and allows for dynamic provisioning of persistent volumes.
Strategy
The deployment strategy is defined under the strategy field of the YAML file.
Nginx deployment
Nginx deployment has great web server capabilities and is optimized for serving static content. It can easily manage a large number of concurrent requests and has a built-in reverse proxy for efficient load balancing.
A typical NGINX deployment in Kubernetes involves creating a deployment configuration that defines the desired state using the NGINX spec. As given below, the YAML specification includes details such as the NGINX image version, which determines the version of NGINX to be deployed, and the number of replicas (set to create three NGINX pods). These NGINX pods run in the Kubernetes cluster, serving web content and handling traffic efficiently based on the configuration specified in the NGINX spec. The below setup ensures that all three NGINX pods are consistently managed and scaled according to the defined NGINX image and deployment strategy.
Updating a deployment
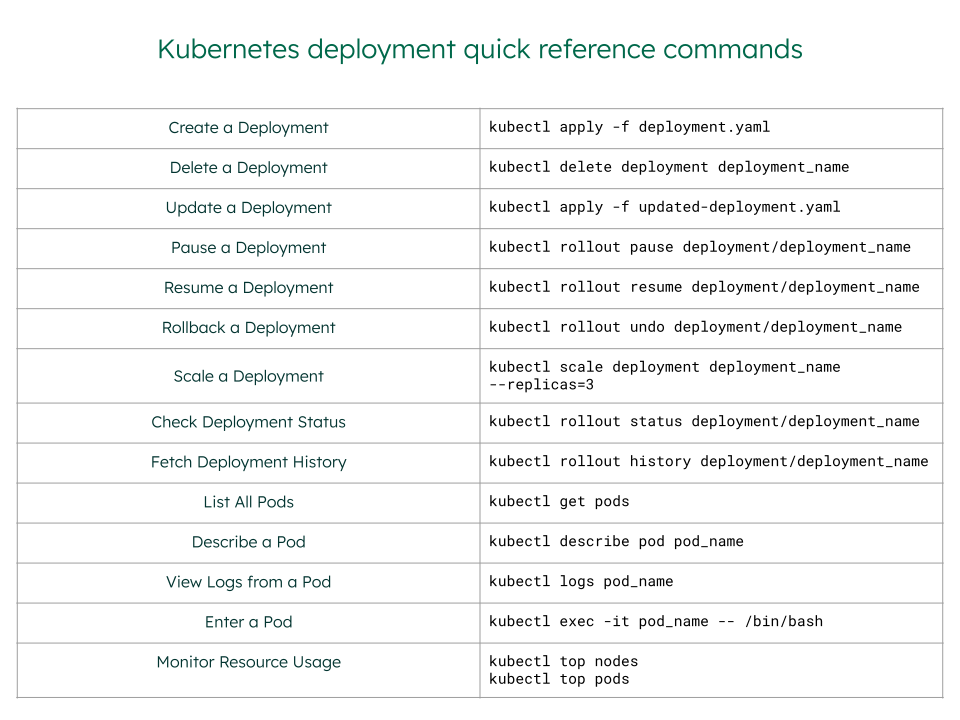
To update a deployment, modify the deployment YAML and use apply on the updated file:
To monitor the update, use rollout status:
Verify the changes by checking the pod details:
You can also directly change a field value using the set command:
Rolling back a deployment
To rollback a deployment, use undo:
You can read more about specific rollback scenarios from Kubernetes documentation.
Scaling a deployment
Scaling is done to meet the workload demands by adding or removing pods. You can scale a deployment by using the scale command and change the number of replicas:
Kubernetes supports automatic scaling using horizontal pod autoscaler (HPA), which adjusts the number of pod replicas based on the demand. You can specify the maximum and minimum number of replicas in the YAML or while creating the HPA resource:
Deployment scenarios
There are few more deployment scenarios other than creating or updating a pod, rolling back a deployment, and scaling a deployment. These are:
- Rolling out a replica set: When a deployment is applied, the deployment controller creates a ReplicaSet (if there is not already one), and the ReplicaSet controller ensures that the number of active replicas always matches the desired state.
- Declaring new state of the pods: Whenever a new ReplicaSet is created, the controller moves the pods from old ReplicaSets to the new one at a controlled rate.
- Pausing and resuming a deployment: You may want to apply multiple changes to the spec, and hence pause the deployment, apply the changes, and then resume for a new rollout.
- Cleaning up the old ReplicaSets that are no longer required.
- Using the status of the deployment to indicate that a rollout is stuck.
MongoDB and Kubernetes
You can deploy a MongoDB database on Kubernetes just like any other stateful resource. MongoDB also provides several operators to self manage MongoDB instances and resources on Kubernetes.
In the previous section on deployment, we have seen how Kubernetes deploys MongoDB using StatefulSets. While deploying this way provides a high level of customization, it requires manual setup and cumbersome YAML files. Further, the scaling, maintenance, updates, and management of resources are also manual.
MongoDB Kubernetes Operators
MongoDB provides three flavours of operators for Kubernetes, one each for its enterprise, community, and Atlas editions.
MongoDB Kubernetes Operators are considered to be at a Level 3 maturity according to the Operator Capability Levels. This means it supports full lifecycle management, including application lifecycle, storage lifecycle (backup, failure, recovery), and more.
MongoDB Atlas deployment using operator
We will demonstrate here the deployment of MongoDB Atlas using the operator.
If you do not have MongoDB Atlas yet, you can create and configure your Atlas account for free.
Once you have your Atlas cluster in place, you can install the Atlas Kubernetes Operator. This operator extends the Kubernetes API to support custom resources for managing Atlas. You can then use these custom resources to define Atlas cluster configuration in the deployment YAML.
Some examples of a custom resource are AtlasProject, AtlasDeployment, AtlasDatabaseUser, AtlasBackupSchedule, and more.
Example YAML with custom resource:
You can then apply the custom resource using kubectl apply.
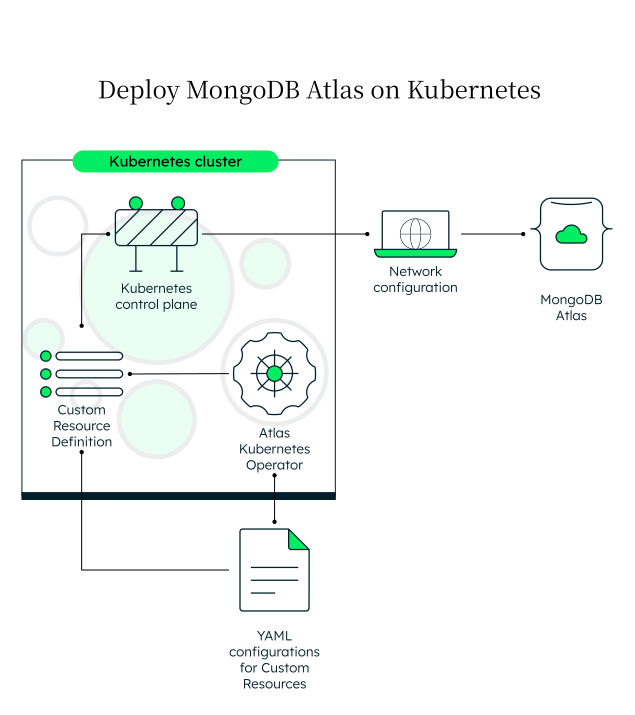
Read the article MongoDB Kubernetes Operators to understand how the operator watches and takes action to ensure the desired state of a custom resource. To know the specific fields of each custom resource, visit the documentation page of the particular resource.
Common deployment issues and best practices
While Kubernetes deployment seems to be straightforward, you may face some practical challenges. Here are some common issues and best practices that can help with smoother deployment while maintaining application reliability.
- If the pod is not starting or is crashing, check the logs using kubectl logs <pod_name>. Logs give information about any misconfiguration or application errors. You can also use the kubectl describe pod <pod_name> to find details about the pod, like error messages and events.
- Missing or incorrect environment variables or incorrect reference to ConfigMaps can also lead to application failures. Ensure these are correct by verifying the Deployment spec.
- If your pods are removed or not starting, it is also possible that there are some misconfigured resource requests and limits. You can check your resource usage through kubectl top nodes and kubectl top pods.
- If you want to troubleshoot an issue directly on the pod, you can gain access to a running pod using kubectl exec -it <podname> - /bin/bash. Then you can inspect the running process using root@<pod_name>:/$ ps aux.
It is a best practice to regularly perform health checks and monitor the logs to get insights on cluster health and application performance. Also, you should use proper namespaces to separate different environments and apply correct resource configuration based on the environment. Also, using the RollingUpdate for deploying a new application is a good choice and ensures minimal downtime, while also allowing easy rollback.