Docs Home → Develop Applications → MongoDB Drivers → Kotlin Coroutine
Kotlin Driver Quick Start
On this page
Introduction
This guide shows you how to create an application that uses the Kotlin driver to connect to a MongoDB Atlas cluster. If you prefer to connect to MongoDB by using a different driver or programming language, see the list of official MongoDB drivers.
The Kotlin driver lets you connect to and communicate with MongoDB clusters from a Kotlin application.
MongoDB Atlas is a fully managed cloud database service that hosts your data on MongoDB clusters. In this guide, you can learn how to get started with your own free cluster.
Tip
To view another example that demonstrates how to build an application in Kotlin that connects to MongoDB Atlas, see the Getting Started with the MongoDB Kotlin Driver developer tutorial.
Set up Your Project
Install Kotlin
Make sure that your system has Kotlin installed and running on JDK 1.8 or later. For more information on getting started with Kotlin/JVM development, refer to Get started with Kotlin/JVM in the Kotlin language documentation.
Create the Project
This guide shows you how to add the MongoDB Kotlin driver dependencies by using Gradle or Maven. We recommend that you use an integrated development environment (IDE) such as IntelliJ IDEA or Eclipse IDE to configure Gradle or Maven to build and run your project.
If you are not using an IDE, see the Creating New Gradle Builds guide or the Building Maven guide for more information on how to set up your project.
Add MongoDB as a Dependency
If you are using Gradle to manage your
packages, add the following entry to your build.gradle.kts
dependencies list:
dependencies { implementation("org.mongodb:mongodb-driver-kotlin-coroutine:5.1.0") }
If you are using Maven to manage your
packages, add the following entry to your pom.xml dependencies list:
<dependencies> <dependency> <groupId>org.mongodb</groupId> <artifactId>mongodb-driver-kotlin-coroutine</artifactId> <version>5.1.0</version> </dependency> </dependencies>
After you configure your dependencies, ensure that they are available to your project by running the dependency manager and refreshing the project in your IDE.
Add Serialization Library Dependencies
To enable the driver to convert between Kotlin objects and BSON, the data format for documents in MongoDB, you must also add one or both of the following serialization packages to your application:
bson-kotlinx(Recommended)bson-kotlin
If you are using Gradle to manage your packages, add one of the following
entries to your build.gradle.kts dependencies list:
implementation("org.mongodb:bson-kotlinx:5.1.0") // OR implementation("org.mongodb:bson-kotlin:5.1.0")
If you are using Maven to manage your packages, add one of the following
entries to your pom.xml dependencies list:
<dependency> <groupId>org.mongodb</groupId> <artifactId>bson-kotlinx</artifactId> <version>5.1.0</version> </dependency> <!--OR--> <dependency> <groupId>org.mongodb</groupId> <artifactId>bson-kotlin</artifactId> <version>5.1.0</version> </dependency>
After you configure your dependencies, ensure that they are available to your project by running the dependency manager and refreshing the project in your IDE.
To learn more about these packages, see Kotlin Serialization.
Create a MongoDB Cluster
After setting up your Kotlin project dependencies, create a MongoDB cluster in which you can store and manage your data. Complete the Get Started with Atlas tutorial to set up a new Atlas account, create and launch a free tier MongoDB cluster, and load sample datasets.
After you complete the steps in the Get Started with Atlas tutorial, you have a new MongoDB cluster deployed in Atlas, a new database user, and sample data loaded into your cluster.
Connect to your Cluster
This step shows how to create and run an application that uses the Kotlin driver to connect to your MongoDB cluster and run a query on the sample data.
First, you must specify how the driver connects to your MongoDB cluster by including a connection string in your code. This string includes information on the hostname or IP address and port of your cluster, authentication mechanism, user credentials, and other connection options.
If you are connecting to an instance or cluster that is not hosted on Atlas, see the Other Ways to Connect to MongoDB section of the Connection Guide for instructions on how to format your connection string.
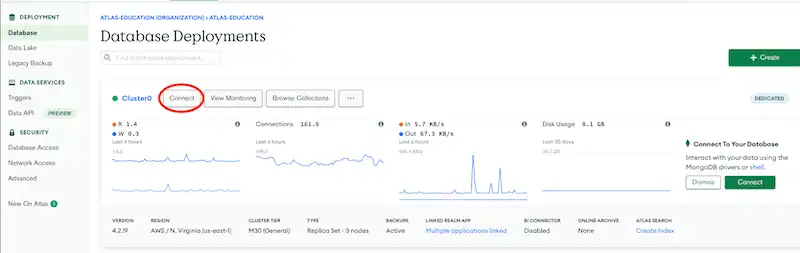
To retrieve your connection string for the cluster and user you created in the previous step, log into your Atlas account and navigate to the Database page under Deployment and click the Connect button for your cluster, which is shown in the following image:

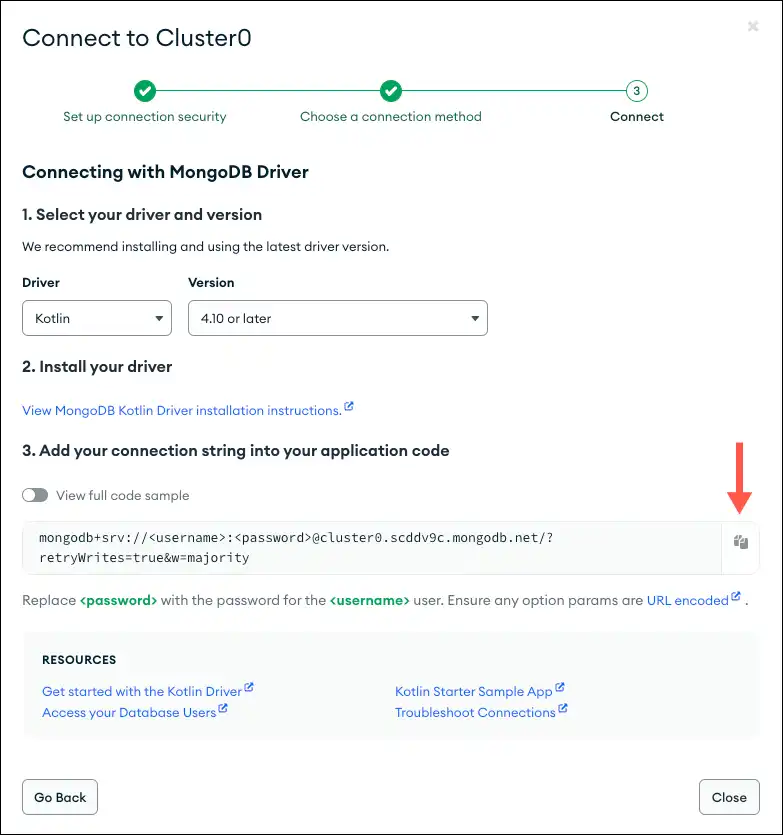
Select the Drivers option for connection and select Kotlin from the list of drivers and 4.10 or later from the version dropdown.
Next, click the Copy icon, which is highlighted in the following image, to copy your connection string to your clipboard:

Save your Atlas connection string in a safe location that you can access for the next step.
Query Your MongoDB Cluster from Your Application
Next, create a file called QuickStartDataClassExample.kt in your
project.
Copy the following sample code into the file and replace the value of
the uri variable with your MongoDB Atlas connection string that you
saved in the preceding step. Replace the "<password>" placeholder of
your connection string with the password you set for your user that has
atlasAdmin permissions:
import com.mongodb.client.model.Filters.eq import com.mongodb.kotlin.client.coroutine.MongoClient import io.github.cdimascio.dotenv.dotenv import kotlinx.coroutines.flow.firstOrNull import kotlinx.coroutines.runBlocking // Create data class to represent a MongoDB document data class Movie(val title: String, val year: Int, val cast: List<String>) fun main() { // Replace the placeholder with your MongoDB deployment's connection string val uri = CONNECTION_STRING_URI_PLACEHOLDER val mongoClient = MongoClient.create(uri) val database = mongoClient.getDatabase("sample_mflix") // Get a collection of documents of type Movie val collection = database.getCollection<Movie>("movies") runBlocking { val doc = collection.find(eq("title", "Back to the Future")).firstOrNull() if (doc != null) { println(doc) } else { println("No matching documents found.") } } mongoClient.close() }
Note
This example uses a Kotlin data class to model MongoDB data.
When you run the main function, the application prints the details
of a movie document that matches the query, as shown in the following output:
Movie( title=Back to the Future, year=1985, cast=[Michael J. Fox, Christopher Lloyd, Lea Thompson, Crispin Glover] )
Tip
Data Classes
To learn more about using data classes to store and retrieve data, see the Document Data Format: Data Classes guide.
If you don't see any output or receive an error, check whether you included the proper connection string in your application. Also, confirm that you successfully loaded the sample dataset into your MongoDB Atlas cluster.
Important
Known connection issue when using TLS v1.3
If you encounter the following error while connecting to your MongoDB instance, you must update your JDK to the latest patch release:
javax.net.ssl.SSLHandshakeException: extension (5) should not be presented in certificate_request
This exception is a known issue when using the TLS 1.3 protocol with specific versions of JDK, but this issue is fixed for the following JDK versions:
JDK 11.0.7
JDK 13.0.3
JDK 14.0.2
To resolve this error, update your JDK to one of the preceding patch versions or a newer one.
After completing this step, you have a working application that uses the Kotlin driver to connect to your MongoDB cluster, run a query on the sample data, and print out the result.
Working with the Document Class (Alternative)
The preceding section demonstrates how to run a query on a sample collection to retrieve data by using a Kotlin data class. This section shows how to use the Document class to store and retrieve data from MongoDB.
In a new file called QuickStartDocumentExample.kt, paste the following sample
code to run a query on your sample dataset in MongoDB Atlas. Replace the
value of the uri variable with your MongoDB Atlas connection string:
import com.mongodb.client.model.Filters.eq import com.mongodb.kotlin.client.coroutine.MongoClient import io.github.cdimascio.dotenv.dotenv import kotlinx.coroutines.flow.firstOrNull import kotlinx.coroutines.runBlocking import org.bson.Document fun main() { // Replace the placeholder with your MongoDB deployment's connection string val uri = CONNECTION_STRING_URI_PLACEHOLDER val mongoClient = MongoClient.create(uri) val database = mongoClient.getDatabase("sample_mflix") val collection = database.getCollection<Document>("movies") runBlocking { val doc = collection.find(eq("title", "Back to the Future")).firstOrNull() if (doc != null) { println(doc.toJson()) } else { println("No matching documents found.") } } mongoClient.close() }
When you run the main function, the application prints the details
of a movie document that matches the query, as shown in the following output:
{ _id: ..., plot: 'A young man is accidentally sent 30 years into the past...', genres: [ 'Adventure', 'Comedy', 'Sci-Fi' ], ... title: 'Back to the Future', ... }
If you don't see any output or receive an error, check whether you included the proper connection string in your application. Also, confirm that you successfully loaded the sample dataset into your MongoDB Atlas cluster.
Next Steps
To learn more about the Kotlin driver, see the Fundamentals guides, which describe relevant concepts in detail and provide code examples for performing different tasks.