Quick Start Guide for Windows
On this page
Estimated Time to Complete: ~15 minutes
This guide provides step-by-step instructions to quickly set up the required components for the BI Connector on your local system. This guide is recommended for users who would like to experiment with the BI Connector or create a local environment for development or testing.
In this tutorial you will:
Start a local MongoDB mongod process
Start a local BI Connector mongosqld process
Create a data source name (DSN)
Connect with a BI tool of your choice
Prerequisites
MongoDB installed on your local system. Download the latest production release of MongoDB from the MongoDB Download Center and install it. For detailed instructions, see Install MongoDB.
MongoDB Connector for BI installed on your local system. Download the latest production release of BI Connector from the MongoDB Download Center and install it. For detailed installation instructions, see Install BI Connector On Premises.
The MongoDB BI Connector ODBC Driver installed on your local system.
A BI tool of your choice, such as Power BI or Qlik Sense.
Getting Started
Start a mongod
Process
If mongod is not already
running on your local system, start it from the command line in
the MongoDB program directory. You can create the default data
directory at C:\data\db
or specify a different directory
with the --dbpath
option.
mkdir C:\data\db
"C:\Program Files\MongoDB\Server\3.6\bin\mongod.exe"
Import a Sample Dataset
Make sure your MongoDB instance has at least one collection with some data for testing purposes. A sample dataset with United States ZIP code information (3.2 MB) is available at media.mongodb.org/zips.json.
Note
To save the ZIP code dataset directly to disk, right click on
the link and select "Save Link As..."
This tutorial assumes
that the saved file is in the directory
C:\data
.
Import the dataset into MongoDB. The following command imports
the zips.json
file into a collection named zips
in a
database named test
:
"C:\Program Files\MongoDB\Server\3.6\bin\mongoimport.exe" --db test --collection zips --file "C:\data\zips.json"
See the MongoDB manual for help with mongoimport, the mongo shell program, and CRUD operations.
Start a mongosqld
Process
Start a mongosqld
process from the command line in the
BI Connector program directory.
"C:\Program Files\MongoDB\Connector for BI\2.3\bin\mongosqld.exe"
With no command line options, mongosqld
generates a schema from
all the user-accessible collections in your MongoDB instance. For
more information about specifying database namespaces for BI Connector
to work with, see the mongosqld
reference page.
If mongosqld
starts correctly, the last line of on-screen output
declares the namespaces it has found for its schema. For example, the
following output indicates that mongosqld
started correctly and
sampled the zips
namespace.
[schemaDiscovery] mapped schema for 1 namespaces: "test" (1): ["zips"]
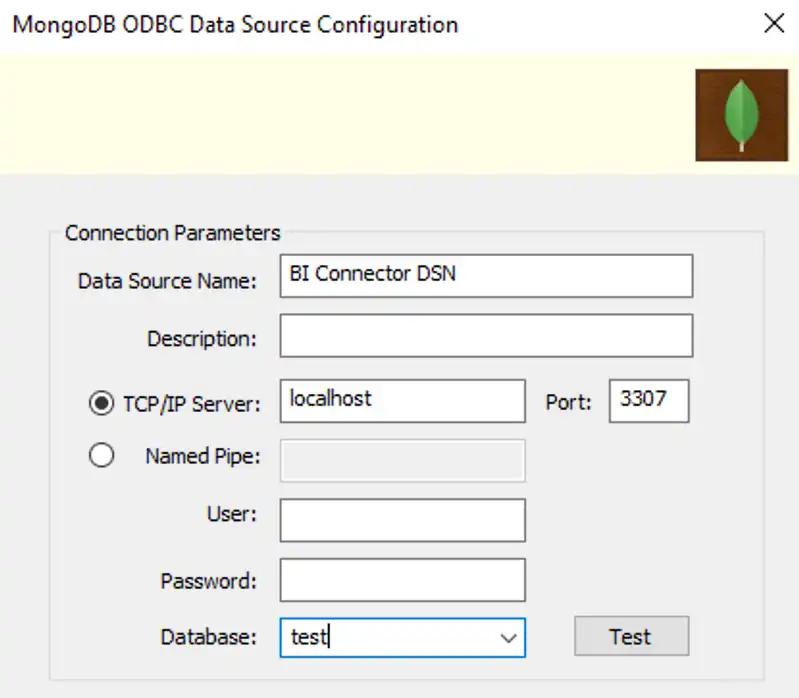
Create a Data Source Name (DSN)
Create a System DSN by following instructions in the tutorial. For the
purposes of this local test installation you can leave the
User, Password and Authentication
fields blank, because mongosqld
is running without the
--auth
option.
When you press the Test button you should see the Connection Successful result.
Start an SQL Client or BI Tool
Most BI tools can import data from an ODBC DSN. There are instructions for connecting with several applications elsewhere in the BI Connector documentation.